baking

SOFT, SUGAR-COATED HAMENTASHEN

SOFT, SUGAR-COATED HAMENTASHEN

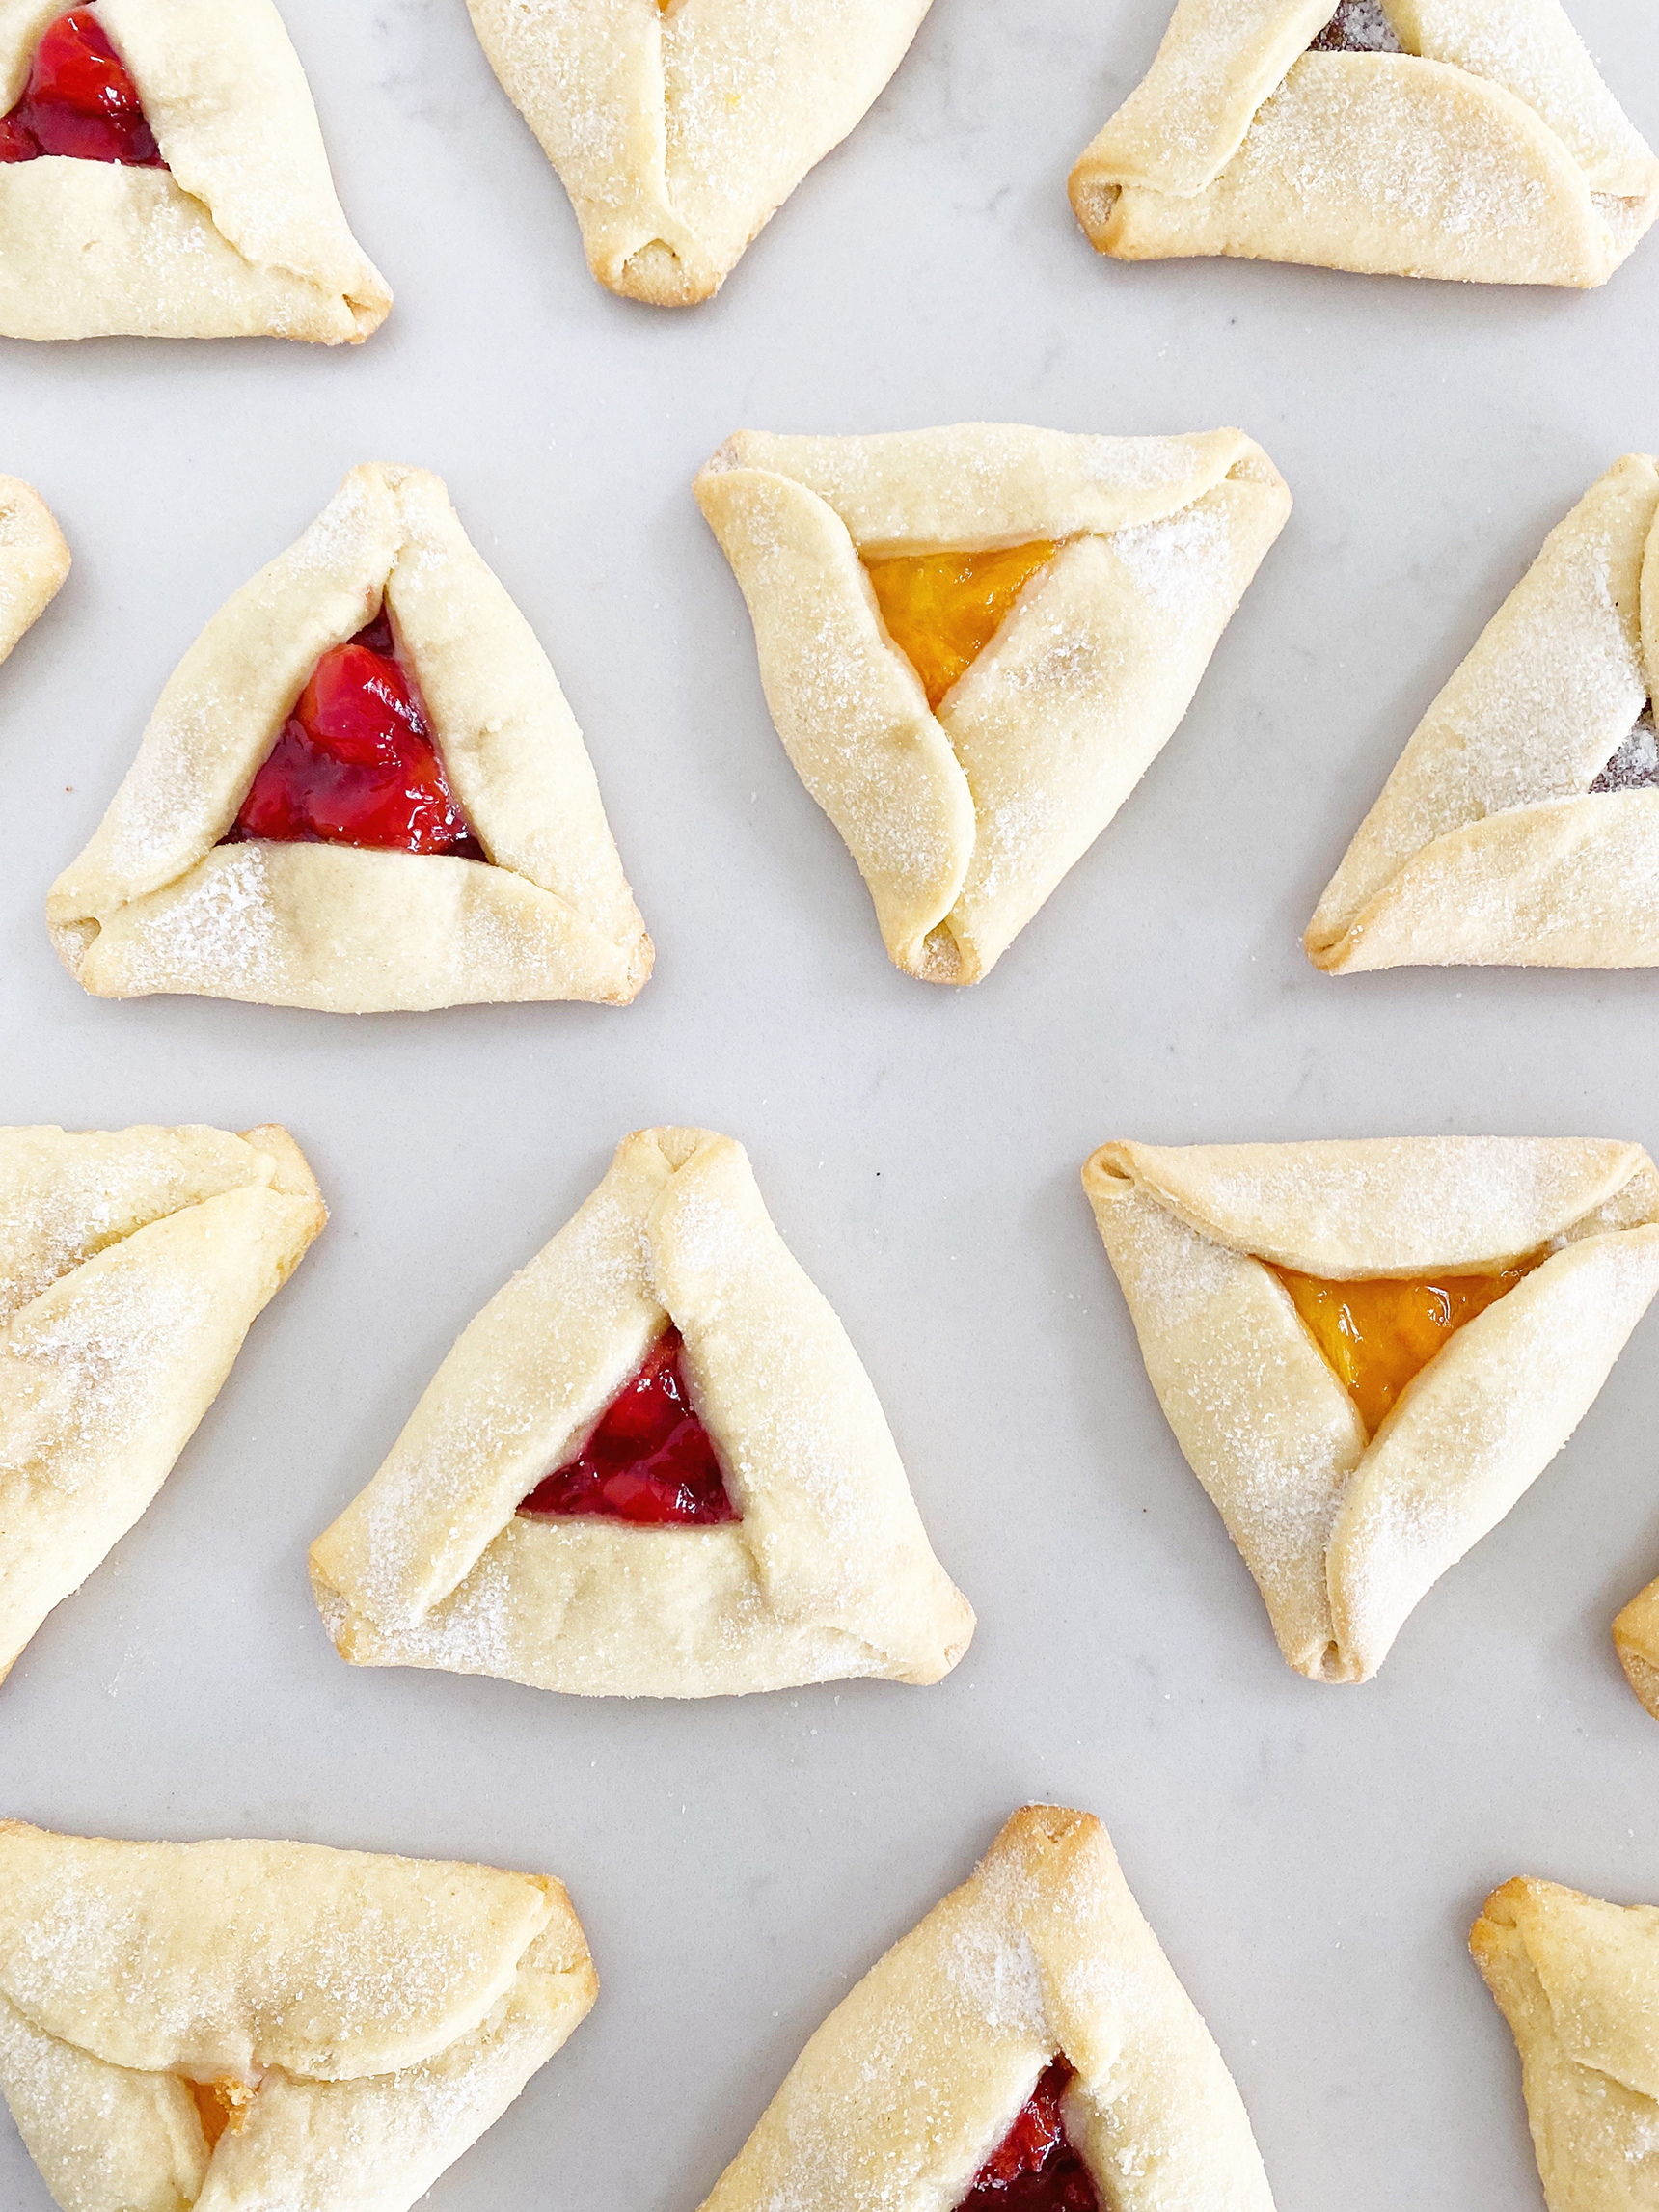
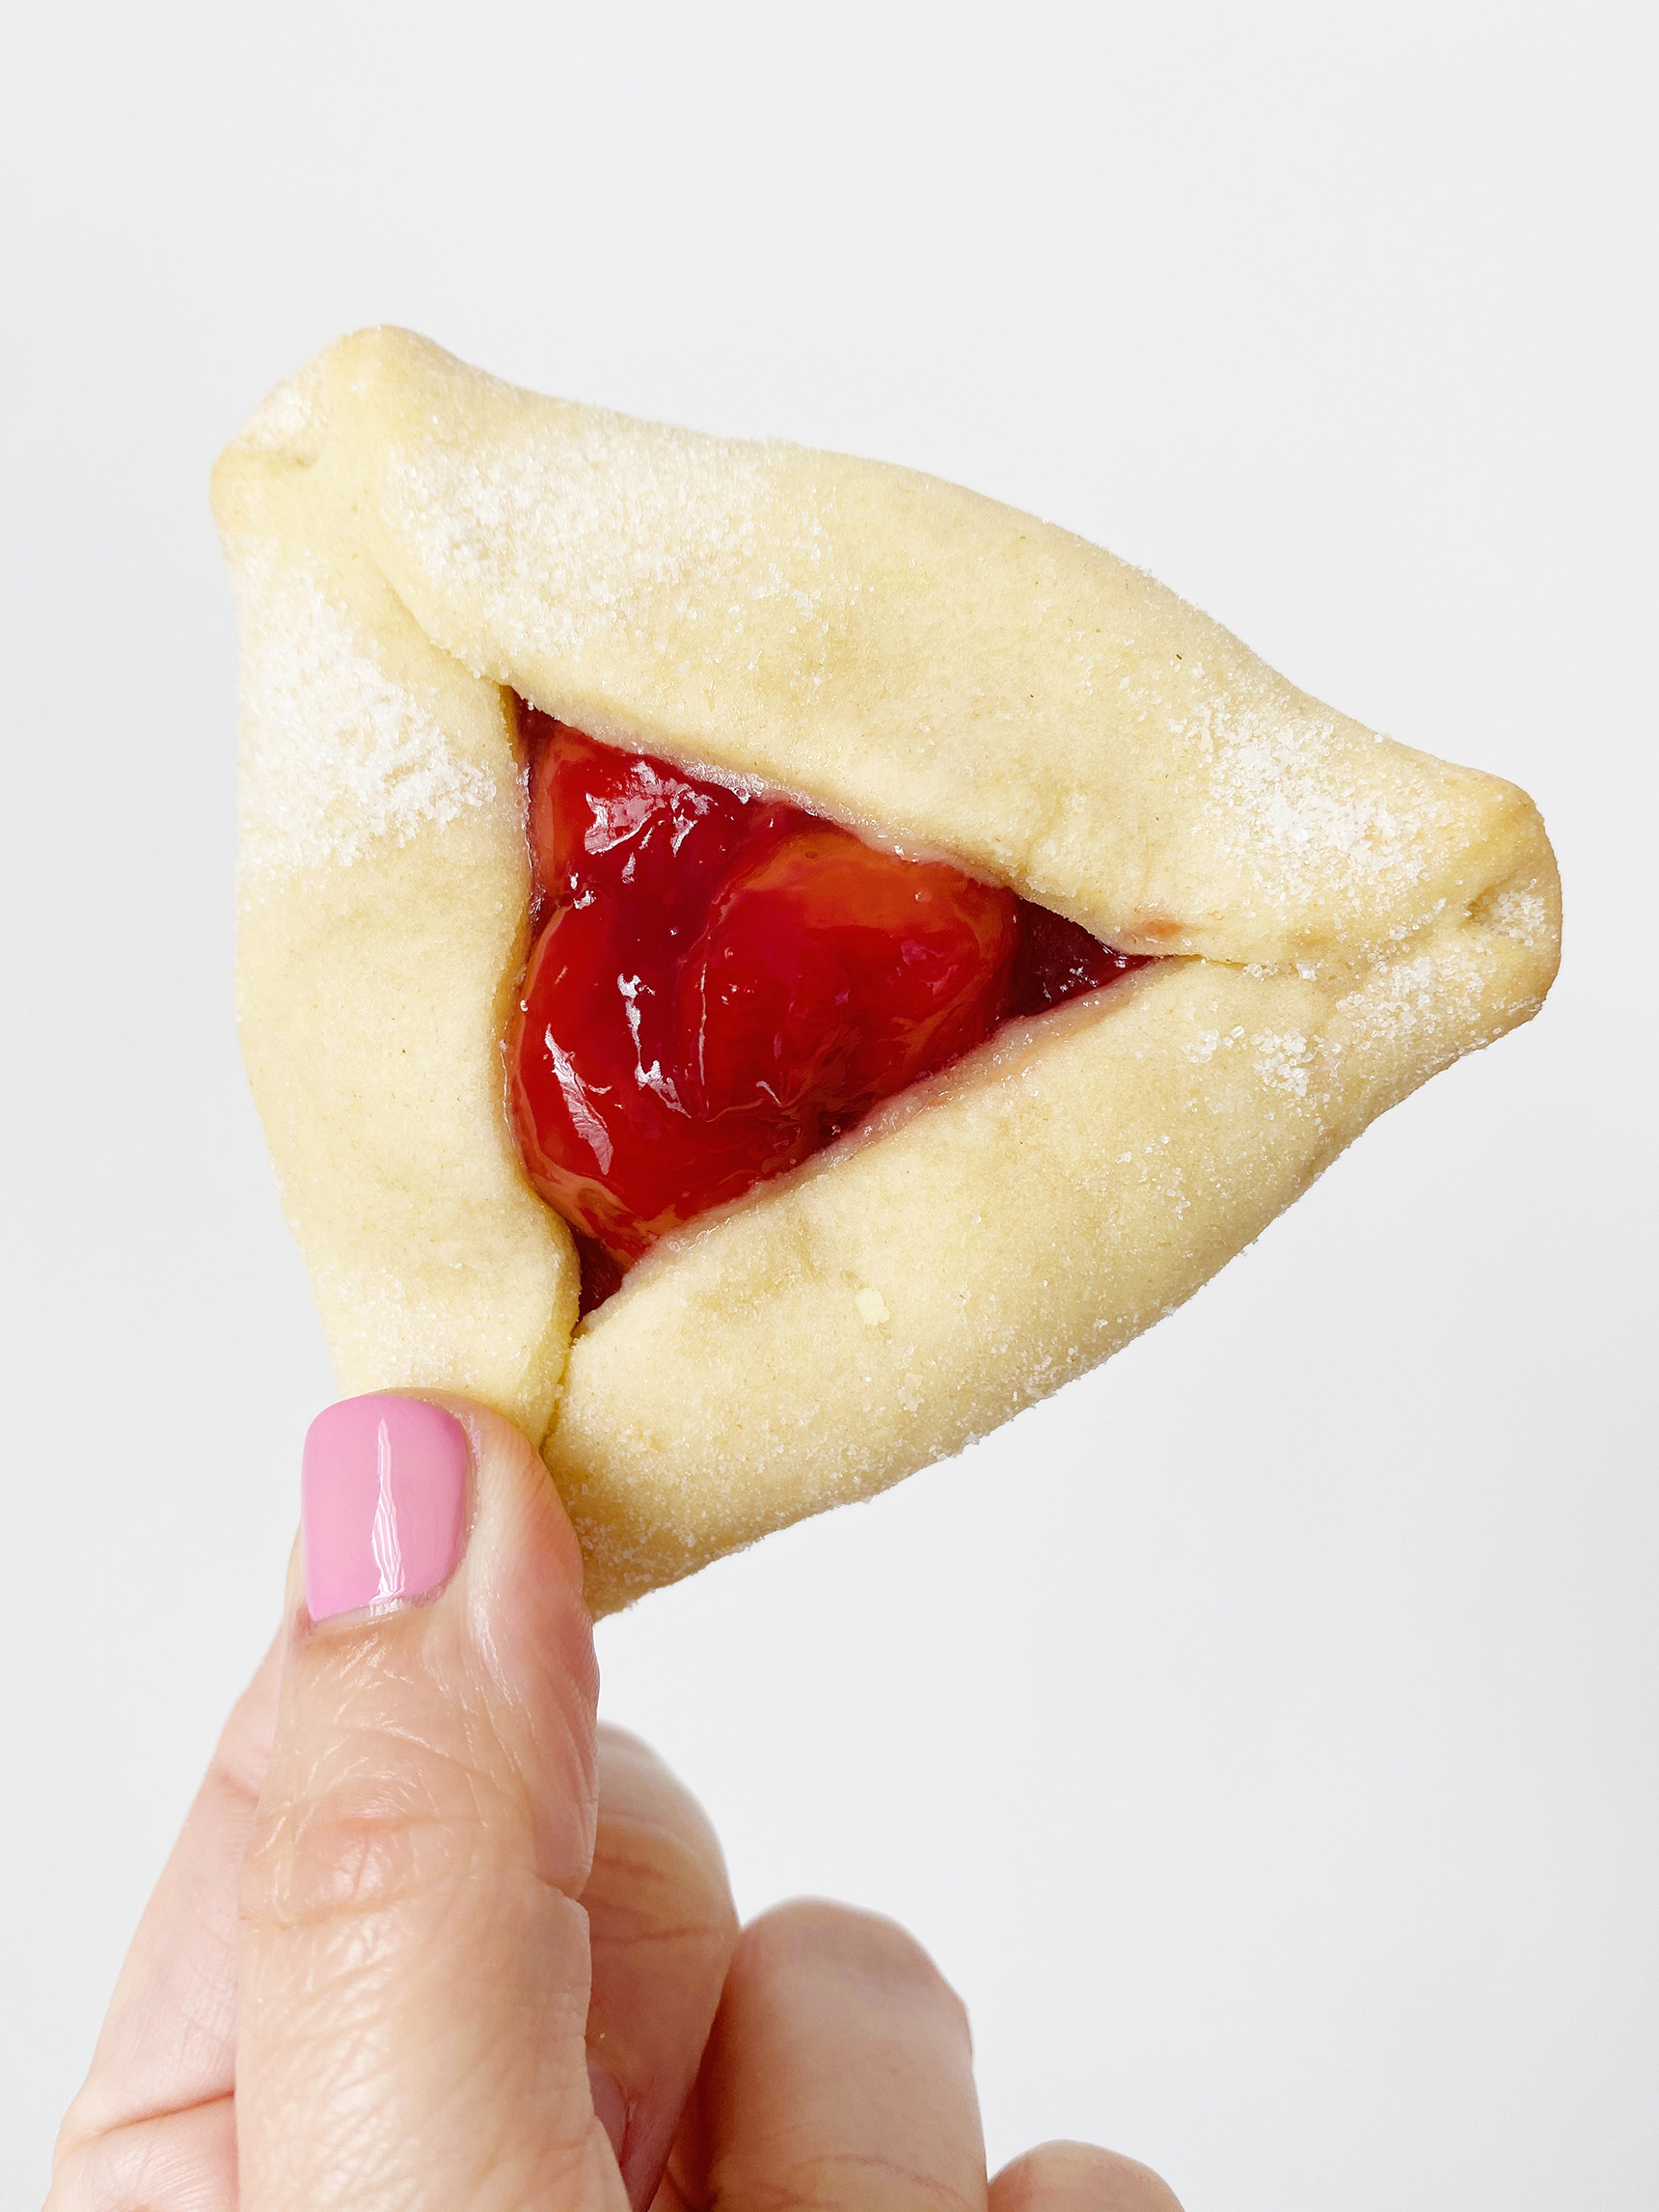
Hamentashen are a traditional three-cornered cookie we (Jews) make on Purim! I grew up in St. Louis, MO. There was this great Jewish bakery called Pratzels, and I would look forward to their hamentashen every year. Most other recipes I’ve tried are crunchy, crumbly, dry, or tasteless. But this bakery made them soft, filled them with a delicious pie filling situation, and covered them in sugar. Sadly it closed, but I think I made a pretty good sub recipe which also doubles as a great sugar cookie recipe! Because this dough is so soft, you can fold the corners over like you see in the photos rather than pinching the corners like you’ll see in traditional hamentashen. If the dough is just the right temp when you’re folding them, they’ll stay shaped as traditional triangles- just the luck of the draw! Either way, they’re going to taste the same

Check out my new Double Chocolate Hamentashen recipe here!

IMPORTATANT NOTES:
  1. I know it’s annoying, but you should chill the dough, either the night before or at least for a couple hours in the fridge. Divide the dough in quarters and wrap each in saran wrap. No need to make them into disks. The dough is super soft but keeps it’s shape. Stack them together and wrap in foil to avoid any odor contamination in your fridge.
  2. Before baking, you MUST chill the cookies. They’ll keep their shape that way! So this means after you add the filling, pinch into triangles, coat with sugar, then you MUST chill them in the freezer until they’re cold to the touch, and THEN you can bake them.
  3. Don’t overfill the cookies or have the topping be runny. I used a heaping 1 teaspoon of filling with a 3.5″ round cutter.
  4. If you’re using a bigger circle cookie cutter, you can add more filling and bake for about 12 minutes instead of 10.


RECIPE:

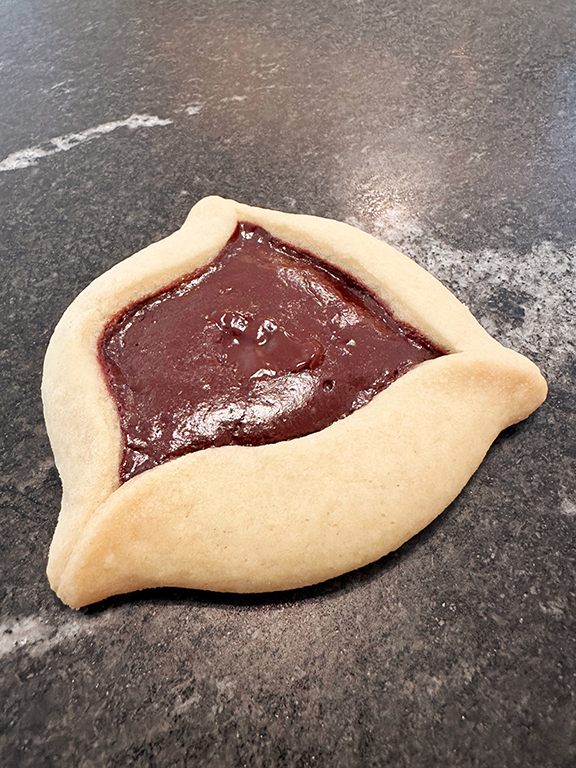
1 c. margarine, room temp (margarine lets the cookie keep it’s shape. If using butter, add 1/2 cup more flour but be prepared for melty but delicious cookies. Scroll to the bottom to see the difference)

1 c. granulated sugar

1 egg, room temp

2 tbsp whole milk, room temp (you can use half and half)

2 tsp real vanilla extract

3 c. flour / 360 grams (I always bake with bread flour)

1 tsp. baking soda

1 tsp. baking powder

1 tsp. salt

Filling: pie filling, really good jams, nutella, chocolate filling, sprinkles. My favorite combination with the dough is strawberry jam.

A little extra granulated sugar for the outside

3″ – 4″ round cutter- really any size is fine. You’ll just adjust your baking time. 3.5″ is about 10 minutes, 5″ about 12 minutes, etc.


INSTRUCTIONS:
  1. Sift all dry ingredients and set aside.
  2. Mix butter and sugar til fluffy 2-3 min.
  3. Add egg and mix well.
  4. Add vanilla.
  5. Slowly mix in dry ingredients alternating with milk.
  6. Mix until just combined.
  7. Divide the dough into four parts, plop each down on Saran Wrap and wrap each tightly. Stack them up and wrap them all in foil. Chill in the refrigerator overnight or at least stick them in your freezer for a couple hours.
  8. Take one disc out of the fridge and roll out on a lightly floured board, 1/8″ – 1/4″ thick.
  9. Cut circles and place on a parchment paper-lined tray.
  10. Chill in the freezer while you work on the next tray.
  11. Fill each circle with a SMALL amount of filling, about 1 tsp, and try to keep the runny parts to a minimum. The larger you make the circles, the more filling you can use and vice versa.
  12. Form triangles and pinch the corners together slightly to make sure they don’t fall apart and spill all the filling! This dough is really soft so I like to fold them over or pinch sharp corners but it depends on the exact consistency you have going on. I promise they’ll taste just as good whatever they look like.
  13. Wet the dough a little with your fingers or a brush and sprinkle the triangles generously with granulated sugar.
  14. Chill in the freezer again for 20 minutes or so. The longer they’re chilled, the more they will keep their shape. If you’re making way in advance, just keep them covered in the fridge.
  15. Bake at 350 degrees for just 10 minutes or until very slightly golden. The whole point is to keep these SOFT so please don’t over-bake them. Cool on the tray for a minute or two only, then slip the cookies still on the parchment paper off the tray to cool completely.


Structured cookie on the left used MARGARINE, the droopy cookie on the right used BUTTER and while they’re not pretty, they’re delicious!

Mazel tov, you’ve made delicious hamentashen!!


xo

Leah


RECIPE: CHOCOLATE TOFFEE BARK

You know when you’re eating something and every time you take a bite, you have to say how good it is? Even if you’re by yourself? Ooooooor is that just me? I think this crack chocolate salted toffee cracker will have you doing just that. Crunchy, rich, and sweet with a touch of salty. Since Passover starts Friday, we made ours with matzo, but you could certainly use Ritz crackers or Saltines.
Scroll down for the super simple recipe.
Rich bittersweet chocolate topped with fleur de sel
 
Sprinkles by Fancy Sprinkles!
This is the best baking investment you can make. I sprinkle this on every chocolate dessert I bake.
RECIPE
CHOCOLATE SALTED TOFFEE CRACK(ERS)
Ingredients:
2 sticks unsalted butter
3/4 cup packed brown sugar
1/2 tsp vanilla
fleur de sel (or course sea salt)
6 sheets of matzo or your fav crackers
10 oz. bittersweet chocolate chips
toppings – fleur de sel, toasted almonds, sprinkles, candy, peanut butter chips… the list goes on!
1. Preheat oven to 350 degrees
2. Line baking tray with parchment paper. Cover tray with matzo, edge to edge.
3. Melt butter and sugar in a pan over medium heat til boiling. Boil 3-4 minutes. Remove from heat and add vanilla and a large pinch of sea salt
4. Immediately pour over matzo and spread with an offset spatula. This will turn into a sea of bubbling toffee so it will sort of spread out naturally- don’t stress if it’s not perfect.
5. Bake 10 or so minutes until toffee is bubbly and brown. Watch or it will burn!
6. Remove from oven and immediately sprinkle chocolate chips on top. Cover loosely with foil. After 5 minutes remove foil and spread the now-melted chocolate chips evenly over toffee. Sprinkle with your fav toppings.
7. Put the tray in the freezer for about 30 minutes until chocolate is hardened. Break into pieces and keep in a ziplock bag in the freezer. This will keep it from getting all melty… and hide it from view…
-L

RECIPE: DONUT CAKE

 This cake may look insane and tricky, but it’s the EASIEST cake you could make! Decadent? Yes. Delicious? Yes. Difficult? NOT AT ALL!
INSTRUCTIONS:
1. Buy a store bought cake or make one from a box… normally I’d say absolutely not, but when you’re going to cover it with donuts, you might as well. I made this one with an angel food cake box mix since that’s my mom’s fav and it was her birthday!
2. Buy plain or glazed donuts in regular and mini sizes from the store. Donut holes would have been really cute, but they didn’t have any that day. The minis were from a Hostess bag!
3. Make the glaze (recipe below). I divided the glaze up into three bowls and tinted them with food coloring
4. Pour the glaze just on top of the cake and let the sides drip down. Top with sprinkles and let dry.
5. Dip the tops of the donuts in the glaze and top with sprinkles and let dry.
6. Pile up the donuts on top of the cake and secure with tooth picks. That’s it.
GLAZE RECIPE:
2 cups powdered sugar
2 tbsp butter, very soft
1 tsp vanilla
1 tbps hot milk
Mix all together. If the glaze is too thick to be drippy, add a little more milk. If it’s too runny, add more powdered sugar. Divide the glaze into three bowls with a little more glaze in the color you’ll use for the cake. The glaze dries pretty quickly so make sure to cover with saran wrap pressed to the top if you make ahead of time.

This is a great glaze for frosting sugar cookies too!

This would be so yummy with a chocolate ganache or caramel or peanut butter… yum the list goes on!
ENJOY!
-L

RECIPE: BEST EVER CHOCOLATE CHIP COOKIE

We all have our favorite chocolate chip cookie recipe that is our go-to. Jenni’s is soft and chewy with a brown sugar flavor, while mine is salty, chewy, and crisp on the edges. I have this dough in my fridge most of the time, just ready to scoop out what we want at the moment. So good for those late night cravings or for your kids after school treat!
I’ve made these with lots of variations as far as add-ins. These are perfect with just bittersweet chocolate chips, but I also love to add dried cherries… trust me on this one. So. Freaking. Good.
Although this has the most amazing flavor, you really need to let the dough refrigerate for at least 24 hours. Sorry. But it makes a huge difference. We’ve found that three days has the best flavor.
RECIPE and super helpful TIPS below!
PS. the towel is from my sweet friend’s company Earthin’ Out!
RECIPE:
Chocolate Chip Cookies
INGREDIENTS:
*Need to refrigerate at least 24 hours
– 2 c. minus 2 tbsp cake flour
– 1 2/3 c. bread flour
– 1 1/4 tsp baking soda
– 1 1/2 tsp baking powder
– 1 1/2 tsp kosher salt
– 2 1/2 sticks of unsalted butter, room temp
– 1 1/4 c. light brown sugar
– 1 c. plus 2 tbsp granulated sugar
– 2 eggs, room temp
– 2 tsp vanilla
– 1 c. bittersweet chocolate chips
– additional mix-ins if you want! The cookies pictured have crushed Heath bar pieces and chocolate chips.
– a pinch of fleur de sel or kosher salt for tops of cookies
INSTRUCTIONS
– cream butter and sugar for 5 minutes
– combine all dry ingredients besides mix-ins while you wait
– add in eggs one at a time to the butter and sugar, mix well in between
– add vanilla
– slowly add flour mixture
– when there’s only a little bit of flour left, add in the toppings and mix until JUST combined. Do not overmix at this point
– press saran wrap on the dough in the bowl and refrigerate at least 24 hours for best flavor (more in tips)
– when ready to bake, set oven to 350. Using a large ice cream scoop, scoop out dough onto a parchment paper lined baking sheet
– bake 16-18 minutes or until edges are golden and the center looks light
– sprinkle immediately with a little kosher salt or fleur de sel
– let cool on the tray for about 5 minutes, then slide the parchment paper off to cool completely… or eat warm… you’re welcome.
TIPS:
* Though the dough tastes amazing RIGHT away, you need to refrigerate for at least 24 hours for the best flavor when you bake. Three days is best! Just trust me!!
* Only scoop out what you want to eat! We keep the bowl of dough in the fridge with saran wrap pressed down on top of the dough. Just scoop out and bake what you want to eat at the moment. No need to let the dough come to room temp first.
* If you bake all the cookies and don’t eat right away, freeze them immediately to keep fresh. These are amazing fresh out of the oven, but get stale VERY quickly.
* Bittersweet chocolate chips are best with this in my opinion. The cookie is already sweet- it doesn’t need sugary sweet chocolate in there too. I love 60% Ghirardelli.
* A good cookie starts with good ingredients. Use GOOD vanilla, good butter, etc. It only makes sense right? What you put in, you get out.
* A sprinkling of fleur de sel on top after the cookies finished baking really brings out the chocolate flavor.
Enjoy!
-L