thanksgiving

GINGERSNAP CARAMEL PUMPKIN CHEESECAKE


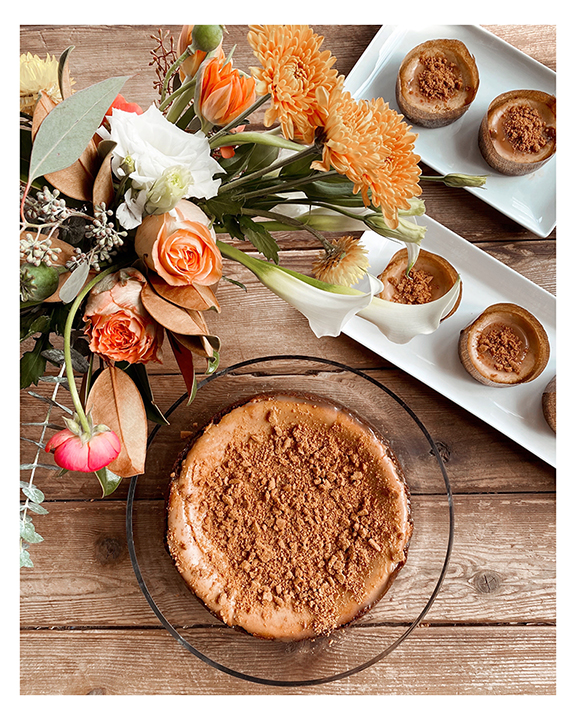
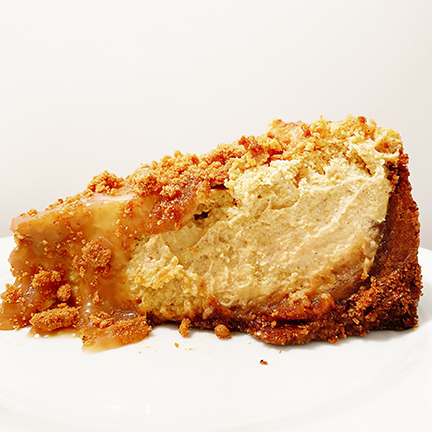
I found these gingersnaps… mainly purchased for the tin… and OMG they are so good! I thought that in order to not eat the entire tin in one day, I better use them for a pie to be shared. Thanksgiving is the perfect excuse to turn these cookies into the crust for a gingersnap caramel pumpkin cheesecake! I had extra batter since I used a smaller springform pan, and made 6 minis- so cute and easy. I actually liked the balance between crust and filling on the minis better than the cake… both great, don’t get me wrong. If you have extra minis, they would be perfect to drop off on a neighbor’s porch (which I did) since many cannot get home to see their families. Effing Covid.

Gingersnap Caramel Pumpkin Cheesecake Recipe

Scroll down for the mini version (you don’t necessarily need to make a crust for this- just use the unbroken cookie as the base).


Crust and cheesecake via The Pioneer Woman

Caramel sauce via The Brown Eyed Baker


Crust Ingredients (for minis you just need the cookies):

12 oz. (about 54) gingersnaps plus 8-10 extras for the topping – THESE are the best!

6 tbsp unsalted butter, melted

2 tbsp brown sugar

1/2 cup chopped pecans

1 dash of salt


Caramel Sauce Ingredients:

1 cup granulate sugar

6 tbsp unsalted butter, room temp

1 tsp sea salt

2/3 heavy cream


Filling Ingredients:

packages (8 0z. packages) cream cheese

1 1/2 c. sugar

can 15-ounce pumpkin puree (NOT pumpkin pie filling)

1 tsp ground cinnamon

1 tsp. allspice

1/2 tsp. nutmeg

4 whole eggs

2 tbsp. heavy cream


Equipment:

food processor (or ziplock bag and a rolling pin could substitute)

9″ or 10″ springform pan

muffin liners or ramekins if you’re making minis

parchment paper

rimmed baking sheet


1. Make the crust:

Lightly butter a 9″ or 10″ springform pan. In a food processor (or large Ziploc bag), crush gingersnaps. Add chopped pecans, melted butter, brown sugar, and salt, and pulse (or mix) until thoroughly combined. Press into bottom and sides of the springform pan. Chill crust for 20-30 minutes.


2. Make the caramel sauce:

In a 3-quart saucepan, heat the sugar over medium-high heat, whisking as the sugar begins to melt. Some of the sugar will harden into clumps, but that’s okay – it will melt eventually – just keep whisking. Continue to cook the sugar until it reaches a dark amber color. At that point, whisk in the salt, and then add the butter all at once and whisk until it is completely incorporated into the sugar. Remove the pan from the heat and pour in the heavy cream (it will foam up when first added). Continue to whisk until it forms a smooth sauce. Allow to cool for 10-15 minutes before using.


3. Make the filling:

In a mixing bowl, beat cream cheese and sugar until light and fluffy. Add pumpkin and spices and mix again. Add eggs one at a time, mixing for 20 seconds between each addition. Add cream and mix until just combined.


4. Assemble the cake:

Line a rimmed baking sheet with parchment paper. I did not not do this and the caramel leaked through and burned my oven… yikes. Pour a little less than half of the caramel sauce onto the crust (I prefer more on top of the cake), moving the springform pan around so that it coats the sides and bottom. Save the rest of the caramel in an airtight container for the top of the cake before serving. Put the crust back in the fridge to set. Pour the filling into the caramel-coated crust and fill up to the top of the crust. If you have extra filling, see below suggestion for minis. Place the cheesecake on top of the parchment paper lined rimmed baking sheet. Bake 350 degrees, 1 hour and 15-30 minutes until jiggly but not soupy. Cool on the counter for 30 minutes. Cover and chill for 4 hours or overnight. Remove rim of the pan then use a spatula to carefully remove the bottom of the pan and transfer it to a serving platter. Pour the rest of the caramel sauce on top. Top with crumbled gingersnaps. Slice and eat!


For minis:

Line a rimmed baking sheet with parchment paper. Place muffin liners or ramekins (lightly butter these) on the baking sheet. Instead of making a crust, just place a whole gingersnap cookie on the bottom of the liner. Cover it with a little caramel. When this bakes, the cookie and caramel will fuse together into a soft delicious crust. Fill each about half way with the cheesecake filling. Bake 350 degrees for 25 minutes until jiggly but not soupy. Cool on the counter for 30 minutes. Cover and refrigerate 4 hours or overnight. They look cute in their liners or ramekins plus… it’s easier… no need to transfer! Top each mini with remaining caramel sauce and crumbled gingersnaps before serving.


xo

Leah

A B&W PLAID AND GREEN THANKSGIVING

Is it really Thanksgiving week you guys? Just like every holiday, it feels like this one really snuck up on us. I just wanted to share a couple of “unbloggy” (that is my new word  for non photoshopped and under styled) photos of my tablescape. To give you all the low down, Thanksgiving is at my wonderful MIL’s home. She recently broke her ankle and is recovering from surgery and 85% of my kitchen is packed up for our move, so we will be ordering in for the most part. I love doing a table every year, but this year had to be super simple and inexpensive. Between the dollar section at Target (holla!!) and what I had on hand, I was able to do something a little different. I knew I wanted plaid in there somewhere. I ended up going with a b&w plaid + green theme. Luckily, I found these uuuhmaaaazing placemats and water glasses in the dollar section. Literally, everything else is stuff that I have used years in the past. 
As for the centerpiece…. ha! Green apples and artichokes just seemed like the answer. No flowers over here this year. Super casual and perfect for us!
I took time to add a “thankful” tattoo to a black place card. I wrote to each guest letting them know what about them I was thankful for. It really is the better option for me because I am a crier, so I never make it when we go around the table to actually share what we are thankful for. Ha! Hope they like it! 🙂

Happy Thanksgiving, friends! There is NO doubt we are incredibly thankful for you all! 
Be sure and take advantage of our 30% shop discount here for the month to show our gratitude.
xo!
-J

HAPPY ONE YEAR!!!!

Hey all! We hope your Thanksgiving was full of good eats, sweat pants and crazy relatives that you just love so very much! Leah and I both hosted family and friends in our homes this year. We thought we would share a few pics of our tables, but more importantly, take time to tell YOU “Thank you!!”
But first….. pictures….
Leah just moved into her home days before Thanksgiving. Let me just go on record saying that my dining room would NOT look this put together or be ready to host family. Bravo mama!!

Our very first blog post was our take on a Thanksgiving table last year. That means that the ole Love & Lion blog celebrated its one year anniversary this month! This year has gone by so incredibly fast, we have made such fun relationships through this process, and truly…… we are just so stinking grateful for each person that clicks through our site. Even if it is by accident…. we love you! We have a lot of things in store for this year!! We are excited to grow and hopefully have you all grow with us. In our recent year, Leah gave birth to that sweet Maxie of hers, moved into a new home and I am currently half way through my second pregnancy. These are big changes for us that have sometimes kept us from blogging as much as we would have liked or even from being as creative as our little hearts like to be. We are certainly mommies and wifeys first, but have a mad love for this blog. We look forward to getting to know you all even better over this next year! We appreciate you sticking with us.
Thank you from the bottom of our hearts…..
Sincerely, 

MODERN THANKSGIVING TABLESCAPE

One day until our Thanksgiving feast, and my table is already set! I may be a little excited. Creating a tablescape is my absolute favorite part of Thanksgiving ( well, second favorite to devouring all of the delicious food).
This year, I tried to use things that I mostly had on hand. I couple of Thanksgivings ago, my mom purchased some beautiful linen napkins from Pottery Barn. They weren’t cheap, but I just HAD to have them. Therefore, I owe them several appearances on my table. I absolutely love the dark teal color, and really wanted to create a table around that color with hints of gold. 
I spray painted pumpkins with a metallic gold spray paint, which has to be the easiest project ever. It makes such an impact too! I purchased some brass candlesticks a couple of years ago at a thrift store, and this is my first time using them! Sometimes you just have to wait for the perfect time to pull things out, ya know? I also had a gold dotted burlap runner from a previous event I hosted. I purchased a set of salt and pepper shakers and a Threshold runner from Target. I put the final touches on the table with some greenery, roses and pheasant feathers. Now we are ready to stuff our faces!

I hand painted a small “say grace” print with water color. I think it may be a permanent framer for my dining room.

My favorite part of my Thanksgiving decor is the floating branch above the table. I found it on the side of the road while on a walk with my daughter. I strung it up with fishing line and commando hooks. I am really considering leaving it up and stringing “snow” from it for winter, so this may not be the last you see of it.

Happy Thanksgiving everyone!
-J