Rock Paper Scissors

ROCK PAPER SCISSORS WEBSITE LAUNCH + GIVEAWAY!!!!

** GIVEAWAY CLOSED**
Friends, we have such a fun giveaway today!! Our sweet friend, Lauren, has RE-launched her paper boutique’s website, and we are soooooo excited!! Leah and I shop there often, and go to Lauren for ALL of our stationery needs. She and her staff are just the best at what they do… end of story! Now, everything is available to you out of towners as well. YAY!!
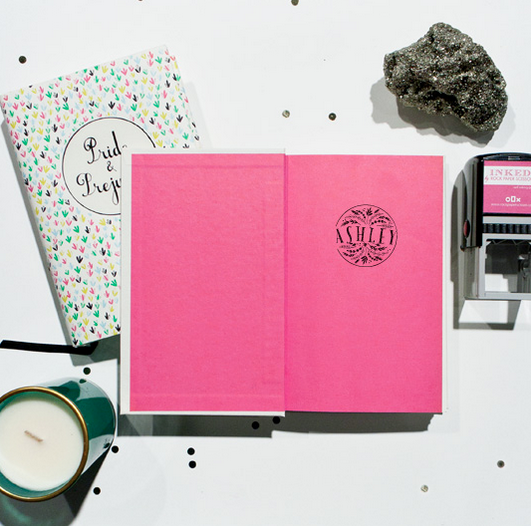
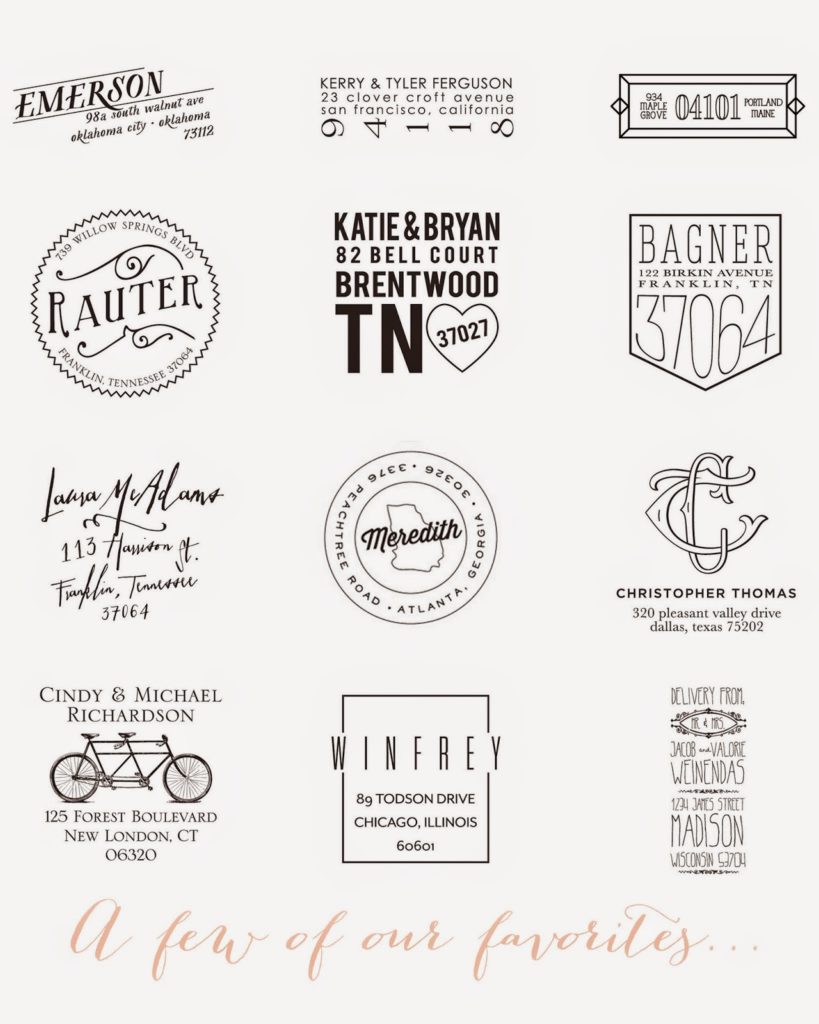
We are celebrating with a giveaway!! Lauren was kind enough to offer up one of her custom designed self-inking address stamps for one of our lucky readers. Leah and I both have one, and we LOVE it!! It makes addressing envelopes or stamping your books so much easier and much more stylish. They make great gifts as well.  Although, you may have a really hard time deciding on which one to pick. That is always the hardest part, right? 
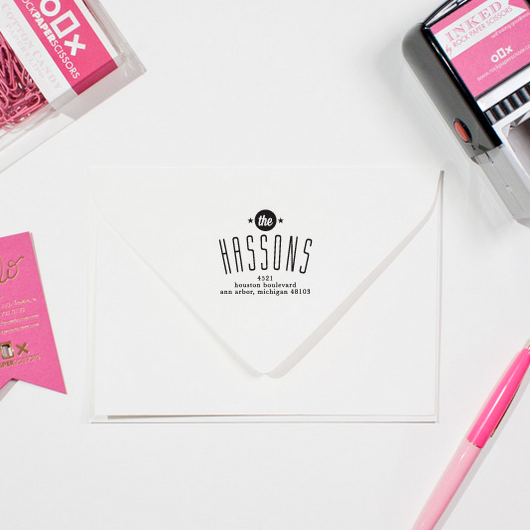
Here is how you enter…
1. Go to Lauren’s beautiful new site HERE 
2. PIN your favorite stamp design from her site.
3. THEN, come back here and comment on which stamp you liked best! Be sure and leave your Pinterest name in the comment so that we can be sure you pinned!!
** Winner will be announced on Thursday**
Happy entering!!!!
XO,
Heydy Lopez… you are our winner! Please email us to claim your lovely stamp, friend!!! 
Thanks for entering everyone!! We really appreciate you!

JENNI’S CONCERT THEMED SHOWER

HIP HOP HOORAY! A baby boy is on the way!
Jenni is due soooo soon with her second baby, Remy! Don’t you love the name for a sweet baby boy by the way? Two great friends, Lori Mahon and Lauren Rauter, co-hosted with me. We decided to throw a concert-themed baby shower since Jenni currently thinks at one point thought she could be a country singer, and her husband Gabe a singer/performer/song writer (and for that matter Lori, Lauren’s husband, and my husband are all in the music industry as well! It is Nashville, after all). A nod to 90’s hip hop, Jenni’s love of country music, and concert references mixed together to create our decor.
It all started with the invitation, designed by Lauren of Rock Paper Scissors. Actually all of the paper materials you see here were all printed by Lauren. Geez it’s handy having a graphic designer bestie.
Concert posters, concert ticket garlands, and DIY marquee lights were the main decor, offset by cassette tapes and a boom box I got off of Ebay and spray painted gold!
Below is a DIY cassette tape mobile! I spray painted an embroidery hoop and cassette tapes gold, then used fishing line to attach. Command ceiling hooks held up perfectly.
For food, we did all concert food: hot dogs, nachos, soft pretzels, popcorn, and soda all held together in a food tray so it was easy for guests to carry around. 
Note the music themed names we gave all of the food… we crack ourselves up.
 Custom painted scoops sold on our Etsy shop.
Jenni’s fav Sugarfina gummies in the shape of sneakers! Perfect for our hip hop theme!

At every shower we throw, we like to have the guests write their address on the envelopes for Jenni’s thank you notes! Saves a ton of time for the mama-to-be.
Of course, we have the diaper cake – tutorial HERE – topped with baby Nike Dunks, Jenni’s request for her baby boy!
For favors, Lauren made these little boom boxes wrapped around an animal crackers box.
 Being a Love & Lion shower, we had to have a tattoo bar 🙂
Big sis-to-be, Amara, helped open all of the prezzies.
 Gorgeous mama Jenni!!
We LOVED throwing you this shower, Jenni! You’re already an incredible mom, and we know you’re going to be a pro with two. Love you!
-L

ICE CREAM SOCIAL – SIP AND SEE

My oldest friend, Rebecca, just had Ada, the sweetest little bean you ever did see! Remember her baseball themed bridal shower HERE? We had an ice cream bar then (her fav), so my mom and I went with a whole ice cream theme for her sip and see! I basically have no imagination and wanted ice cream. BTW a sip and see is a baby shower AFTER the baby is born- you sip drinks and see the baby. Get it? Might be a southern thing, I don’t know!
Colors and design began with this adorable invitation by Rock Paper Scissors.
Frozen water balloons = the cuter cousin of ice cubes.
Loooove how Rock Paper Scissors designed the ice cream cup labels and cone wrappers!
DIY GIANT ICE CREAM CONES:
-honeycomb balls (here and here)
-kraft wrapping paper
-double stick tape
For the cone, follow THIS template… just eyeball it and make it giant! It’s a little tricky, not gonna lie. Cut out and tape the ends of the cone together. Stick the honeycomb ball in and gently tape with double stick tape. I was laying mine flat on the table, so I didn’t need to secure it well. If you’re hanging them, I’d make them with the tiny honeycomb balls so they’ll be lighter.
Pinwheels, plates, and napkins by Meri Meri.
It’s not a party without Aunt Ellie’s Campfire Crispies! This time we went with gluten free Oreo flavor. Yuuuuum.
We got these adorable scoops HERE and painted them. We’re thinking about selling these little scoopity scoops painted custom in our ETSY shop- what do you think? They were perfect for ice cream toppings.
Table runner by Kitchen Papers.
I used THIS tassel tutorial and used my Silhouette for the letters.
Here’s the new mama Rebecca and sweet Ada! Imagine knowing someone for your entire life, then they’re in labor, and you’re crying alone in your car just sitting in your driveway so your kids don’t get freaked out that you’re crying. Yep, that was me.
Ice cream parties are the easiest because there’s no cooking or baking! Everything is store bought but looks special depending on how you display it. Sweet and simple!
-L 

HOW TO PERFECTLY WRAP A GIFT

We hope you guys are enjoying the holiday season. Leah and I are a bit under the weather, which is NO. FUN. 
Okay, so wrapping gifts is one of our favorite tasks of the season. Most people loathe it, but we feel like if you buy beautiful wrap, gift toppers, ribbon and use these tips then you might actually ENJOY it. What!?!?! When Leah and I met ( working for our friend, Lauren, at her paper boutique) we were taught the skills to pay the bills by Lauren herself. We offered a professional gift wrapping service that saved a LOT of people from going insane over trying to wrap their gift themselves. Okay, they may not pay our bills, but they do make people envious of your beautifully wrapped gift at your holiday gift exchange. Whenever all of us girls get together, and there is gift giving involved, we almost care more about how it is wrapped vs. what is inside the box. True story! It is just in our blood now. 
Here are our tips that we are passing on from one great wrapper to another…. YOU!
Get a great box that is sturdy and has a good shape.
-Wrap your gift in beautiful tissue and seal with pretty tape 🙂 Details people.
– Once your items are placed in the box, then fill all of the extra empty space with tissue paper. This helps your box not cave in when you are wrapping it. This is VERY important. The box structure is everything!!
-Roll out your wrap and lay your box in face down. Pull the edge of your wrapping roll to the center of your box and tape (using regular invisible tape). This is where your perfect seam will be.
– Then, pull the other side of the wrapping roll (the actual roll itself) over about a 1/2″ passed the seam you created, and cut.
– Now, turn your box (with the wrap attached) horizontally to where the untaped edge of the wrap is closest to you. Fold over to create a perfectly seamed line. Then, attach DOUBLE-SIDED tape to the inside of the wrap. In other words, put the tape right on the fold that you just created. We use about three strips to go along the width of the box.
– Now time to do the ends! Simply cut excess paper off so that your edges reach about half way down the side of the box. Any seam you are taping directly to the box can be adhered with regular tape. Any of the corners that you fold in and adhere to the paper itself should be taped with double-sided tape. 
– Fold in all of your corners just like you would on a regular wrapping job. Remember to keep pulling tightly and doing intense folds to keep the wrap from “bubbling” around the box.
– Turn your gift right side up! We love to add “bands” around our gifts. They help make your pretty wrapping paper go further and adds interest. I chose an old wrap from last year to use as a band over the gold polka dots. Simply cut the band to size (width wise) and wrap it around the BACK of the box to where the ends of the band take up about a 1/4-1/2″ of each side of the back of the gift. We are alllllllll about the front! 
– I opted for a sparkly ribbon with no bow ( as this gift is for my 16 year old girl cousin). Again, to save ribbon, I just wrapped the ribbon slightly around the edges to the back of the gift and taped it. Double stick tape is preferred here so that you don’t see it on the back of the ribbon, but regular tape seemed to hold this ribbon better. 
– Choose your perfect gift tag. Don’t skimp on the gift tags!! They are fun and add that special touch to your already beautiful gift. Is it bad to say that we are NOT fans of sticker name tags on gifts???
oops!
Host a wrapping party, turn on a good holiday movie, or just grab a glass of champagne and get to wrapping!!! The investment in good boxes, pretty tissue, gift wrap and all of the pretty things that come after truly make the wrapping experience so much more fun! Also, receiving a beautifully wrapped gift can make the recipient feel all the more special. 
XO!!
-J
All wrap and gift wrapping goods were purchased at Lauren’s boutique, Rock Paper Scissors
Seriously, she has the best stuff!!!

ARI’S TODDLER ROOM

We’re putting our house on the market this week which forced me to go through all of our junk and clean it to perfection. I’ve been wanting to post Ari’s big boy room transformation from his nursery for some time now and thought… it’s now or never! So, disclaimer… it’s never this tidy! 
I wanted to do a room that would grow with Ari from baby to little boy, so I chose a more mature paint color but paired it with bright colorful accents that can be easily changed. We had a double mattress already in a guest room, so we just put it in Ari’s room when we gave his crib to Max. Having the larger size has been extremely helpful lately, as Ari has been going through a ‘sleep in my bed’ phase which I only indulge in extreme cases out of desperation. I know, I know, terrible parenting! It’s one of those things that I always judged other parents on, and now I’m that parent. Gah!
I’m in love with this paint color – Martha Stewart Brook Trout – which in person looks a bit more gray than brown. It’s the perfect background for artwork. Really makes colors pop! 
The “a” wall letter was a vintage find from my sister- love it!
Bed and sheets from Pottery Barn Kids, striped comforter and lamp from Target, garland by Oeuf.
 Ari’s little spot to read zoom cars all over the chair. Usually just in his skivvies. 
 I found this old printers box in my Nana’s garage and turns out it’s the perfect size for matchbox cars.
LOVE this felt garland from The Bannerie, graciously given by Gilit of Shoes Off Please– love her!
The print was given to Ari from his Aunt Lauren of Rock Paper Scissors
If you peek to the right, that’s Ari’s closet! We took the door off and created a little playroom in there in addition to his clothes. 
My favorite spot. Books upon books, fav toys hidden in the baskets, and plenty of natural light.
Love these alphabet flashcards from Tweed
Toddler-height dress up spot.
Coolest growth chart ever, also from Tweed. Looking forward to adding Max’s stats on there too! 
What’s on a three-year-old’s nightstand you ask….
…pics of his BFFs, magic rock and crystal to keep away bad dreams, and a huge stack of fav bedtime books. Especially loving “Hank Finds an Egg”, and “What Does the Fox Say” lately. 
Jelly bean jar used for potty training only! Or if I need a secret treat.
Loving Ari’s new wiener dog pillow by Kate Durkin. Max got a teeny raccoon pillow and is OBSESSED with it! Ugly doll and crazy chicken given to Ari from our non-ugly and very crazy friend, Carlye, of Awkward City. She always gets the boys the coolest toys! Kitty and Watson by BlaBla Kids
DIY- I made Ari’s pennant from his 1st birthday party out of felt and the polka dot picture from leftover garland from my baby shower. 
That’s it! Now time to pack all of it up and re-do in our new pad… oy.
-L

PIPER’S BUNNY THEMED 2ND BIRTHDAY

You are officially invited to the most fabulous 2nd birthday party for the cutest little bunny lover we know. When Lauren of Rock Paper Scissors was deciding on a theme for her sweet girl, Piper, there was no question that Floppy ( her little bunny) would need to be the guest of honor. Piper and Floppy are BFFs for sure! We love how Lauren took something so meaningful to Piper and created a party around that.
We are so excited to share this with you all…. especially during this Easter season. The touches are all so sweet and the details are nothing short of perfection!
^^ Lauren is our girl when it comes to invites! We are just swooning over this beautiful invite she custom designed for the party. Who wouldn’t want to come after seeing this!?! ^^
^^ Honestly, our absolute favorite detail were these pink painted carrots! SO creative!! ^^
^^ Right when you entered, there was a little coloring station where each party guest could color their own “floppy”…. after you put your bunny ears on of course. ^^

^^ Can we just talk about this for a second?! Each flower was handmade by the fab mama herself to create a garland along the mantel. Definitely time consuming, but absolutely worth it all we think! ^^
^^ The celebration wouldn’t be complete without this incredible cake to blow candles out on. 
Beautiful! ^^

^^ We love that there was a little something there for the adults to do. A little bunny origami 
anyone? ^^
^^ There were actually REAL bunnies there for the party guests ( adults included) to snuggle on! They were a huge hit, and seriously the “cherry on top” of this big ole fat, delicious cupcake of a party! ^^
^^ Lastly, each little party guest left with their very own finger puppet attached to a custom designed card showing little Miss Piper herself. ^^ 
Lauren! We adore it all!! Thank you for letting us share your party. It is clear that so much love and thought went into making this day so special for your little.

WINTER WHITE BABY SHOWER FOR LAUREN

As part our #TBT Party Series, we’re sharing Lauren’s baby shower today! Lauren is our bestie and the owner of Rock Paper Scissors, where Jenni and I met and worked pre-babies. It’s quite possibly the cutest and most creative paper boutique… we’re planning a comprehensive post on this later, but for now, here is her baby shower for little Piper (who is turning 2 next week!). She and husband, Tim, wanted a party that wasn’t too girly since it was a couple’s shower, so we decided on a winter white theme. The party was in January and the weather certainly fit the theme. Lauren’s good friends Pauline (who’s gorgeous home you see here), Randi, and  sister-in-law Gretchen were the gracious co-hostesses.

We hung parasols from the ceiling using fishing line and clear 3M Command hooks.
All white dessert table with vanilla cupcakes, macarons, meringues, sparkling sugar cookies, and white candy covered oreo truffle pops to match the winter white theme. The middle… is a diaper cake! 
Most of the guys were truly disappointed to find out this was a diaper cake and not a real cake. I’ll share the tutorial with you soon! It’s pretty easy and is a great gift for the parents-to-be.

My favorite project to make was this “family tree”. I asked Lauren and Tim’s parents to secretly send me three generations of family photos. I scanned in the photos and made them the same size, mounted them on sparkly white paper to match the theme and hung on a branch spray-painted white. On the bottom level, I hung a blank card that said “Baby Rauter”. Oh, and Maggie, their sweet dog, is on there too! She’s the big sis after all.  
Little babies Lauren and Tim! 
Instead of a traditional guest book I tied 12 envelopes together, one for each month of Piper’s first year. Then we asked the guests to write advice or encouragement on the cards and place it in the corresponding envelope. Lauren and Tim opened an envelope each month and got to read what their family and friends wrote throughout the year!
Gorgeous letterpress invitation designed by Lauren’s BFF, Dabney of Dabney Lee. The back was covered in a silver snowflake pattern. Perfection.
Lauren and Tim sipped hot chocolate with homemade marshmallows and opened gifts in style in the all white indoor tent. 
Party favors were tiny milk jars and mini pumpkin donuts from Ellie’s Donuts– everyone’s fav in Franklin, Tennessee. Drooling right now.
Pauline’s insanely beautiful home with projected snowflakes and faux snow lining the walk way. That’s how you enter a party, am I right?
*Photographs by Twinkle Twinkle Images
-L