Archives for April 2015

GRAMMER LOVER MOTHER’S DAY CARD- FREE PRINTABLE

This one’s for the grammar nut in your life! I painted a similar card for my mom last year, and she loved it…she not so silently corrects my grammar on all blog posts and in every day life. Thought some of you might know a mom or yourself who needs this! Free printable HERE.
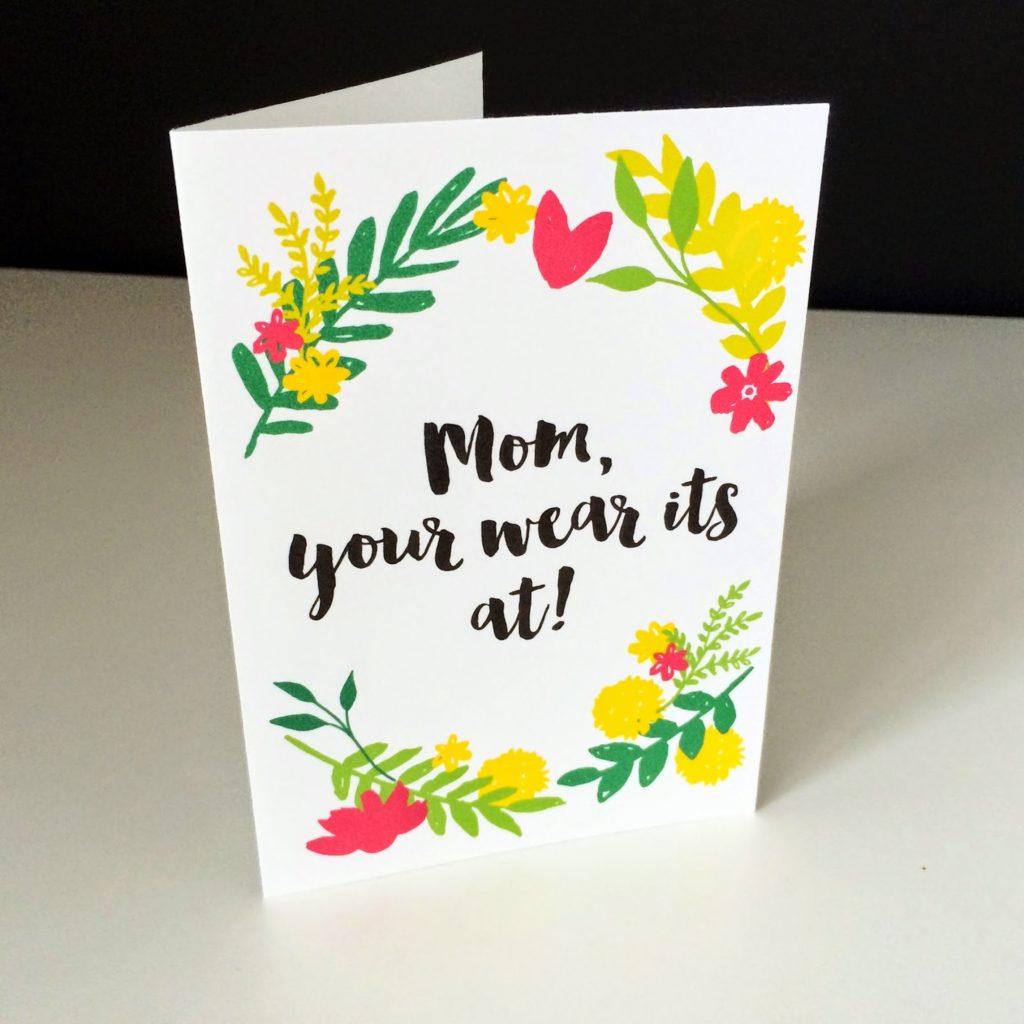
Happy Mother’s Day! Yes, there’s an apostrophe in there, MOM.
-L

BOON SUDS BOTTLE WASHER REVIEW + GIVEAWAY!!!!

We are big Boon fans over here! How can you not be? Modern design, beautiful colors and major functionality are all things that appeal to these two mamas. Boon was kind enough to send us their new SUDS bottle washer for us to try out. It is peeeeeerfect timing since I am cleaning bottles for our little one that is due in just weeks. I was so excited to try it out, even though I already knew it would be a love at first use kind of thing. 
Dishwashers are great, but lets be real….. How many times do you go into the kitchen in the morning and need a bottle or sippy cup for your little, and realize you DID NOT run the dishwasher or you just still have a FULL SINK of dishes. There is nothing I hate more than a sink full of dishes greeting me in the morning. However… it happens! This SUDS friend of ours totally makes it a quick and slightly enjoyable process to clean a bottle quickly for your little. You simply put the bottle face down on the pump, and move it up and down so that the brush gets every inch of the bottle! GENIUS! Even my husband was intrigued!! Ladies…. this might be how we trick them into doing dishes?!
My only wish for this little gem is that you could actually wash the small inner parts of the bottle. It would be great if there was a smaller brush attachment of some sort to actually do the smaller pieces of the bottle that the milk passes through. We use Dr. Brown’s bottles, which contain a couple of smaller pieces that need some scrubbing. However, I just toss those pieces in the bottom tray of the Sudsy, and it makes for a GREAT soaking tray! Sometimes, that may be all you need to get those small pieces clean. 
This is still a product I would highly recommend. Totally worth the $22.99 that it sells for. Especially if you don’t have a dishwasher!! You could easily leave this in your sink full of soapy warm water so that you can just easily clean each bottle throughout the day. Sidenote: this is a great method of cleaning for a wine glass ( or two) that us mommies like to indulge in every night every now and then. 😉


Thank you, Boon! We are forever fans, and we truly love all of your products for us moms and our littles. 
**NOW FOR THE GIVEAWAY**
Boon was kind enough to offer a SUDS bottle cleaner to one of our lucky readers!! You MUST Follow Boon on Instagram and us of course!
Tag a friend on our IG, and you are entered!!!
For an additional entry, leave a comment below telling us what you FAVORITE Boon product is after visiting their website HERE. There is just too much pretty to look at!
Happy Entering!!!

KITCHEN REDO : BEFORE & AFTER

Yes, the very first bit of imagery you see in this post was how my kitchen looked at one time in my life. Embarrassing, but REAL. LIFE. I must say, the mess alone makes the “after” shot look pretty impressive. Haha!
Ok guys!! I feel like I teased you with a kitchen redo post many months ago. Theeeeeen, I got pregnant, L&L shop has bloomed so beautifully (and busily), and life in general brought us to a lot of roadblocks during this process. However, it is FINALLY done!!!
We started this process as a bit of a challenge! Could we actually do OUR OWN kitchen? on a budget? And paint our own cabinets? Would we totally screw them up? One day, we went and picked out cabinet paint colors just to keep for when we decided to actually got the guts decided to paint the first coat. Little did we know, it would be sooner than later. I think we went that week to buy our first gallon of primer. To be honest, there were MANY times that we wanted to quit during this process, but the good news is that…. you just can’t. Paying someone to finish what we started was just NOT an option.
Our best investment while doing this kitchen was buying a paint sprayer. After lots of research by my hubby, we decided on this one. It didn’t break the bank and it worked beautifully. It really makes your cabinets look like they are professionally done. My biggest tip to anyone taking on a project like this is to be patient, and go through all of the steps…. properly!! Anytime we got antsy and wanted to knock out two coats of paint in one night vs. one…. we hit the brakes and gave ourselves a pep talk. We just really didn’t want anything to set us back! I plan on posting a tutorial on how WE painted our cabinets soon. I promise!!
Ok, enough talk…. here is what our kitchen looks like now!
 ^^DIY cafe curtains HERE. ^^
^^ Barstools from Target, aaaaand they are on sale now! Also, we ended up just paneling out our island. We wanted it to look a little more custom, but didn’t want to rebuild an entire island. We were happy with the way it came out! ^^
^^ Pendant lighting from Ikea ^^

^^ Also, to stress ourselves the freak out cut costs, we opted for a concrete countertop for the kitchen island. We followed this tutorial. Let’s just pretend ours went just as smoothly as this tutorial makes it seem. Oooooook…. moving on….
 ^^ We found our subway tile online… Ebay to be exact! Home Depot had a $2/per tile price tag. No thanks! We ended up getting ours for roughly .50 per tile. We were able to do our entire kitchen for $100. ^^
 ^^ The marble and glass tile was a last minute call. We had purchased it at Habitat for Hummanity Restore months before we started this process. We thought we would use it in a bathroom or something. It costed us $1/sq ft., and it was the perfect focal piece we needed for behind the oven.
^^ You may have seen our open shelf styling post HERE. This still stands to be my favorite part of our kitchen redo. We simply bought corbels from Home Depot, stained them, and painted some slabs of plywood that my husband cut to size. Super simple DIY! ^^
Please comment and email us with any questions that you may need answered regarding a kitchen redo. We are no pros, but through trial and error, have learned a thing or two! We would be happy to share that knowledge!!
**All cabinet hardware was from Home Depot**
BE SURE AND ENTER OUR GIVEAWAY IF YOU HAVEN’T ALREADY!!! It ends today!!

ROCK PAPER SCISSORS WEBSITE LAUNCH + GIVEAWAY!!!!

** GIVEAWAY CLOSED**
Friends, we have such a fun giveaway today!! Our sweet friend, Lauren, has RE-launched her paper boutique’s website, and we are soooooo excited!! Leah and I shop there often, and go to Lauren for ALL of our stationery needs. She and her staff are just the best at what they do… end of story! Now, everything is available to you out of towners as well. YAY!!
We are celebrating with a giveaway!! Lauren was kind enough to offer up one of her custom designed self-inking address stamps for one of our lucky readers. Leah and I both have one, and we LOVE it!! It makes addressing envelopes or stamping your books so much easier and much more stylish. They make great gifts as well.  Although, you may have a really hard time deciding on which one to pick. That is always the hardest part, right? 
Here is how you enter…
1. Go to Lauren’s beautiful new site HERE 
2. PIN your favorite stamp design from her site.
3. THEN, come back here and comment on which stamp you liked best! Be sure and leave your Pinterest name in the comment so that we can be sure you pinned!!
** Winner will be announced on Thursday**
Happy entering!!!!
XO,
Heydy Lopez… you are our winner! Please email us to claim your lovely stamp, friend!!! 
Thanks for entering everyone!! We really appreciate you!

JENNI’S CONCERT THEMED SHOWER

HIP HOP HOORAY! A baby boy is on the way!
Jenni is due soooo soon with her second baby, Remy! Don’t you love the name for a sweet baby boy by the way? Two great friends, Lori Mahon and Lauren Rauter, co-hosted with me. We decided to throw a concert-themed baby shower since Jenni currently thinks at one point thought she could be a country singer, and her husband Gabe a singer/performer/song writer (and for that matter Lori, Lauren’s husband, and my husband are all in the music industry as well! It is Nashville, after all). A nod to 90’s hip hop, Jenni’s love of country music, and concert references mixed together to create our decor.
It all started with the invitation, designed by Lauren of Rock Paper Scissors. Actually all of the paper materials you see here were all printed by Lauren. Geez it’s handy having a graphic designer bestie.
Concert posters, concert ticket garlands, and DIY marquee lights were the main decor, offset by cassette tapes and a boom box I got off of Ebay and spray painted gold!
Below is a DIY cassette tape mobile! I spray painted an embroidery hoop and cassette tapes gold, then used fishing line to attach. Command ceiling hooks held up perfectly.
For food, we did all concert food: hot dogs, nachos, soft pretzels, popcorn, and soda all held together in a food tray so it was easy for guests to carry around. 
Note the music themed names we gave all of the food… we crack ourselves up.
 Custom painted scoops sold on our Etsy shop.
Jenni’s fav Sugarfina gummies in the shape of sneakers! Perfect for our hip hop theme!

At every shower we throw, we like to have the guests write their address on the envelopes for Jenni’s thank you notes! Saves a ton of time for the mama-to-be.
Of course, we have the diaper cake – tutorial HERE – topped with baby Nike Dunks, Jenni’s request for her baby boy!
For favors, Lauren made these little boom boxes wrapped around an animal crackers box.
 Being a Love & Lion shower, we had to have a tattoo bar 🙂
Big sis-to-be, Amara, helped open all of the prezzies.
 Gorgeous mama Jenni!!
We LOVED throwing you this shower, Jenni! You’re already an incredible mom, and we know you’re going to be a pro with two. Love you!
-L

DIAPER CAKE TUTORIAL

At every baby shower we throw, there’s always a diaper cake centerpiece (scroll down for more of our cakes)! Not only is it visually super fun, but it’s also the perfect gift for a new mama. We try to embellish the tiers and topper to match the theme of the party, and this one pictured above was from Jenni’s hip hop/concert themed baby shower we threw last weekend… working on that post… promise! Jenni’s always talked about getting baby Nike Dunks for her baby boy way before she even had Amara, so I knew the topper had to be these little kicks.
I’ve made all the mistakes for you and come up with my fail-safe way to make a 4-tiered spectacular diaper cake!
I’ve found TARGET BRAND diapers to be the best!! First of all, they’re great diapers. When I had Ari I insisted on Pampers swaddlers (they are super soft after all) but when Max was born, I just went to Target brand and they’re just as good and way cheaper. Aesthetically for a diaper cake, they’re the best, because they are plain white and nice and flat. Pampers are a little puffier and look messy on a cake. Still works though- scroll down to see previous diaper cakes.
I bought one small pack each of newborn, size one, and size two. It’s nice to give the mom a variety and it also looks really nice on the cake to have the tiers be different heights.
 My secret to the perfect shaped diaper cake is…. an oatmeal can inside! Yep, that’s how I get that nice round shape, it fills in the middle nicely, and it keeps all the tiers sturdy.
WHAT YOU NEED:
1 Oatmeal Can
LARGE Rubberbands
String (anything will do!)
About 75 diapers 
(see anatomy picture above for size variety)
Embellishment for tiers and topper
Cake Platter (mine is about 13″)
INSTRUCTIONS:
*Tip- make sure each diaper for each tier is facing in the same direction
4th TIER
Start with the largest size diaper for the bottom tier.
Place a large rubberband around the can and start sticking diapers in, layering about 2-3 inches. You want to overlap them evenly all around. Soon your rubberband will get super tight and break in your face and your diapers will fly everywhere and you’ll say a non-baby-shower-appropriate-word and you’ll need to reinforce this layer with a piece of string. (See, told you I’ve made all the mistakes for you!) Just tie loosely around this layer in a bow so that you can adjust the length as you add more diapers.
As you layer the diapers all the way around, tuck the last diaper underneath the first so that it looks continuous and clean. Tie TWO pieces of string around this layer, one on the top and one on the bottom of the tier. This keeps the shape.
This bottom tier (4th tier) will have TWO rounds of layers. So just start layering again on top of the first round of diapers, this time with a string to hold this layer unless you have a huge rubberband! Can’t tell you how many times I thought a rubberband was big enough and -snap-! Tie two pieces of string around the layer, one near the top and one near the bottom. You’ll cover these up with embellishment at the end.
3rd TIER
This is one layer of diapers all around, about 17 diapers in size 1. Tie two pieces of string around the layer, one near the top and one near the bottom.
2nd TIER
If you’re using the same size diapers and oatmeal can that I did, you’ll notice that there’s only about 2-3 inches of space left on the oatmeal can for the next tier. That’s not going to be sturdy enough to keep the clean, round shape of the tier. You’ll need to take 3 diapers and simply fold them each in half, stack them, and wrap 2 rubberbands around them. Place on the top of the oatmeal can, and now you’ll keep that 2nd tier more sturdy and not falling in on itself.
Wrap only 8 or so diapers around and spread the layers a little wider than before. This keeps the tier thinner than the previous tier. Tie two pieces of string around the layer, one near the top and one near the bottom.
1st TIER
Roll 4 newborn size diapers up and individually wrap with a rubber band. Bring these 4 together and wrap all 4 up with a rubberband. This is the center of the top tier which will keep the shape since you’ve run out of room on the oatmeal can. Put another large rubberband around these 4 and start tucking in your diaper layers. Wrap about 8 diapers around, tucking the last one behind the first for that continuous look. Tie two pieces of string around the layer, one near the top and one near the bottom.
 You can see each tier has the string tied around the top and bottom which keeps that nice straight shape.
Voila! You’re ready to decorate!
Lauren of Rock Paper Scissors printed these patterned strips of paper to match the invitations she designed. You could use thick ribbon or any type of paper (taped together into strips) to cover the strings and rubberbands.
 Don’t forget your cake topper!
Here are some of our earlier cakes to give you decoration ideas: 
Modern mint an neutral baby shower HERE.
 This was from Jenni’s baby shower for Amara almost 4 years ago! (HERE) This was one of my first diaper cakes, so I used colorful diapers, but I think it still turned out okay not being all white.
Lori’s stork-themed baby shower (HERE) These were Pampers diapers- see a little too puffy and not uniform enough for OCD me. For embellishment, I taped strips of kraft paper together, wrapped around each tier, and glued feathers on top.
Lauren’s Winter White Baby Shower (HERE). I loved this one! I used white silk ribbon so that everything was white…. can’t tell you how many people thought this was a real cake. They were super disappointed.
Please let me know if you have any questions on construction! It can be a little confusing! If you’re in Nashville, we can totally make this for you! Convo us on our Etsy shop or email us 🙂
XO
-L