party

FOOD ERASERS CLASS VALENTINES (FREE PRINTABLE)

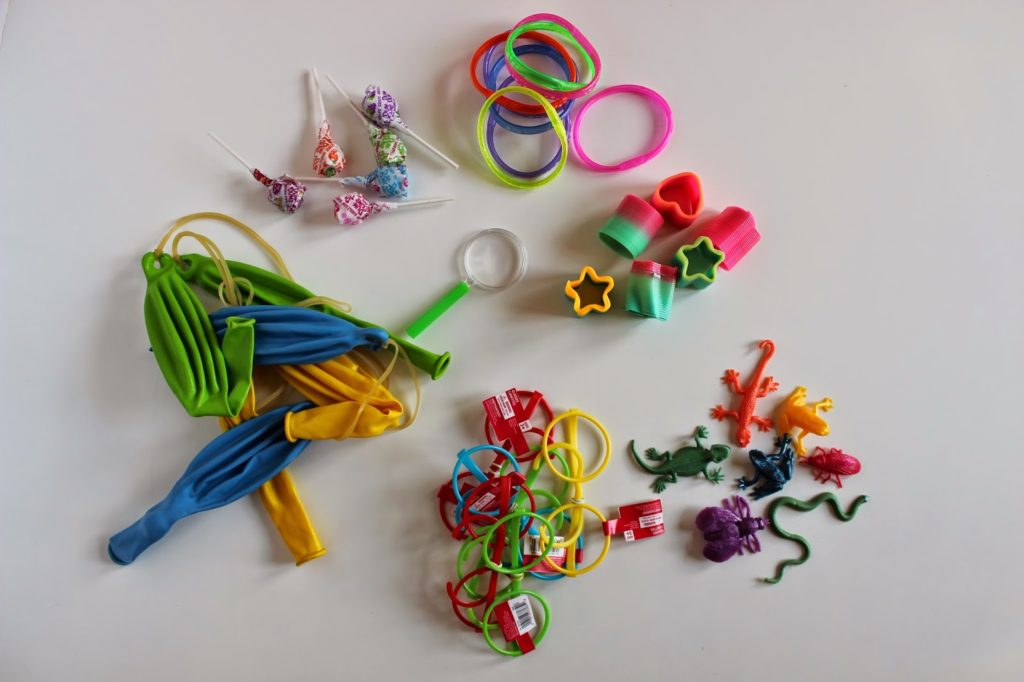
More non-candy class valentines for ya! We both stumbled on these erasers in the dollar section at Target at HAD to use them somehow! What’s more fun than everything in miniature?
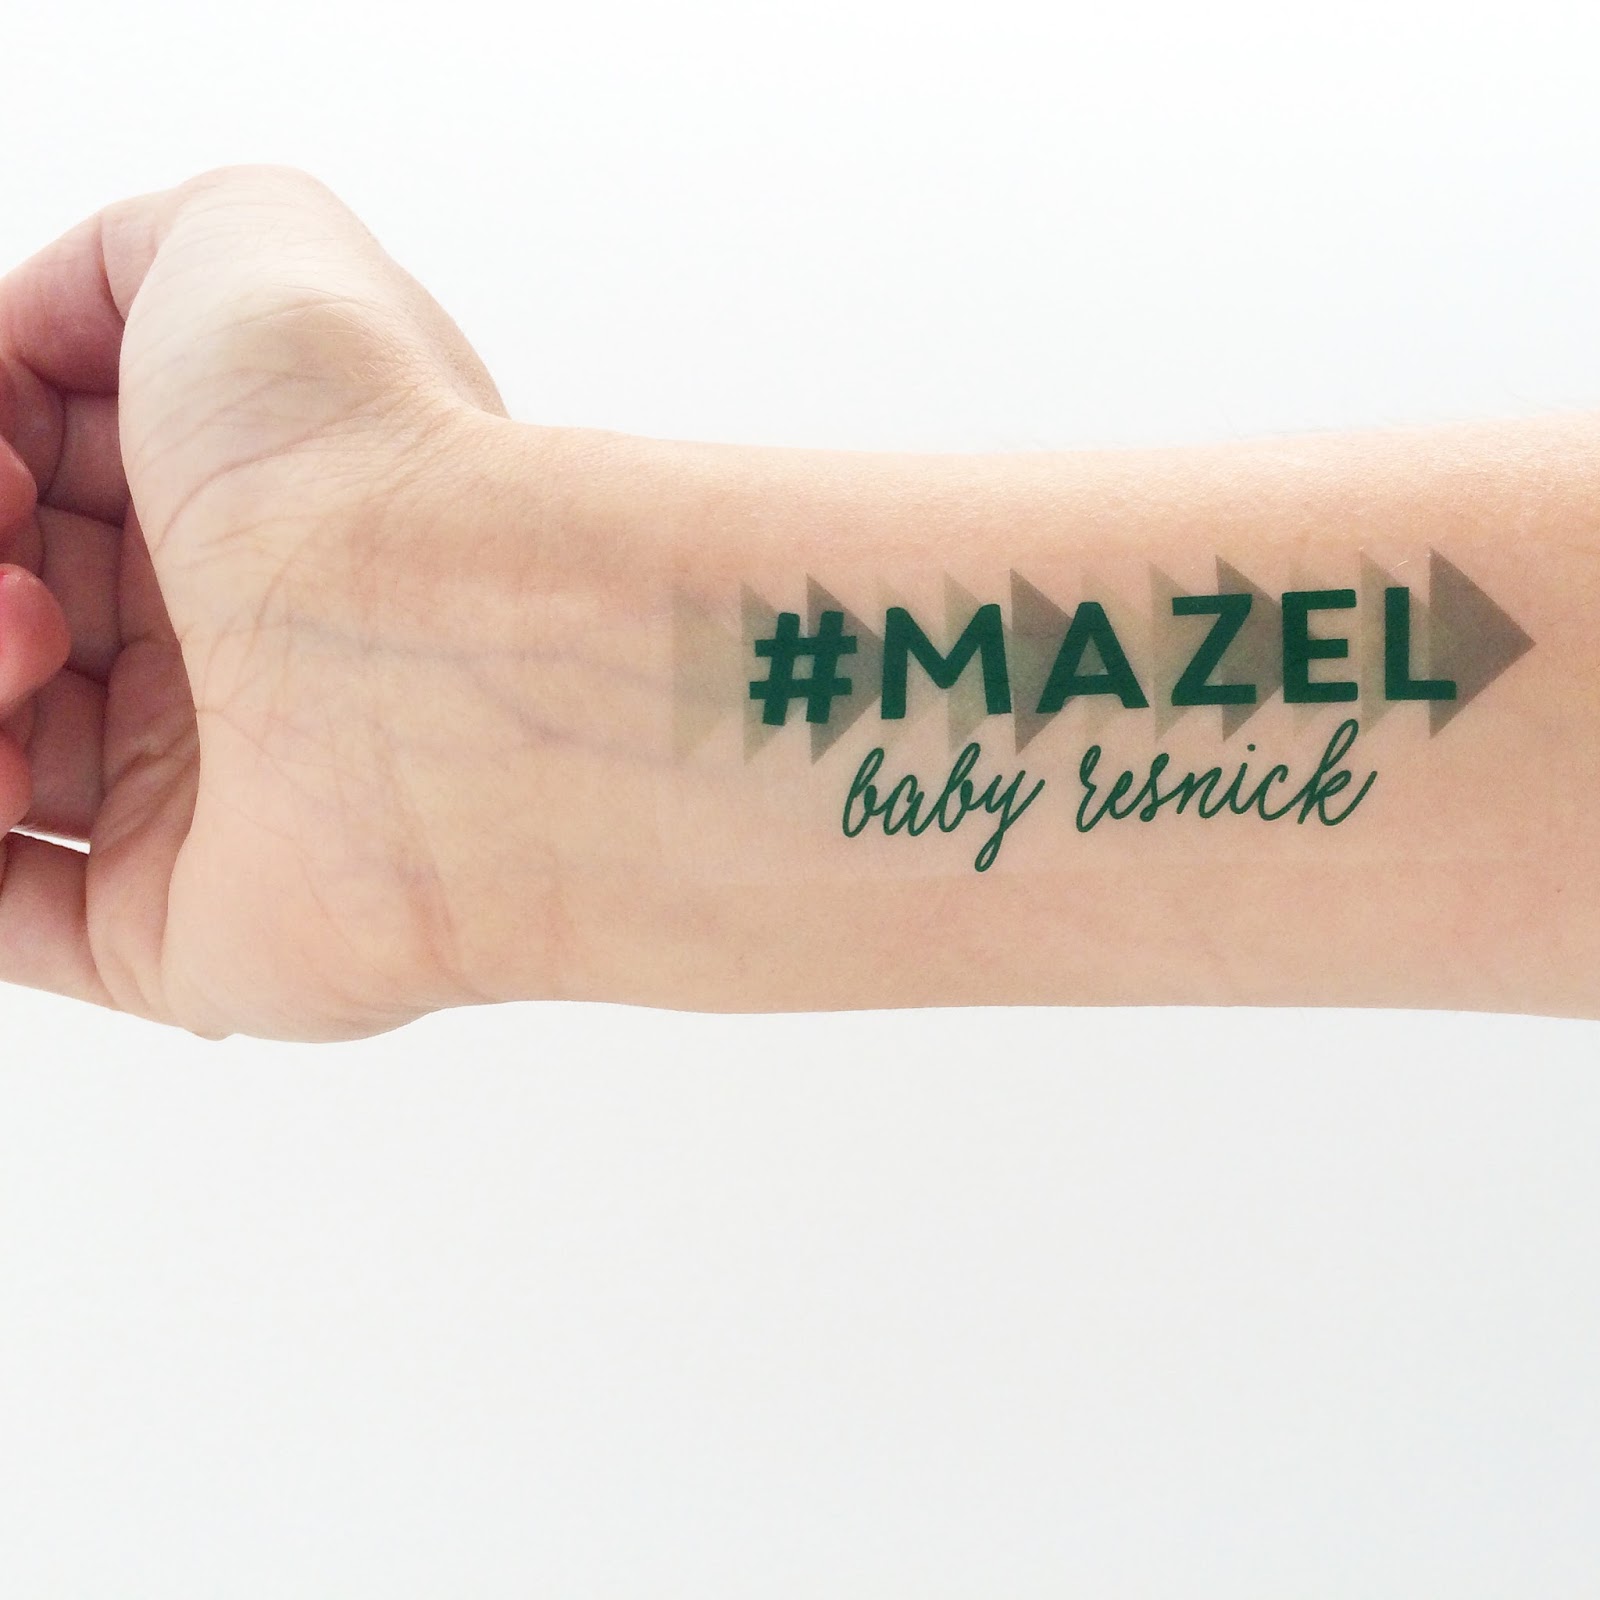
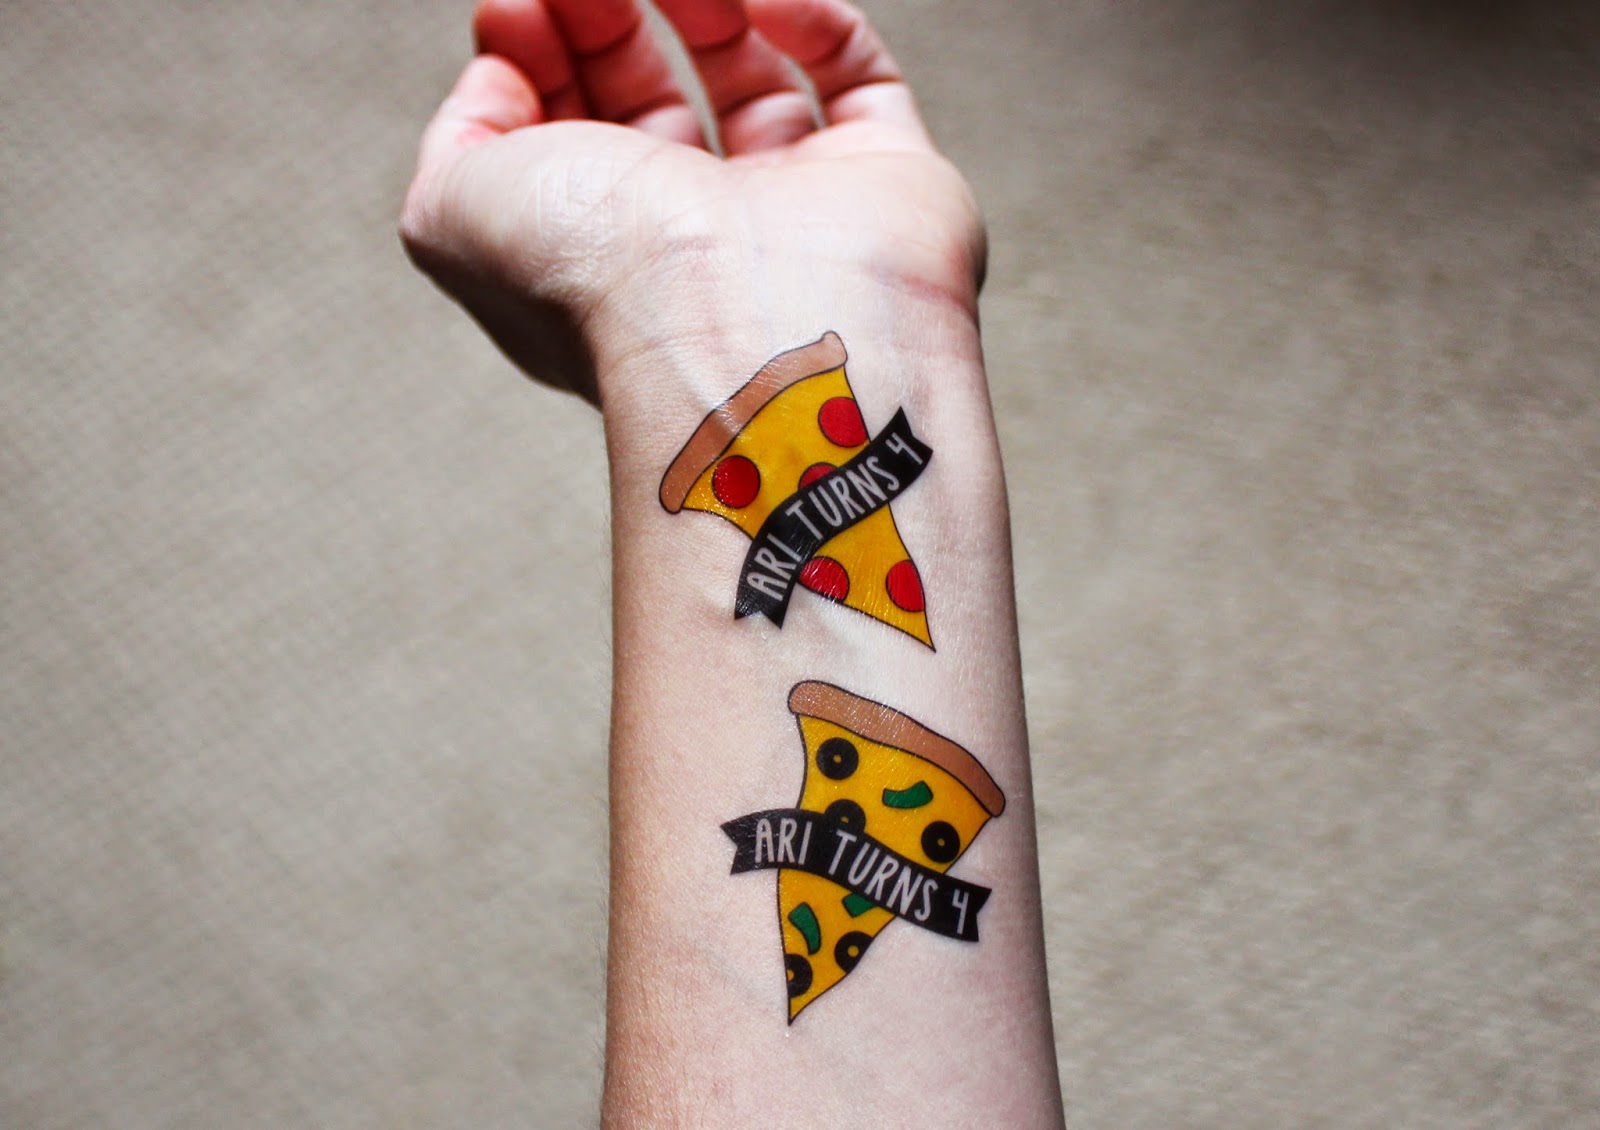
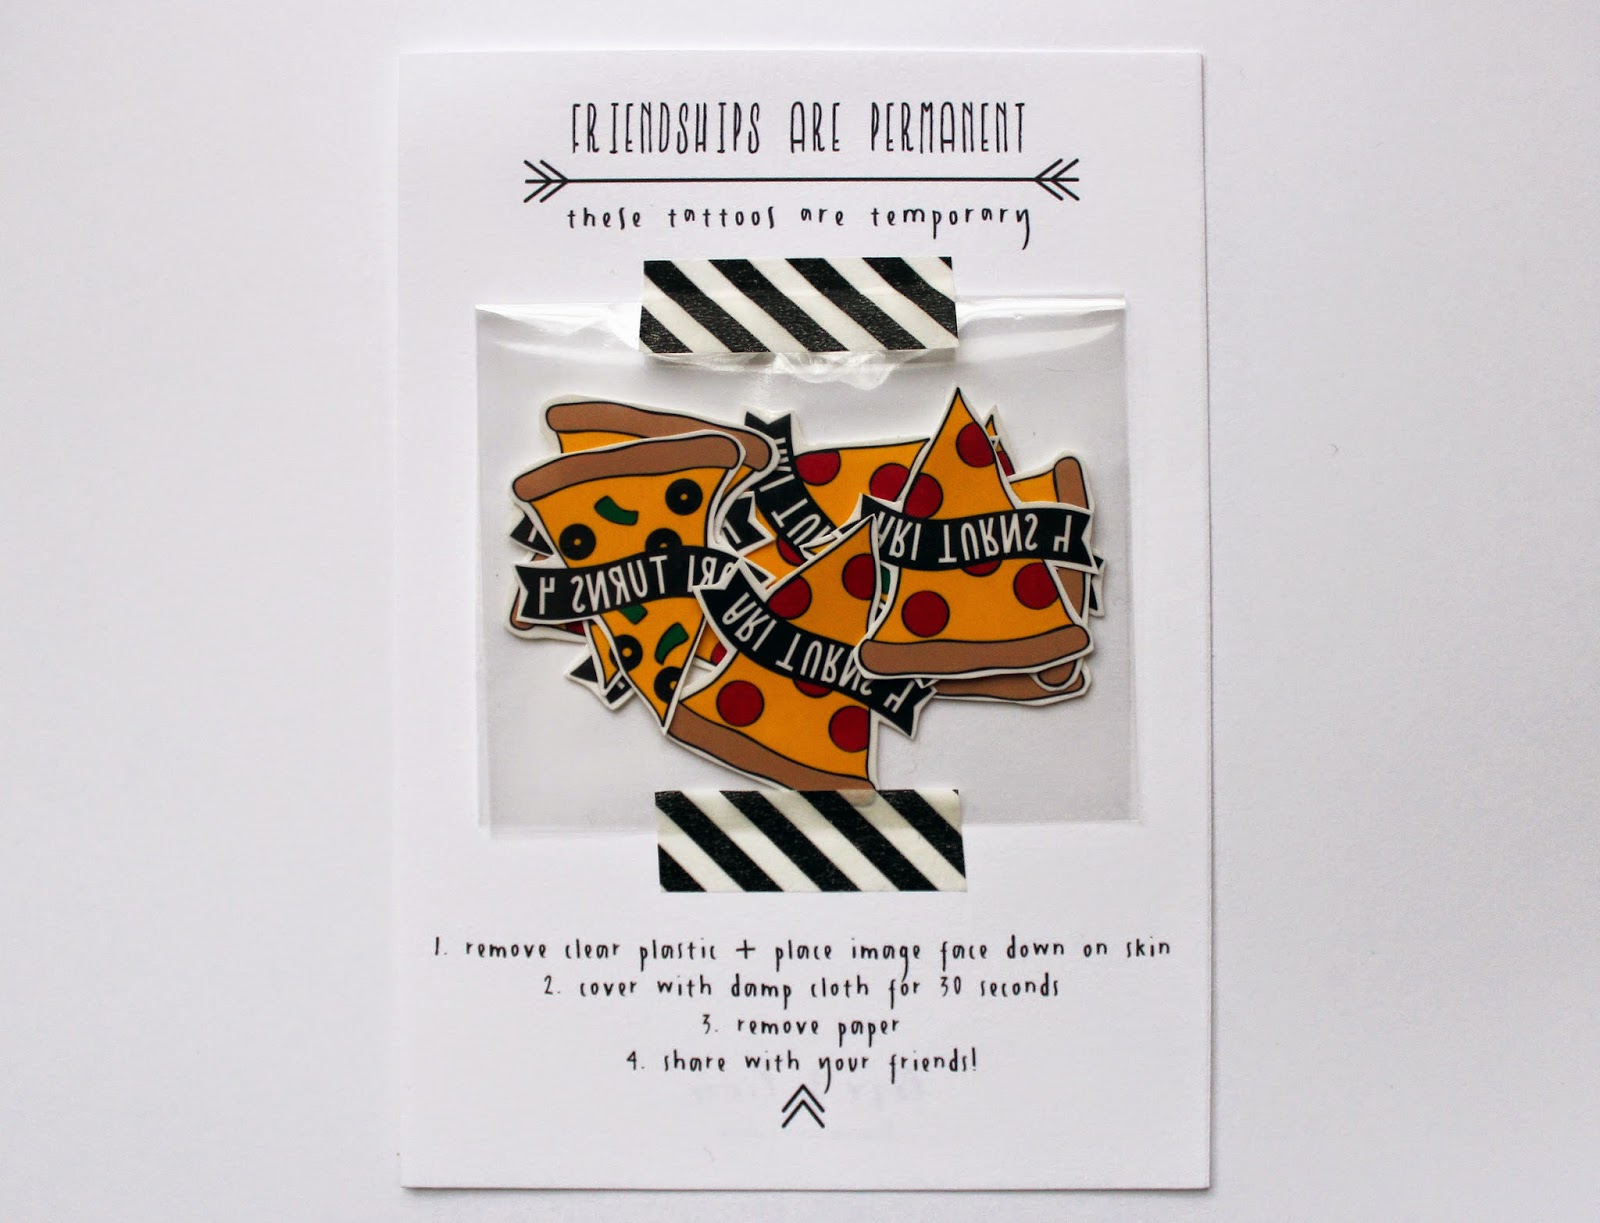
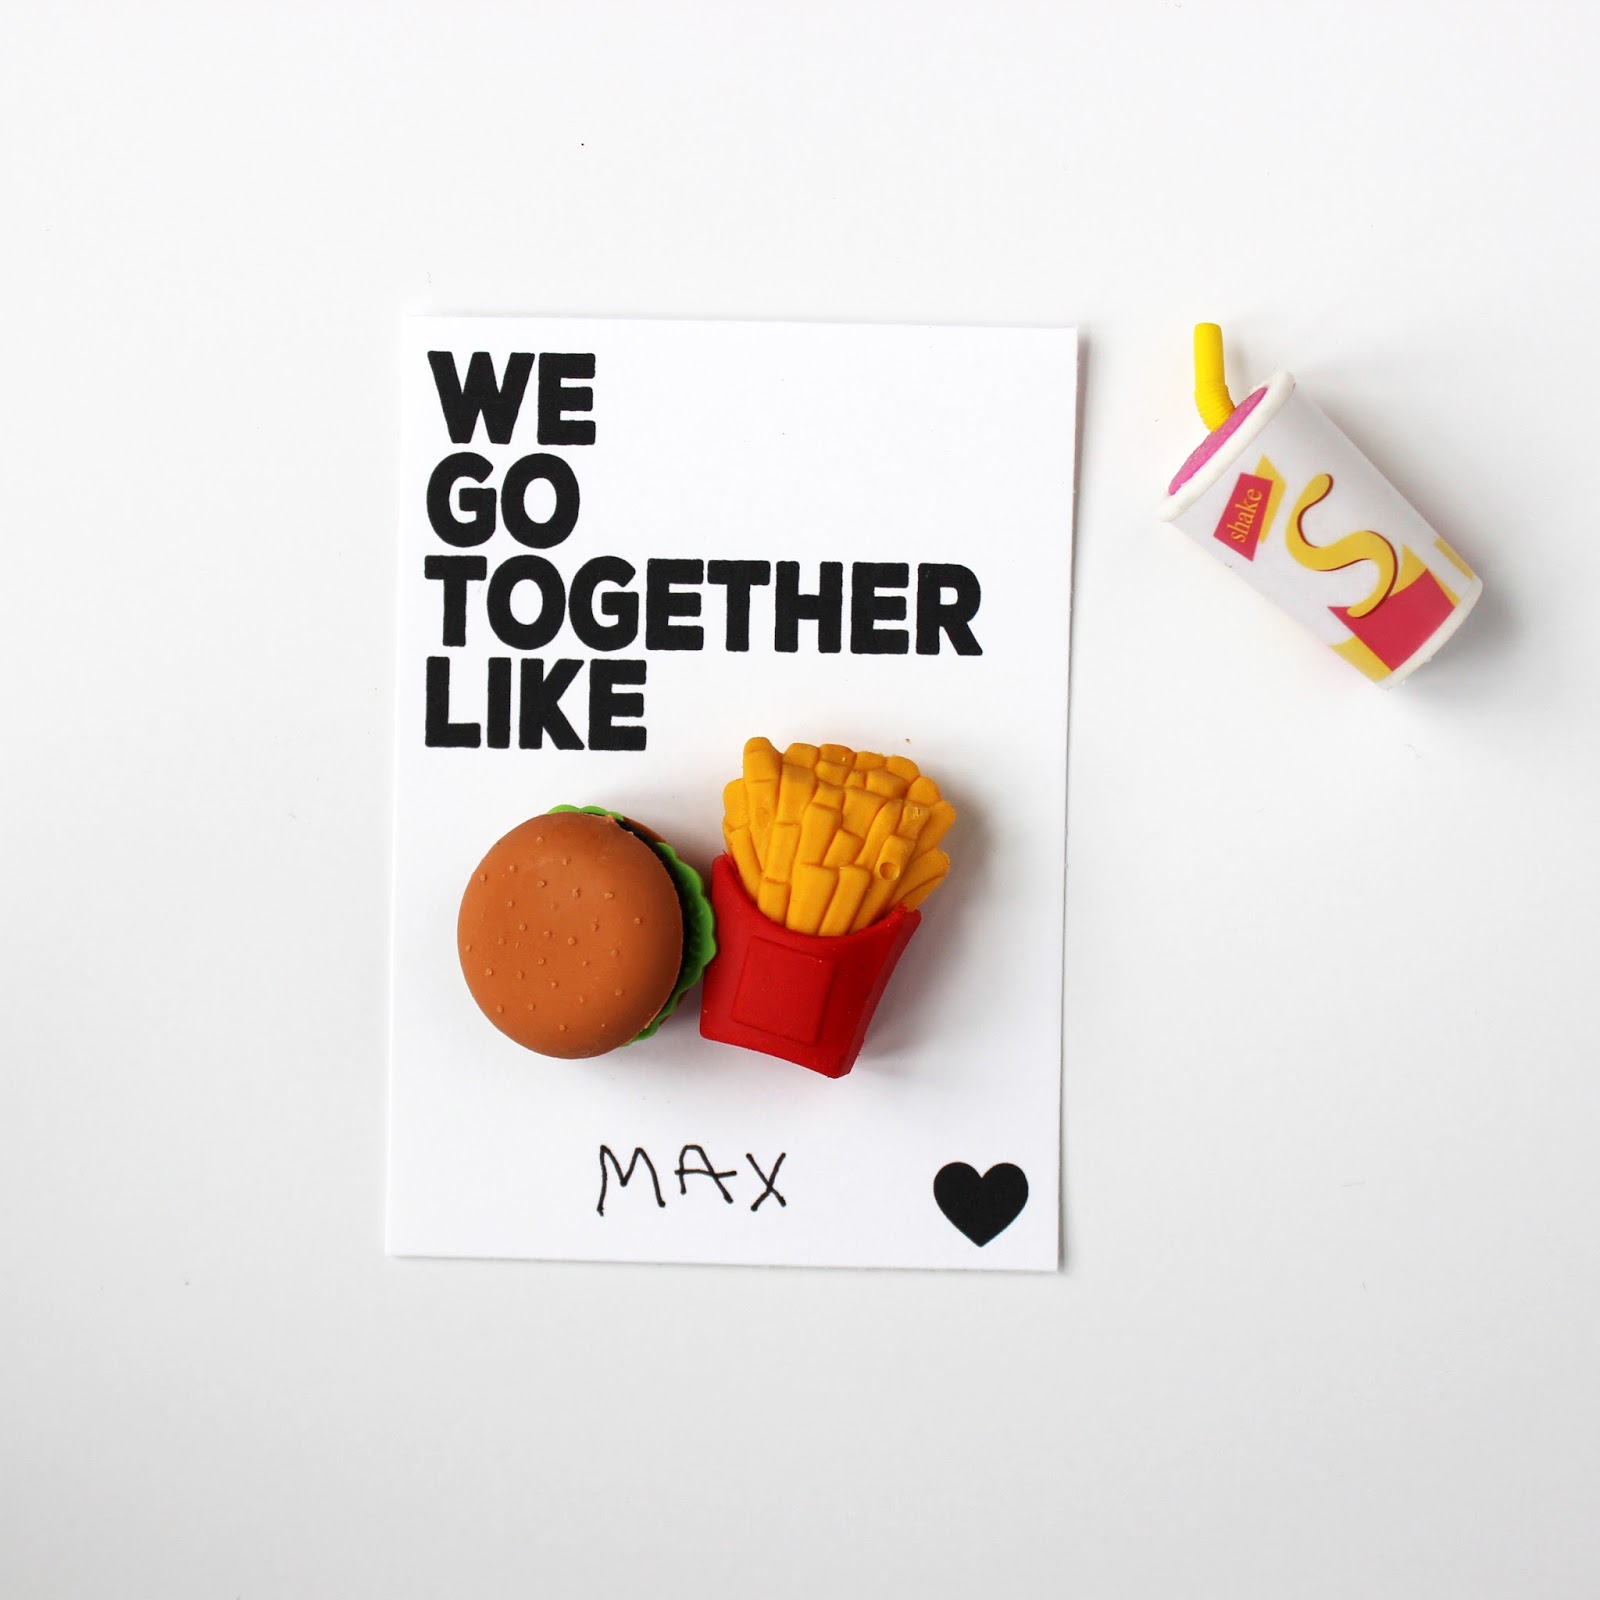
You can also use our food tattoos HERE, food key chains, charms, or stickers. Or you could tie to a box of donuts because – duh. We go together like… burgers and fries, milk and cookies, peas and carrots, peanut butter and jelly… you get the idea.
Scroll down for sources and the free download!
The erasers don’t really stick with tape well, so we just threw them in a bag and taped the back with washi tape. Easy peasy!
SOURCES:
VALENTINE CARD: Download HERE and print on card stock for best results.
BAGS: purchase HERE or at craft stores in size 3″ x 5″.
ERASERS: purchase HERE
CARD STOCK: THIS one prints with super bright colors!
WASHI TAPE: purchase HERE
CUTTING BOARD: THIS is the easiest, because you can see right where you’re cutting
Download our other class Valentine’s Day designs below by clicking on the titles:

MAX’S COW PARTY!

My little baby turned 2!! Eek! His favorite thing in the whole wide world (besides his big bro) are COWS. He has an entire backpack full of cow figurines that attend all of our outings. With every person he meets, he tells them about cows or the one time he pet a cow or cows say moo… I could go on. There was no other choice but to make him a cute little cow party and celebrate with family!
Cow PBJ’s, farm veggies, and cow cheese! I just used a cow cookie cutter to cut out the bread and black food dye for the spots. Just dab a corner of a paper towel in the food dye and dot on the bread.
 Milk bar anyone? Vanilla, chocolate, and strawberry.
 This is what I call a deconstructed cow cake… easy peasy. I used pink frosting and pink jelly beans for the udder 🙂
I cut out squiggles of black paper for the table decoration.
I had some leftover tattoo favors from Max’s little preschool buddies that I used as table decoration. Moooo Max is 2! We do custom packaging like this in our Etsy shop!
 Our party hat DIY is HERE. Just decorate with black squiggly shapes and a pink “2”.
 Max’s “aunt” Ashley got him this bouncy cow for his birthday! He obviously LOVED it!
I made Max his tee shirt with the tattoo image printed on iron-on transfer paper.
Sources – click below:
Letter balloons by Northstar Balloons
– L

PARTY IN AN ENVELOPE

It was my boys’ last day of preschool today! It’s actually a year-round school, but it was their last day with their current teachers who have loved and cared for them like they were family. I think it’s always the most meaningful to write a handwritten note, but to step it up a notch, I added a little handmade banner and confetti to let them know they were THE BEST! My sister and I have this thing with “the best”. It’s the best donut, it’s the best movie, it’s the best book… we tend to think a lot of things are “the best”, and these teachers really were the best!!
You could totally use this idea for any occasion by switching up the saying on the banner. How cute would it be to get a “congrats” or “happy birthday” party in an envelope?! I’d for sure go [delightfully] inappropriate when sending it to some of my friends… but we’ll keep the blog PG.
Here’s what you need:
Pencil
Paper scraps
Scissors
String
Hole punch
2 pieces of washi tape
Time: 20 minutes
You can freehand cutting the letters or trace them out with pencil. I actually have a cutting machine but wanted it to look more homemade. I made the letters about 2 inches tall.
Using the scraps from cutting out the letters simply cut little squares to make confetti.
Punch holes through the top of the letters and string.
 Tape one end of the string to a piece of cardstock and wrap the letters around it, securing the other end with tape when finished.
Fill envelope with confetti (and add a handwritten note)!
Voila! You’ve made the tiniest party in an envelope! 
We’d love to see what you come up with! Tag us on instagram @loveandlion so we can see!
-L

MODERN MINT & NEUTRAL BABY SHOWER

We LOVE planning parties, especially baby showers! It’s so special and important to shower that mama-to-be with lots of love and thoughtful details. I was honored to co-host with 2 fabulous ladies, Dara and Emily, friends of the guest of honor, Leeron. It will be the second boy for Leeron, but we didn’t want to go all blue blue blue. We went with white, neutrals, and pops of mint and sage green. 
Lauren of Rock Paper Scissors designed the invitation, and I really went off of that for decor. It always starts with the invitation for me! The big letter “R” is just a paper mache letter from the craft store… use painters tape to mask off a straight line, paint, and remove tape. 
Diagonals, squares, and triangles mixed with all white flowers and live moss made for a simple and pretty party! 
The drink tags were my fav! Guests remembered which drink was theirs by the baby picture of the mama and pop-to-be and the color tag. Leeron’s amazing husband, Matt, secretly emailed me their baby pics, I changed them to black and white in photoshop and cropped to a square. Just punch a hole in the corner of the picture and the colored square and tie with string. The color tag was nice so that you didn’t have to have a different baby pic for each guests. Just use different colors for each pic. Leeron was so surprised (and immediately removed that one embarrassing photo from her tween years)!
Use painters tape to mask off a diagonal line. Paint and remove tape when dry! Super simple!
Every baby shower needs a diaper cake, right? See our TUTORIAL HERE. I used double stick tape to add on the triangles of leftover scraps from the garlands to keep that geo-mod vibe.
Cake topper by Rock Paper Scissors to match the invite.
Every party needs Campfire Crispies, especially a baby shower when you can be punny and say “She’s about to POP!” These were SO. GOOD. Fluffernutter flavor: toasted marshmallow and peanut butter with a white chocolate peanut butter coating. Droooool. Order HERE.
And of course us being us, we needed a tattoo station with the party’s hashtag (from our little shop HERE)! 
Here’s the actual party! It was at night, so I took the photos above so you could see the details!
 The simplest projects make the biggest impact. Jenni and I have done these live moss letters several times. Simply cut the tops of paper mache letters you can find in any craft store, and stuff with live moss from your florist!
Even though Leeron couldn’t enjoy it, we all loved the signature cocktail “The Leeroni”.
Hostesses with the mostesses: Dara, me, Leeron, Emily
The gorgeous and glowing mama-to-be, Leeron!
Loved throwing this baby shower for a very deserving mama!!!
-L

FEATURED: SWEET BIRDIE BIRTHDAY PARTY

We adore DIY parties- that’s our fav for our own kids, so we’re always on the lookout for new creative yet achievable ideas. That’s why we’re so thrilled to feature this Sweet Birdie Dessert Birthday Party by Shauna Younge! You’ll love her pastel and wood grain color palette, pretty dessert table, and simple touches that made this party memorable!
 
SHAUNA:
After I designed the hexagon and faux bois invites and found a great cake recipe, I planned a bash that was full of bright, spring-y colors offset by lots of white and gold accents. I created DIY faux bois color block placemats to bring color and warmth to my white desk for the girls to dine in style. 
Along with sliders, powdered donuts, and popcorn, the girls devoured vanilla ice cream and my strawberry cake. I customized labels with each girl’s name to decorate the paper ice cream cups from Sweet Party Shop. I also designed faux bois labels for the milk bottles to add a natural element to the all-white room. Land of Nod’s birdie garland and cupcake kit added a bit of whimsy to the dessert table that really kicked up the color a notch. 
CREDITS
Party concept, styling, and dessert table: Shauna Younge
Images: Sydnee Bickett
Birdie garland and cupcake kit: Land of Nod
Ice cream cups: Sweet Party Shop
DIY projects: DIY starburst birthday crown and DIY faux bois color block placemats


Check out more of Shauna’s ideas on her blog, Sweet Tooth, and contributor to Momtastic. Also do NOT miss her dessert table portfolio HERE!

JENNI’S CONCERT THEMED SHOWER

HIP HOP HOORAY! A baby boy is on the way!
Jenni is due soooo soon with her second baby, Remy! Don’t you love the name for a sweet baby boy by the way? Two great friends, Lori Mahon and Lauren Rauter, co-hosted with me. We decided to throw a concert-themed baby shower since Jenni currently thinks at one point thought she could be a country singer, and her husband Gabe a singer/performer/song writer (and for that matter Lori, Lauren’s husband, and my husband are all in the music industry as well! It is Nashville, after all). A nod to 90’s hip hop, Jenni’s love of country music, and concert references mixed together to create our decor.
It all started with the invitation, designed by Lauren of Rock Paper Scissors. Actually all of the paper materials you see here were all printed by Lauren. Geez it’s handy having a graphic designer bestie.
Concert posters, concert ticket garlands, and DIY marquee lights were the main decor, offset by cassette tapes and a boom box I got off of Ebay and spray painted gold!
Below is a DIY cassette tape mobile! I spray painted an embroidery hoop and cassette tapes gold, then used fishing line to attach. Command ceiling hooks held up perfectly.
For food, we did all concert food: hot dogs, nachos, soft pretzels, popcorn, and soda all held together in a food tray so it was easy for guests to carry around. 
Note the music themed names we gave all of the food… we crack ourselves up.
 Custom painted scoops sold on our Etsy shop.
Jenni’s fav Sugarfina gummies in the shape of sneakers! Perfect for our hip hop theme!

At every shower we throw, we like to have the guests write their address on the envelopes for Jenni’s thank you notes! Saves a ton of time for the mama-to-be.
Of course, we have the diaper cake – tutorial HERE – topped with baby Nike Dunks, Jenni’s request for her baby boy!
For favors, Lauren made these little boom boxes wrapped around an animal crackers box.
 Being a Love & Lion shower, we had to have a tattoo bar 🙂
Big sis-to-be, Amara, helped open all of the prezzies.
 Gorgeous mama Jenni!!
We LOVED throwing you this shower, Jenni! You’re already an incredible mom, and we know you’re going to be a pro with two. Love you!
-L

DIAPER CAKE TUTORIAL

At every baby shower we throw, there’s always a diaper cake centerpiece (scroll down for more of our cakes)! Not only is it visually super fun, but it’s also the perfect gift for a new mama. We try to embellish the tiers and topper to match the theme of the party, and this one pictured above was from Jenni’s hip hop/concert themed baby shower we threw last weekend… working on that post… promise! Jenni’s always talked about getting baby Nike Dunks for her baby boy way before she even had Amara, so I knew the topper had to be these little kicks.
I’ve made all the mistakes for you and come up with my fail-safe way to make a 4-tiered spectacular diaper cake!
I’ve found TARGET BRAND diapers to be the best!! First of all, they’re great diapers. When I had Ari I insisted on Pampers swaddlers (they are super soft after all) but when Max was born, I just went to Target brand and they’re just as good and way cheaper. Aesthetically for a diaper cake, they’re the best, because they are plain white and nice and flat. Pampers are a little puffier and look messy on a cake. Still works though- scroll down to see previous diaper cakes.
I bought one small pack each of newborn, size one, and size two. It’s nice to give the mom a variety and it also looks really nice on the cake to have the tiers be different heights.
 My secret to the perfect shaped diaper cake is…. an oatmeal can inside! Yep, that’s how I get that nice round shape, it fills in the middle nicely, and it keeps all the tiers sturdy.
WHAT YOU NEED:
1 Oatmeal Can
LARGE Rubberbands
String (anything will do!)
About 75 diapers 
(see anatomy picture above for size variety)
Embellishment for tiers and topper
Cake Platter (mine is about 13″)
INSTRUCTIONS:
*Tip- make sure each diaper for each tier is facing in the same direction
4th TIER
Start with the largest size diaper for the bottom tier.
Place a large rubberband around the can and start sticking diapers in, layering about 2-3 inches. You want to overlap them evenly all around. Soon your rubberband will get super tight and break in your face and your diapers will fly everywhere and you’ll say a non-baby-shower-appropriate-word and you’ll need to reinforce this layer with a piece of string. (See, told you I’ve made all the mistakes for you!) Just tie loosely around this layer in a bow so that you can adjust the length as you add more diapers.
As you layer the diapers all the way around, tuck the last diaper underneath the first so that it looks continuous and clean. Tie TWO pieces of string around this layer, one on the top and one on the bottom of the tier. This keeps the shape.
This bottom tier (4th tier) will have TWO rounds of layers. So just start layering again on top of the first round of diapers, this time with a string to hold this layer unless you have a huge rubberband! Can’t tell you how many times I thought a rubberband was big enough and -snap-! Tie two pieces of string around the layer, one near the top and one near the bottom. You’ll cover these up with embellishment at the end.
3rd TIER
This is one layer of diapers all around, about 17 diapers in size 1. Tie two pieces of string around the layer, one near the top and one near the bottom.
2nd TIER
If you’re using the same size diapers and oatmeal can that I did, you’ll notice that there’s only about 2-3 inches of space left on the oatmeal can for the next tier. That’s not going to be sturdy enough to keep the clean, round shape of the tier. You’ll need to take 3 diapers and simply fold them each in half, stack them, and wrap 2 rubberbands around them. Place on the top of the oatmeal can, and now you’ll keep that 2nd tier more sturdy and not falling in on itself.
Wrap only 8 or so diapers around and spread the layers a little wider than before. This keeps the tier thinner than the previous tier. Tie two pieces of string around the layer, one near the top and one near the bottom.
1st TIER
Roll 4 newborn size diapers up and individually wrap with a rubber band. Bring these 4 together and wrap all 4 up with a rubberband. This is the center of the top tier which will keep the shape since you’ve run out of room on the oatmeal can. Put another large rubberband around these 4 and start tucking in your diaper layers. Wrap about 8 diapers around, tucking the last one behind the first for that continuous look. Tie two pieces of string around the layer, one near the top and one near the bottom.
 You can see each tier has the string tied around the top and bottom which keeps that nice straight shape.
Voila! You’re ready to decorate!
Lauren of Rock Paper Scissors printed these patterned strips of paper to match the invitations she designed. You could use thick ribbon or any type of paper (taped together into strips) to cover the strings and rubberbands.
 Don’t forget your cake topper!
Here are some of our earlier cakes to give you decoration ideas: 
Modern mint an neutral baby shower HERE.
 This was from Jenni’s baby shower for Amara almost 4 years ago! (HERE) This was one of my first diaper cakes, so I used colorful diapers, but I think it still turned out okay not being all white.
Lori’s stork-themed baby shower (HERE) These were Pampers diapers- see a little too puffy and not uniform enough for OCD me. For embellishment, I taped strips of kraft paper together, wrapped around each tier, and glued feathers on top.
Lauren’s Winter White Baby Shower (HERE). I loved this one! I used white silk ribbon so that everything was white…. can’t tell you how many people thought this was a real cake. They were super disappointed.
Please let me know if you have any questions on construction! It can be a little confusing! If you’re in Nashville, we can totally make this for you! Convo us on our Etsy shop or email us 🙂
XO
-L

SUPER BOWL PARTY

Who’s hosting Super Bowl this year? We picked up the bulk of the decor from Home Depot of all places! This post is not sponsored… I literally walked in and happened to find most of what we needed for the party there! Who knew? We are talking SIMPLE, people. Simple with a big impact!
The table runner is astroturf carpet from Home Depot! They just cut me a strip of 1′ x 12′ for around $6. The dude was like, “well that’s a first for me”! I thought it would be fun to put a signature drink inside a Gatorade cooler like in a real game. 
For the table decor, it’s just butcher paper (again, got a huge roll from Home Depot) and drew x’s and o’s with a Sharpie… my husband had to tell me what those meant. 
You know when you have a ton of people over, they sit their cups down and don’t know which is which? Instead of writing names, have each guest have their own “jersey number”. I used my silhouette and label paper only so I didn’t have to take a trip to the craft store, but most stores have those sticker numbers you could put on the cups. If you’re rooting for a team, get cups in your team’s colors and use real player jersey numbers!
Pennant banner is just cut out of the same butcher paper roll and handwritten with a Sharpie, taped up with washi tape.
Perfect plates from Target! No need to get football themed everything.
Good luck, hostesses with the mostesses! Gooooo team!
-L

VALENTINES DAY BREAKFAST AND CRAFTING FOR LITTLES: YOU’VE GOT MAIL!

Here is a simple Valentine’s Day breakfast and card making morning for your littles! We picked up most of these goodies from Target and Michaels Craft stores- just goes to show you what you can create with store bought items and just a touch of DIY.
Scroll down to the bottom for a DIY on this simple heart ornament.
We used fiber fill for the clouds and used THIS tutorial for the paper airplanes.
Straws, cups, plates, and napkins from Target.
Wooden scoops by US! Convo us on ETSY to purchase!
Michaels Craft store had the banner blank- we just added letters! We rummaged through our craft drawers and found lots of card-making supplies for the kiddos.
Fill mini shipping tubes from Michaels with crafting supplies! 
Download “Special Delivery” labels HERE.
Have your littles decorate mailbags – tutorial HERE.
HEART ORNAMENT TUTORIAL:
First make a heart template: fold a piece of paper in half, cut out half of a heart shape. When you unfold it, it should be a symmetrical heart. Fold colorful paper strips in half, fold your template in half and trace on the folded paper strips. (All of the hearts need to be the same size for this to work). 
 Use double stick tape to put the hearts together back to back. We used 6 or 7 hearts per ornament.
Stop half way through to tape the string in the middle.
Voila!
We hope you and your littles have a SWEET and fun Valentine’s Day breakie!

ICE CREAM SOCIAL – SIP AND SEE

My oldest friend, Rebecca, just had Ada, the sweetest little bean you ever did see! Remember her baseball themed bridal shower HERE? We had an ice cream bar then (her fav), so my mom and I went with a whole ice cream theme for her sip and see! I basically have no imagination and wanted ice cream. BTW a sip and see is a baby shower AFTER the baby is born- you sip drinks and see the baby. Get it? Might be a southern thing, I don’t know!
Colors and design began with this adorable invitation by Rock Paper Scissors.
Frozen water balloons = the cuter cousin of ice cubes.
Loooove how Rock Paper Scissors designed the ice cream cup labels and cone wrappers!
DIY GIANT ICE CREAM CONES:
-honeycomb balls (here and here)
-kraft wrapping paper
-double stick tape
For the cone, follow THIS template… just eyeball it and make it giant! It’s a little tricky, not gonna lie. Cut out and tape the ends of the cone together. Stick the honeycomb ball in and gently tape with double stick tape. I was laying mine flat on the table, so I didn’t need to secure it well. If you’re hanging them, I’d make them with the tiny honeycomb balls so they’ll be lighter.
Pinwheels, plates, and napkins by Meri Meri.
It’s not a party without Aunt Ellie’s Campfire Crispies! This time we went with gluten free Oreo flavor. Yuuuuum.
We got these adorable scoops HERE and painted them. We’re thinking about selling these little scoopity scoops painted custom in our ETSY shop- what do you think? They were perfect for ice cream toppings.
Table runner by Kitchen Papers.
I used THIS tassel tutorial and used my Silhouette for the letters.
Here’s the new mama Rebecca and sweet Ada! Imagine knowing someone for your entire life, then they’re in labor, and you’re crying alone in your car just sitting in your driveway so your kids don’t get freaked out that you’re crying. Yep, that was me.
Ice cream parties are the easiest because there’s no cooking or baking! Everything is store bought but looks special depending on how you display it. Sweet and simple!
-L 

ARI’S 4TH BIRTHDAY – PIZZA PARTY!

Ari turned 4 yesterday! I cannot believe I have a four-year-old. What?! After Max’s 1st birthday party last month (HERE) I was pretty spent, so it was music to my ears when Ari declared he didn’t want a party! Background… he’s not too into other kids his age and much prefers adults. We’re working on it at preschool and with play dates, but honestly it was his birthday, so he should get to do what he wants, right? Ari’s request was going to his fav pizza place, Mellow Mushroom, with just the family. So that’s what we did!
I kept decoration to the bare minimum (to my standards) and just made these little pizza party hats, a pizza cake, and pizza tattoos
Pizza Party tattoos in our Etsy shop HERE
For the pizza cake, I just used sour straws and chocolate cheerios for the “pizza toppings”. I tinted frosting red for the middle layer and yellow for the top. You guys… I totally attempted a brown crust out of frosting and failed miserably. Scraped it off and stuck with a clean yellow top! 

I thought these pizza hats turned out pretty well and were super simple! For the tutorial and more DIY party hat ideas, click HERE.

Here’s my birthday boy checking out his cake sans pants.
That’s a wrap! Now to move into our new home NEXT WEEK…. oy.
-L
Ari’s Modern Animal Themed 2nd Birthday Party HERE, HERE, and HERE.

MAX’S 1ST BIRTHDAY – ROUND PARTY!

When people asked what theme Max’s first birthday was going to be, and I said “round”… they were like… ummm cool. Okay so Max is round, he loves balloons and balls- those are round, and honestly I couldn’t think of anything that hadn’t been done a million times before! Plus it’s so simple- just my style. 
The party was supposed to be in our backyard with lanterns strung from the trees, circular picnic blankets, ring toss, bubbles, etc. Guess what? It poured every. single. day. that week including the day of the party. Super dark outside too for pictures. Fantastic. We’re still in our rental (egg yolk and old lady sage walls), so basically my plan was to camouflage the grossness with tons and tons of balloons. I think it turned out really well, and most importantly, everyone had a great time! And let’s be honest, when you’re dealing with one to four-year-olds really all they need are toys and cake. Cake is clutch. 
FOOD:
See what I mean? Cake is clutch.
I baked two batches of white cake in sheet pans so the layers would be thin, froze the layers, cut with a 2.5″ biscuit cutter, then just piped colorful frosting in between. 
 All round food!
 Complete with Aunt Ellie’s Campfire Crispies! They are SO. GOOD. Do yourself a favor and order these babies.

DECOR:

Had to cover the nasty chandelier 🙂
Monthly photos of Maxie cut out into circles, naturally.
I made this little picnic blanket out of a drop cloth. Draw two concentric circles in pencil and paint in the lines. Make sure to paint the circle before you cut. That way it’ll look nice and neat! 
FAVORS:
Party crowns, tattoos, hula hoops, bouncy balls
Custom temporary tattoos with each kid’s name from our Etsy shop!
ACTIVITIES:
RING TOSS
I ordered the rings on Amazon and got bottles from the dollar section at Target. Since the party was supposed to be outside, I had painted wooden dowels to hammer into the grass. Sigh. Still a fun activity for the kids though! 
DIY GIANT SURPRISE BALL
Getting a surprise ball was a tradition at my sister and my birthday parties growing up. I decided to supersize it by using a container from Party City as the center to make this huge!
Each kid got to unwrap a color, once that streamer color ended, they got the prize and gave the ball to the next kid. It ACTUALLY worked! Couldn’t believe how patient the kids were waiting for their turn! So fun!
INVITATIONS:
I got the beach balls from Oriental Trading Company and wrote on them with neon Sharpies. Here’s the thing… they can’t fold totally flat, so they were considered a parcel… which means they were $3 each to mail! I took them to the post office and got 5 different stamps, which actually looked pretty cool. Thankfully I only invited a handful of people, and I hand-delivered most!
 On the back of the ball it said:
ROLL on over to Max’s
(address)
It was a sweet day for my sweet, round little Maxie!
-L
And the winner of the Freshly Picked Giveaway is….
Kelly Vance!
Woohoo!! Please email us at loveandlion@gmail.com!
Thank you all for entering! Many more giveaways to come!