recipe

THE BEST SPICED COOKIE RECIPE

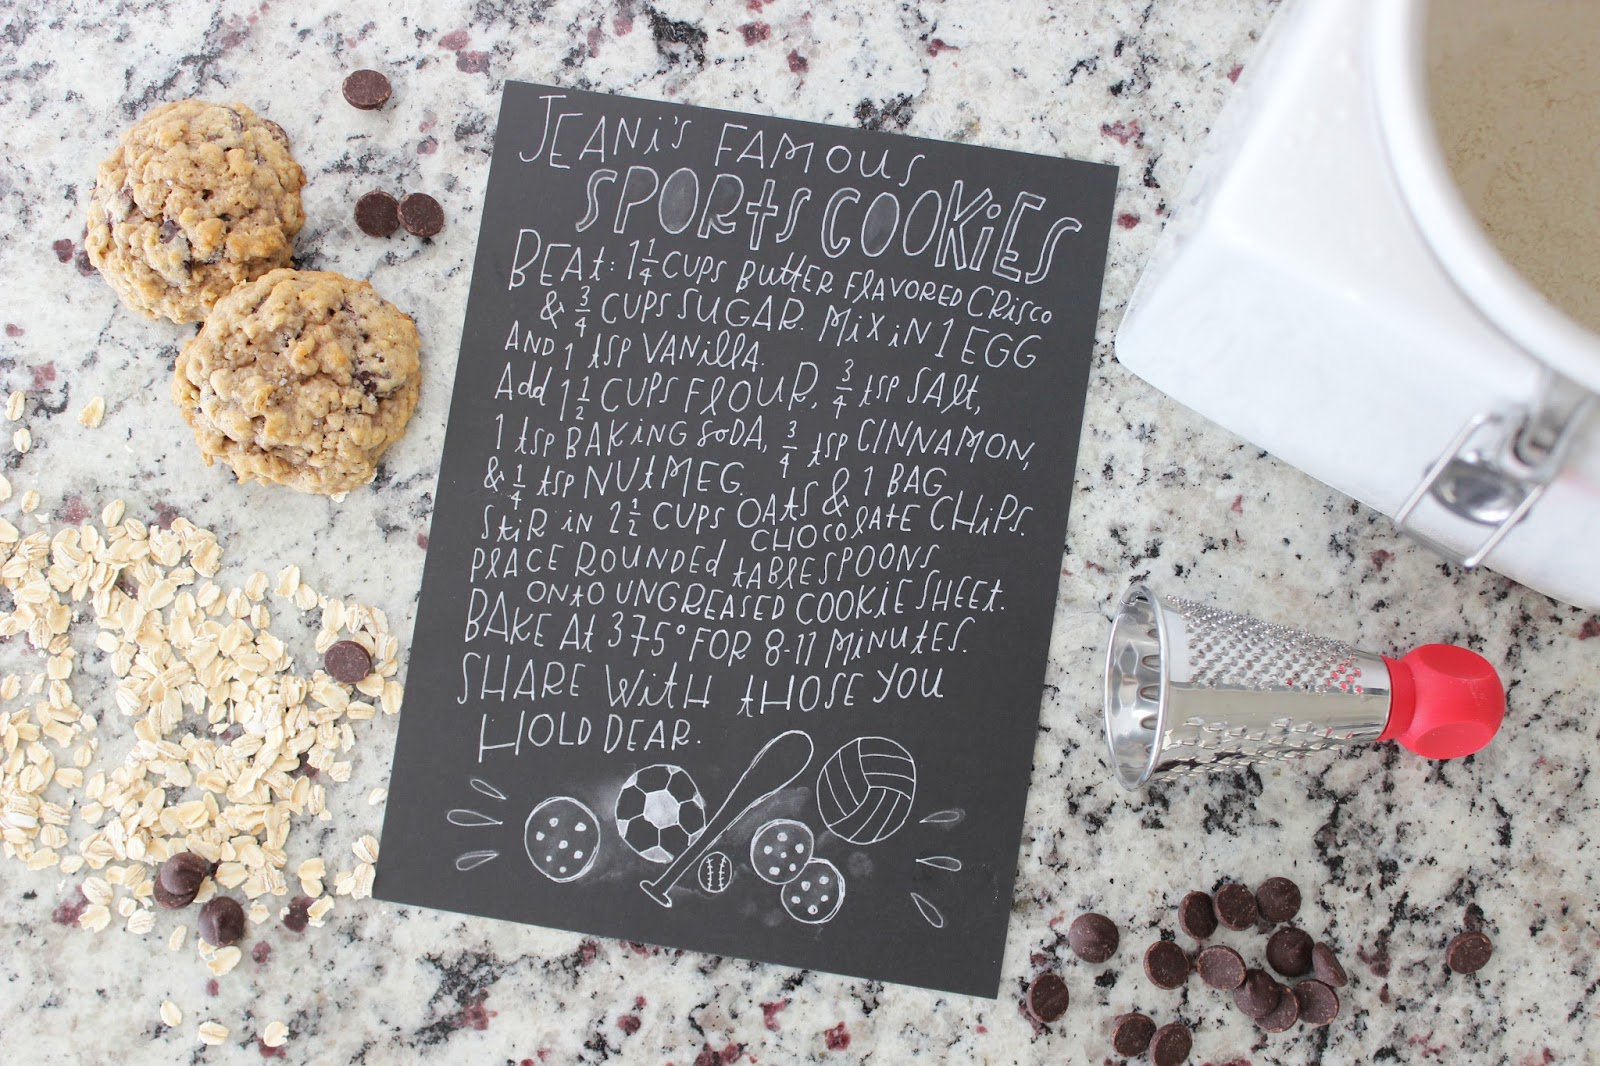
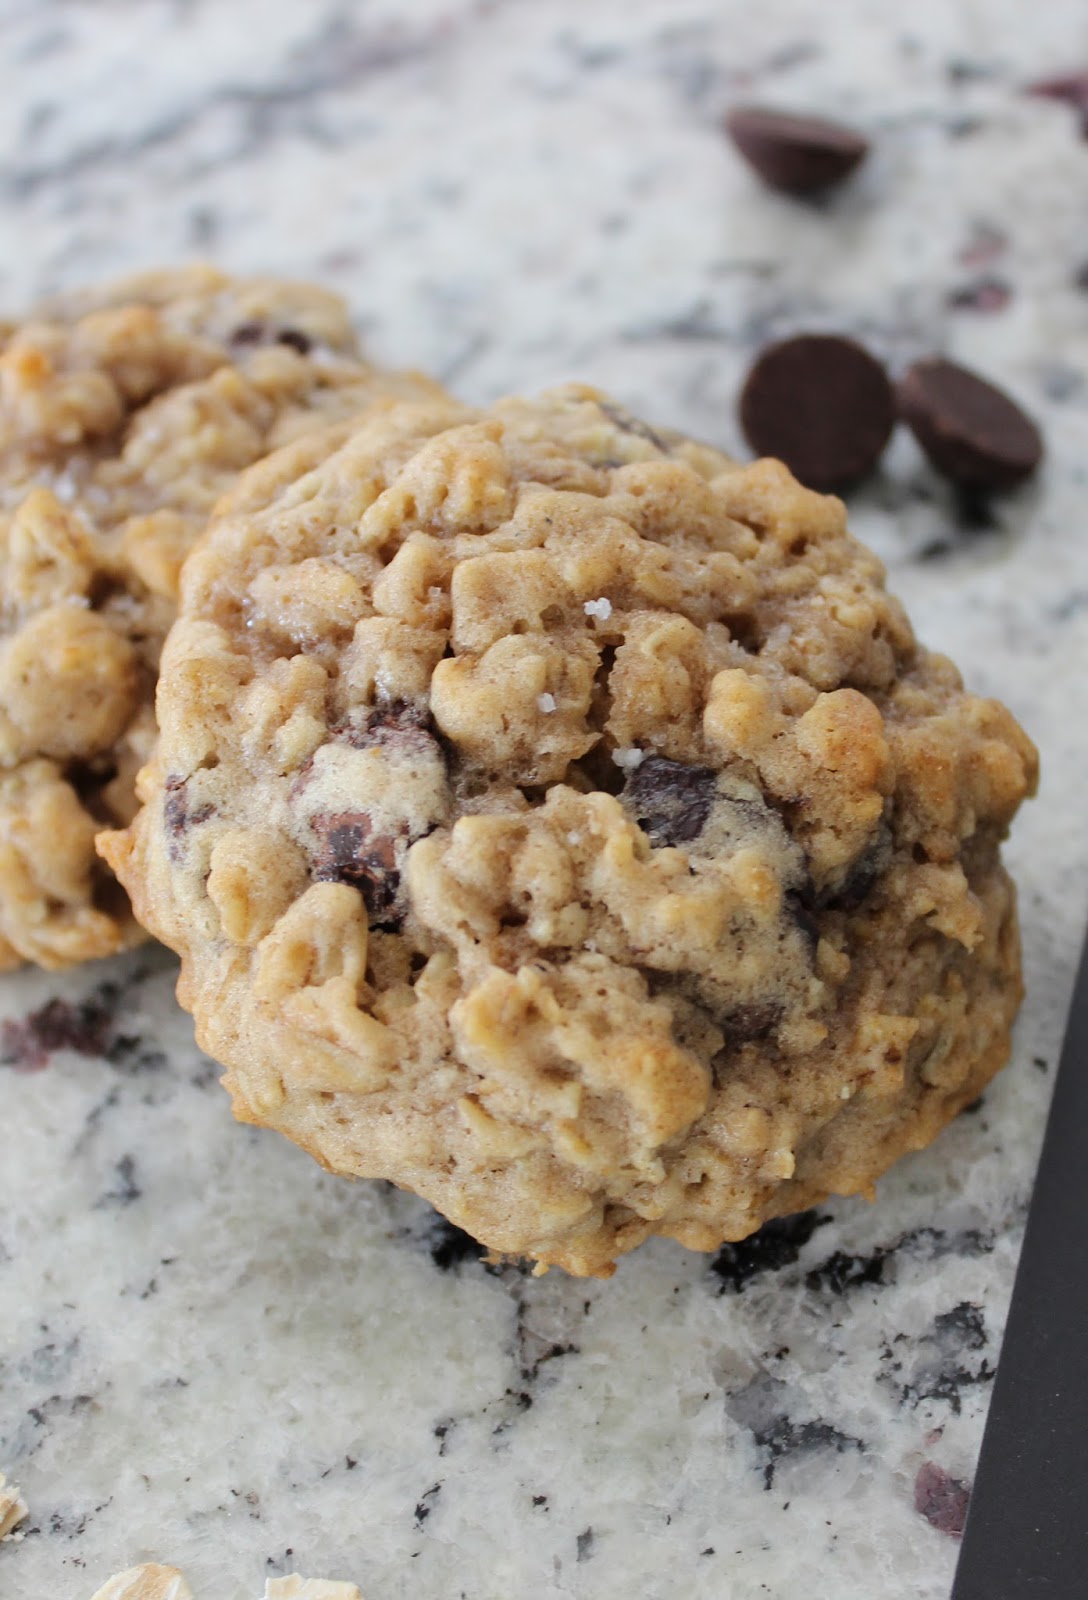
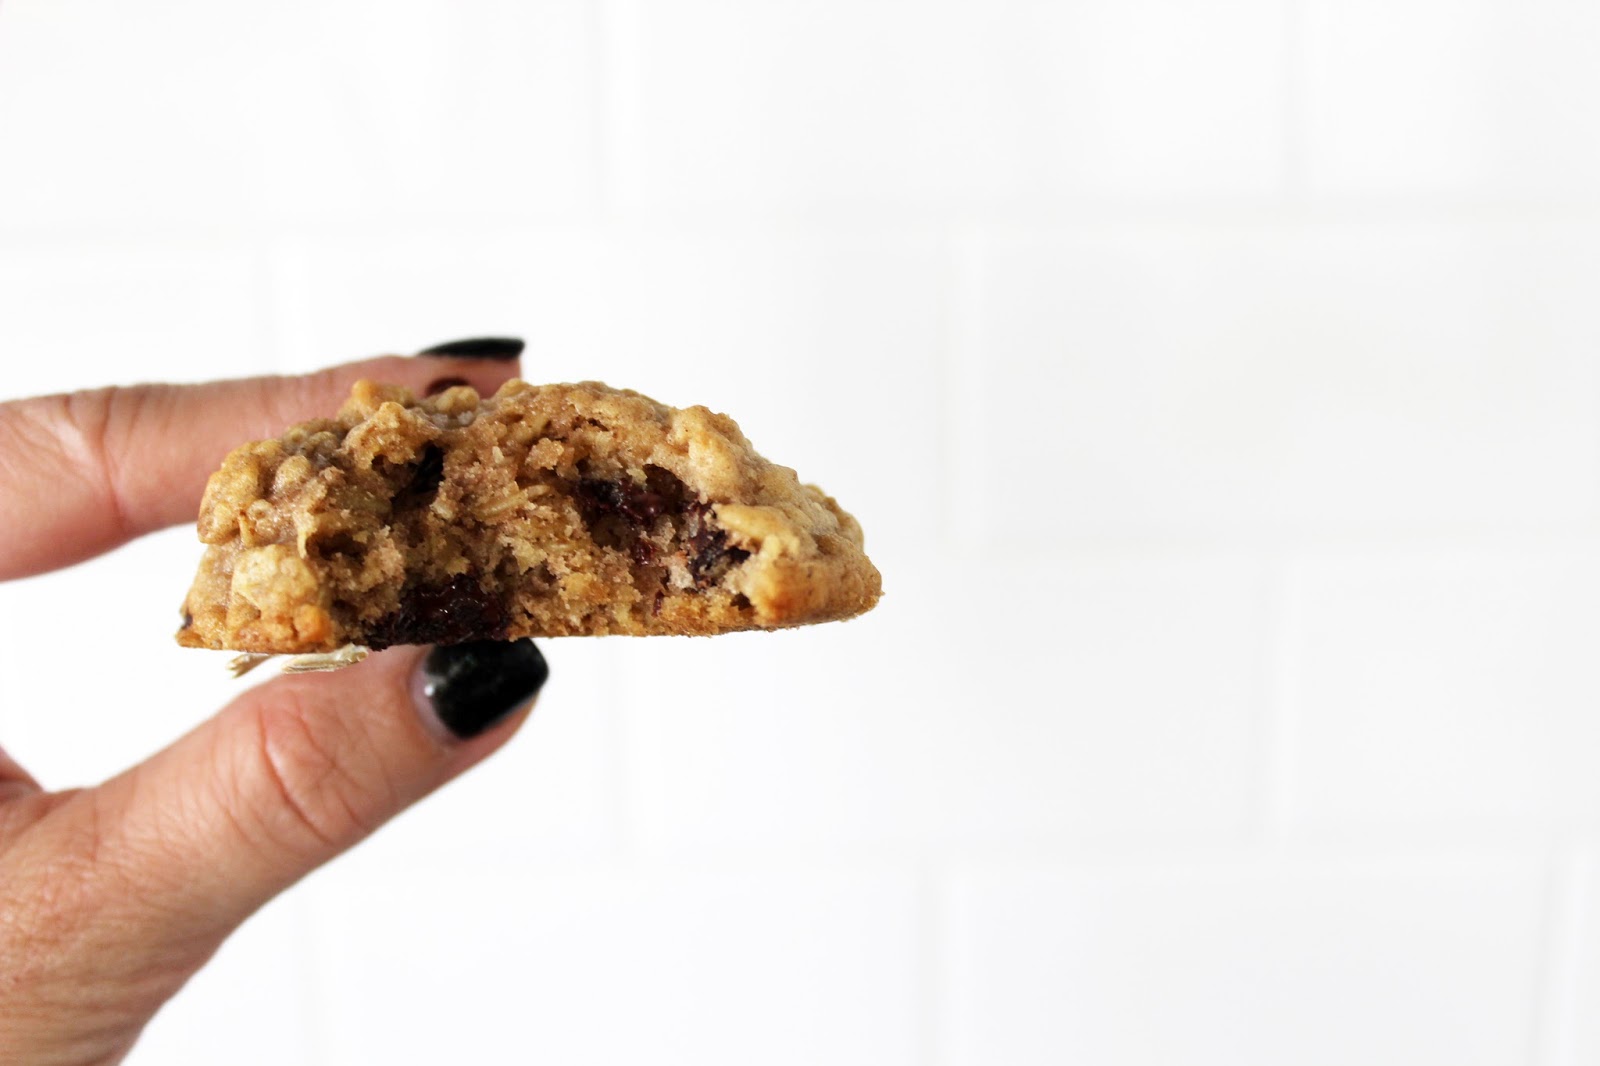
If you saw my last post on hand lettered recipes, you’ll know how much I’m obsessed with Alyssa Makes Something‘s work! This order was super special. My husband and I had a friend, Jeani Cooney, who passed away this year. She was the mother bear of his whole office and was beloved by every single person who knew her. At company softball games she would bring her famous “sports cookies” and they are SO GOOD. And I am a major cookie snob. Oats, chocolate chips, and spices of cinnamon and nutmeg are a surprising and delicious combination. The cookies are dense and chewy will make your whole house smell like Christmas. 
We purchased the digital option of the hand-lettered recipe and had it printed as a keepsake for the entire office to enjoy for the holidays. I made the cookies this holiday season with my five-year-old and told him all about Jeani and about how we will always thing of her when we make these sweet cookies. So happy to pass on our memories of her through this recipe.
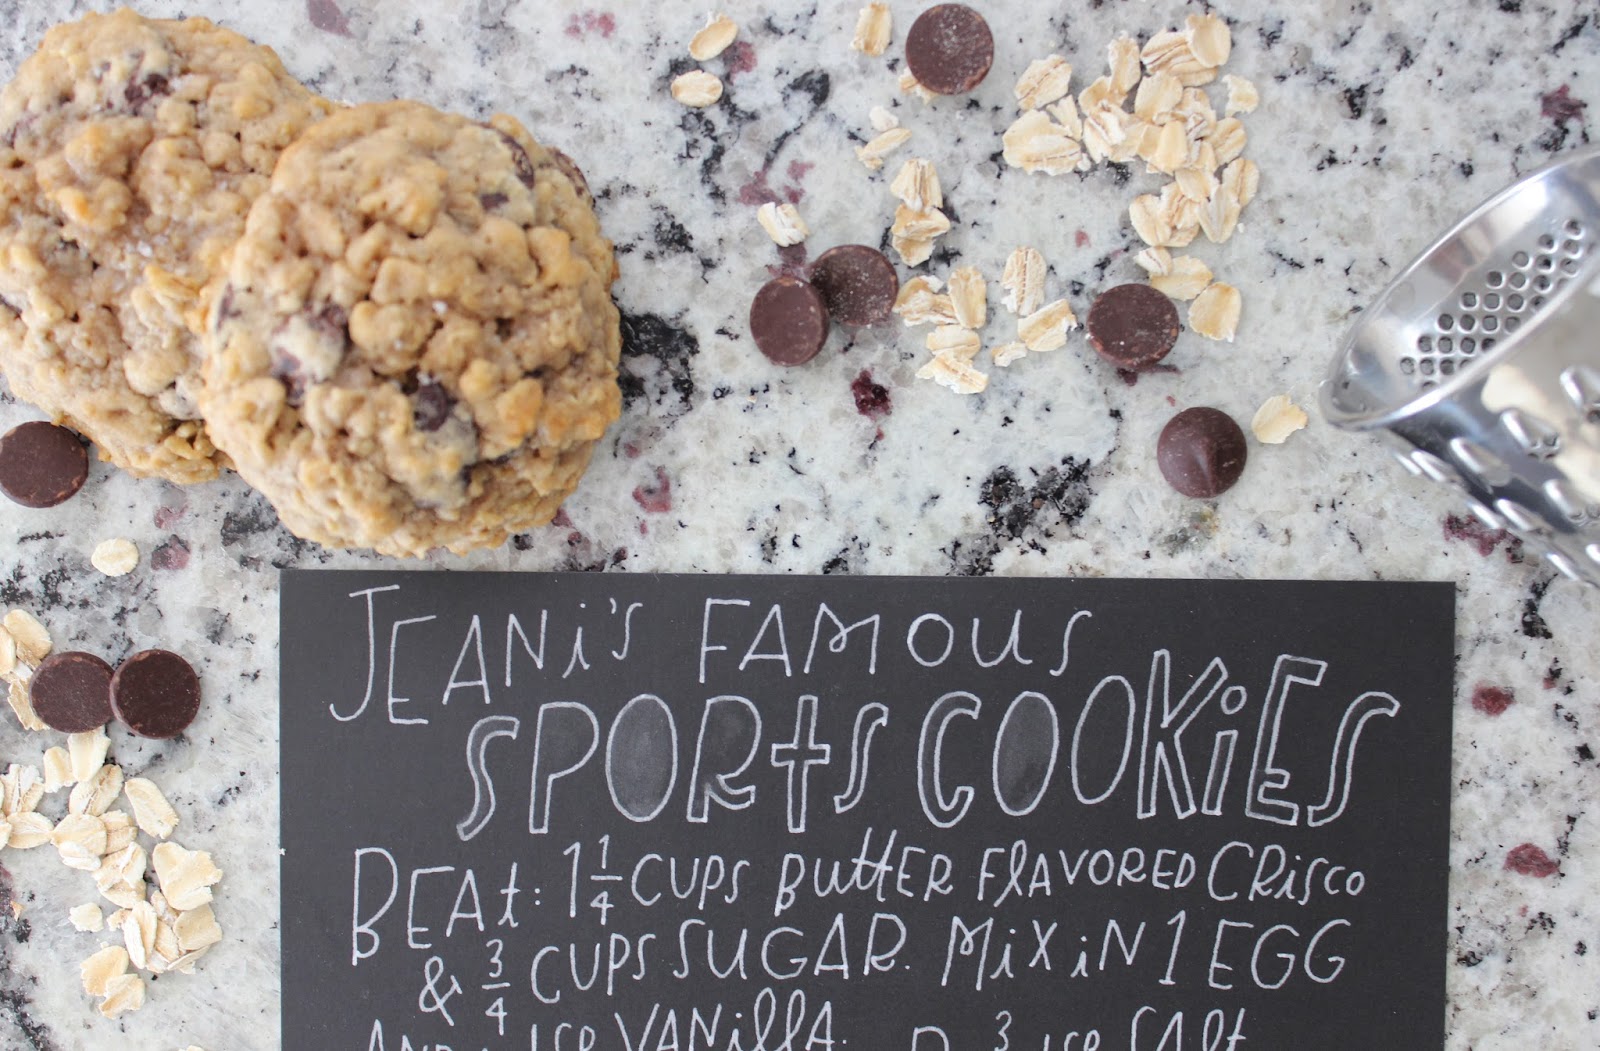
Download printable recipe hand lettered by Alyssa Makes Something right HERE.
* TIPS: All I had at the time was margarine and not Crisco, but it worked just as well. I use a little less nutmeg than Jeani calls for, and I also sprinkle the top of the baked cookies with a little fleur de sel or kosher salt right after taking them out of the oven. Like any cookie dough, it’s way better the next day and even better on the second or third day. We make the dough and just scoop out what we want to eat that day. Leave the rest in the fridge with saran wrap pressed against the dough.
Hope you can make these cookies and share them with the ones you love!
xo
-L

RECIPE: CHALLAH

This challah is the BEST. The recipe is actually by our close family friend, Carol. She made this challah for everyone at my wedding. Like every single table got one. Seriously. Not only do I love eating it, but I love the memories we have surrounding it. Friday nights with family and friends, eating this soft, chewy bread, spread with butter or dipped in honey. Every time my mom would make challah, the whole house was filled with the smell of baking bread! That’s probably my favorite smell in the whole world. That and my newborn babies. Equally delicious.
Full recipe below.
RECIPE:
Mom’s Famous Challah
INGREDIENTS
2 tsp honey
1 pkg yeast
1/2 c vegetable oil
1/4 c sugar
2 tsp salt
2 eggs
4 – 4 1/2 c bread flour
1 egg yolk
  1. Dissolve 1 tsp honey in 1/2 c. warm water in large mixing bowl which has been rinsed with hot water.
  2. Sprinkle yeast on top, mix, let stand 10 min.
    Stir in oil, 1/2 c. warm water, sugar, 1 tsp honey, salt, eggs, and 2 c. flour. Beat well.
  3. Stir in remaining 2 c. flour. Dough will be sticky. If it’s too sticky when you test it with your finger, add another 1/2 cup of flour.
  4. Knead 2-3 minutes with a bread hook attachment or turn onto a floured board and knead.
  5. Round up in greased bowl (I just use the same dough bowl and put vegetable oil all around it), cover, and let rise in a warm place for 2 hrs. It should have doubled in size. Gently put finger in top; if dough stays indented, it’s finished. If it bounces back, continue to rise.
  6. Punch down, cover, let rise again 45 min.
  7. Prep the counter with cooking spray.
  8. Divide the dough on the counter into three or four sections and loosely braid* (instructions below), tucking in the ends. Put the braided challah on a parchment paper-lined baking sheet.
  9. Cover loosely with saran wrap or a non-textured kitchen towel and let rise 20-30 minutes.
  10. Brush with beaten egg yolk and 1 tsp water.
  11. Bake 400 degrees 20 min or until it’s a good color on top. Cover the top with foil, put it back into the oven for 5-8 minutes until a toothpick in the center of a braid comes out clean.
  12. Immediately remove the challah from the tray and place on a wire rack so the bottom doesn’t continue to bake.
  13. Eat! Delicious with butter and/or honey. Perfect the next morning for french toast.
* Traditional challahs are braided in one row. On holidays or special occasions, it’s made into a circle.
* This video tutorial is super helpful! I usually do a 4 strand with a circle challah, but I LOVE the 5 strand technique for a straight loaf: CLICK HERE.
* Round challah braiding tutorial (above) CLICK HERE
* Four strand challah:
Divide dough into 4 equal sections
Leave the ends loose if you’re making this into a circle- you’ll weave these ends in at the end when you connect your circle
Take the strand at the left and weave it over-under-over the other three strands
Take the next strand at the left and do the same- weave it over-under-over the other three strands
Repeat until you can’t anymore, form it into a circle and connect the ends on each side- just sort of weave them together…as long as they stay together it’s fine! Just keep tucking the ends in.
xo, Leah

RECIPE: VEGETARIAN CHILI + CORNBREAD

This is my go-to meal for my family, especially on a chilly fall day! My kids gobble it up, though I think the cornbread might have something to do with it. You can really add in whatever vegetables (or meat) you have in the fridge and it’ll always taste good. There’s a variation of this that I LOVE if you scroll to the bottom- you cook the cornbread dough directly on top of the chili so that each bite has a layer of cornbread on it! YUM.
VEGETARIAN CHILI:
1-2 tbsp EVOO
1-2 tsp minced garlic
1 yellow onion
1 bell pepper
couple handfuls of chopped kale (optional)
soy meat crumbles / real meat
1 can green chilies
2 can diced tomatoes
1 can corn / 4 fresh ears of corn
2 can of your favorite beans (I use black beans and navy beans)
1 tbsp cumin
salt & pepper
Optional spices (leave out if you’re cooking for littles): 
cayenne, chili powder, crushed red pepper, chipotle chili powder
Toppings: 
plain greek yogurt / sour cream, shredded cheese, avocado, scallions
Serve with corn muffins – the Jiffy box is my fav! (1 box makes 6 muffins, and you’ll need 1 egg and 1/3 cup of milk)
Heat olive oil on medium and add in garlic, chopped onion and pepper, and saute 5 min.
Add in meat crumbles and saute 5 min. You may need to add a little more olive oil at this point.
Add in all cans and spices you’d like.
Bring up to a boil then reduce to simmer for about 30 minutes.
I like to put a handful of chopped kale at the bottom of my bowl, put the hot chili on top to steam, then pile on the toppings. When cooking for my whole family, I leave all of the spices out except for cumin, salt, and pepper so it’s not too spicy for my kids. I’ll add crushed red pepper to my own bowl.
VARIATION:
Spread cooked chili in an 11×13″ pan (as much as can fit leaving at least 1″ room on top. I like to freeze the rest! Make 2 boxes of Jiffy cornbread mix (you’ll need 2 eggs and 2/3 cup of milk) and spread the dough on top of the chili. Bake at 400 degrees for 12-15 minutes or until cornbread just starts to brown. Don’t overcook, or your cornbread will be dry! 
Enjoy!
-L

RECIPE: THE BEST EVER OATMEAL COOKIE

I am a cookie snob. And I’m telling you… these are the BEST oatmeal cookies ever. I guess that’s bragging, but I’ve gotta share the love with you! I’ve tried to copy them from my fav bakery, Wild Plum, in Pacific Grove, CA where my husband and I lived before moving to Nashville. I can’t quite get the consistency the same, but the flavors are all there. In fact, every year we visit and if they don’t have them out… I beg them to make a batch before I leave town, and they always do!
You can use any mix-ins you like with these oatmeal cookies! This is just a great base. I used bittersweet chocolate chips, dried apricots, and dried tart cherries. If I’m not using apricots and using chocolate chips or m&m’s instead, I like to omit the cinnamon. Just doesn’t have the right flavor profile!
Please make sure to note that you need to let the dough refrigerate for at least 2 hours. I know…torture. You can eat the dough in the meantime. The longer you leave the dough, the better the flavors will combine. 12 hours is great, 24 hours is better. If you bake after 1 or 2 hours they’ll taste great but the dough will spread out pretty thin. I’ll stop blabbing… scroll down for recipe!

RECIPE:

The Best Ever Oatmeal Cookie

Ingredients:

1 cup unsalted butter, room temp
3/4 cups granulated sugar
3/4 cups brown sugar
1 egg, room temp
1 tsp good vanilla
1 1/2 cups + 1/8 cup bread flour
1 1/2 cups old fashioned oats
1 tsp baking powder
1/2 tsp salt
1/2 tsp cinnamon (I omit if using only chocolate mix-ins or if I’m not adding apricots)
fleur de sel / kosher salt
Optional mix-ins:
dried apricots, quartered
dried tart cherries
bittersweet chocolate chips
m&m’s
(I use 1 cup apricots, 1/4 cherries, 1/4 chocolate chips)

Directions:

1. Mix together dry ingredients and mix-ins in a separate bowl. Set aside.
2. Beat butter and sugars for 5 minutes.
3. Add egg and mix until combined. Add vanilla.
4. Add dry ingredients until just mixed.
5. Press plastic wrap down directly on the dough then cover the bowl. Refrigerate for at least 2 hours
(12-24 hrs is best for flavor and texture!)
6. Scoop 2″ balls and pack firmly together*
7. Bake 350 degrees for 18-20 minutes until edges are browned and the tops are starting to brown.
8. Sprinkle tops with fleur de sel or kosher salt and let the cookies cool on the tray for 10 minutes.
Eaaaaaaat!
*Bake only what you want to eat at that time for the freshest experience! Dough keeps really well in the fridge for a week.
-L

RECIPE: MINI PEACH PIE

This was SO GOOD. If I do say so myself ::pats back, rubs belly::
I used a sugar cookie recipe for crust, because I’m intimidated by pie crusts. 
I made up the filling but it turned out delish! Anything using The Peach Truck peaches is bound to be good right?
RECIPE: MINI PEACH PIE
CRUST:
(Since this is a mini pie, you can 1. halve this crust recipe or 2. make the full recipe and make cookies out of the rest… you should obviously pick this second option)
1 lb butter
1 1/2 cup sugar
2 egg yolks
3 1/2 – 4 cups flour
1 tsp vanilla
1. Cream sugar and butter for about 5 minutes. 
2. Add egg yolks and vanilla. 
3. Slowly add flour until it doesn’t feel sticky anymore. 
4. Press saran wrap on dough and chill in the refrigerator for at least 30 min.
FILLING:
4 small ripe peaches, thinly sliced
1/2 tbsp brown sugar *if you like a sweeter pie, use 1 tbsp
1 tbsp granulated sugar
1/8 tsp orange zest & a smidge of juice
Pinch of salt
1. Mix the filling topping together.
2. Using floured hands, press about 1/2 of the chilled dough into pie pan – just wing it, it’s rustic. Try not to go too far out on the sides of the pie pan. Since it’s a cookie dough recipe, the dough will spread a bit when it bakes. 
3. Pour in the peach filling.
4. Top with a little extra dough in a pretty shape (and save the rest of the dough for cookies!). 
5. Chill the pie in the fridge while the oven preheats to 350.
6. Place pie on a baking sheet in case of the filling or dough bubbling over.
7. Bake at 350 degrees for around 15-25 minutes until crust is lightly brown and filling is bubbly. My oven bakes way faster so just keep an eye on your pie!
Enjoy!
-L 

MY DAILY DINNER – KALE QUINOA SALAD

You guys. This salad is SO good and SO filling. I’ve been craving it (not pregnant) every day for dinner and sometimes for brunch over eggs. Mmmmm. Kelly Simmons from yesterday’s nap time pilates post HERE created the yummiest healthiest salad, and she’s letting us share it with you! Hooray! Actually when she came over for the photo shoot, she brought the salad for me as a yummy post workout lunch. I mean… come on! 
Kelly tells me that’s a lot of siracha I added on there. I could have gone with more, but I’m a freak. I usually add a huge handful of extra steamed kale under the salad, and I’ll throw some grilled tofu on top for me and grilled chicken for the hubs. I make a recipe of this in a huge pyrex covered bowl and it lasts the week. I’m usually in a rush to eat with the kids so this is perfect for just scooping out over kale, microwaving, and dousing in siracha 🙂 Enjoooooy!
-L

Here’s Kelly (see her site and contact info HERE) with the recipe:

RECIPE:
KALE QUINOA SALAD
by Kelly Simmons
INGREDIENTS:
1.5 cups of uncooked quinoa
2-3 cups frozen broccoli
1 c frozen corn
1 c frozen edamame (shelled)
1 c shredded carrots 
1 c chopped raw green beens
2 cups of spinach or 2 cups shredded kale
Sliced almonds
1/2 cup of dried cranberries
Crumbled Feta
Optional toppings: Avocado, balsamic, teriyaki, siracha
-Prepare 1.5 cups of quinoa according to package directions, but boil in large pot, instead of small pot. Add salt to water. 
-While quinoa is cooking, put all of the veggies in a huge, microwave safe bowl (I like using a gigantic glass pyrex bowl, because I can then store the quinoa dish in it later).
-Cover the veggies with water, put in the microwave, cover with a micro-safe top and microwave on high for 10 minutes (or until all veggies are warm/blanched)
-When quinoa is finished, throw 2 cups of spinach or 2 cups shredded kale into pot with quinoa. Stir until greens are wilted. 
-Drain veggies. Put them back in the bowl. Add quinoa and wilted greens to veggies in the bowl. Add salt and pepper, a handful of sliced almonds, dried cranberries, feta, and avocado (optional). 
-Scoop out a serving size, and your favorite condiment (I’d suggest balsamic, teriyaki, hot sauce or siracha) and enjoy!
NOTES: 
– Depending on how much quinoa/veggies you want, you can reduce the amount of quinoa to 1 cup, or increase it to 2 cups. 
– I like a LOT of greens, so before I dish out my serving, I put torn kale in a microwave safe bowl, then add the quinoa mixture on top of the kale. I cover the bowl, microwave for 1-2 minutes until the kale has wilted. Then, I add the feta. 
– For protein, the quinoa mixture tastes great with eggs, chopped deli meat, chopped chicken or whatever you’d like to add. My favorite combination is scrambled egg whites with a few pieces of chopped deli turkey, with avacado and siracha.
Enjoy!

As a Certified Health Coach with the American Council on Exercise, Kelly helps people get well and stay well with tools and strategies for everyday healthy living.
To contact Kelly, visit kellysimmonshealth.com or email kellysimmonshealth@gmail.com
For fitness tips and healthful ideas, go to Facebook.com/KellySimmonsHealth, find her on instagram @kellysimmonshealth, and follow her on Twitter at @ksimmonshealth.

THE BEST CHOCOLATE CAKE!

Not to toot my own horn… but I’m going to. This cake is the BEST. It’s super m-o-i-s-t (don’t say it out loud) and super chocolaty in a not-to-sweet way. It’s pretty easy too!
My two cute helpers
Ari said “Happy Birthday, Daddy! Daddy, how old are you turning? Oh wow, 32? Does that mean you’re going to go bald soon?”

THE BEST CHOCOLATE CAKE EVER EVER EVER

Cake Recipe
Adapted from Ina Garten
Ingredients:
Butter, for greasing the pans
1 3/4 cups all-purpose flour, plus more for pans (I use bread flour)
2 cups sugar
3/4 cups (good!!) cocoa powder
2 teaspoons baking soda
1 teaspoon baking powder
1 teaspoon kosher salt
1 cup buttermilk, shaken
1/2 cup vegetable oil
2 extra-large eggs, room temperature
1 teaspoon (good) pure vanilla extract
1 cup freshly brewed hot coffee
Directions:
Preheat the oven to 350 degrees.
Butter two 8-inch x 2-inch round cake pans (or 11×13″ sheet pan)
Line with the bottom of the pan with parchment paper, then butter and flour (or use cocoa powder) the pans.
If you’re using a sheet pan, have the parchment paper hang off on either side so you’ll have little handles to pop it out when you’re ready to cool it.
  1. Sift the flour, sugar, cocoa, baking soda, baking powder, and salt into a large bowl and mix until combined. I actually don’t like using an electric mixer with this recipe- it’s too liquidy
  2. In a medium bowl, combine the buttermilk, oil, eggs, and vanilla.
  3. Slowly add the wet ingredients to the dry.
  4. Slowly add the coffee and stir just to combine, scraping the bottom of the bowl with a rubber spatula.
  5. Pour the batter into the prepared pans and bake 20-25 minutes. Always bake for a few minutes less if you’ve never made this recipe before, so you don’t over-bake the cakes. You can always add more time, you can’t take away. When you start to smell it, it’s probably almost done. Give the pan a jiggle when you start smelling it. Keep adding 3 minutes on your time and checking it again. It should jiggle like solid pudding, not like jello. It will keep baking in your pan after you take it out of the oven. If you want to really check it, put a knife in the middle and it should come off with a few crumbs.
  6. Cool in the pans for 5 minutes (unless you’ve over-baked it*). Run a knife around the edges so the cake will come out more easily. Turn the cake out onto a cooling rack lined with parchment paper and cool completely. It’s a gooey cake, so the parchment paper on the cooling rack is KEY. If you’re baking it in a sheet pan, you’ll already have the parchment paper to just pop off and place on the cooling rack.
*If you’ve accidentally over-baked your cake, pop it out of the cake pan immediately to cool on a cooling rack or it will keep baking. Scrape off any crispy parts. Combine 1/4 cup of milk with 1/4 tsp vanilla. Brush it all over the surface of the cake.

CHOCOLATE FROSTING RECIPE

Adapted from Magnolia Bakery
* If frosting a sheet cake, I like to halve the recipe since you’re not covering as much area. This frosting is rich!
Ingredients:
1 1/2 cups (3 sticks) unsalted butter, softened to room temp
2 tablespoons whole milk, room temp
12 ounces chocolate, melted and cooled (I use Ghiradelli 60% bittersweet chocolate)
1 pinch fleur de sel / sea salt / kosher salt
1 teaspoon (good!!) vanilla extract
2 1/4 cups sifted confectioners’ sugar
Directions:
  1. To melt the chocolate, place in a double boiler over simmering water on low heat for about 5-10 minutes. Add a pinch of sea salt. Stir occasionally until completely smooth and no pieces of chocolate remain.
  2. Remove from the heat and let cool for 5-15 minutes.
  3. In a large bowl, on the medium speed of an electric mixer, beat the butter until creamy, 3 minutes
  4. Add the milk carefully and beat until smooth
  5. Add the melted chocolate and beat for 2 minutes.
  6. Add the vanilla and beat for 3 minutes.
  7. Gradually add the sugar and beat on medium until fluffy.
Your frosting might be a little melty so keep your mixer and beater attachment out. Refrigerate the frosting for 30 min or until the frosting is more solid, then re-whip it with the mixer.

MARSHMALLOW FROSTING

This will make the cake taste like a s’mores!

* If frosting a sheet cake, I like to halve the recipe since you’re not covering as much area. This frosting is rich!

Whip together:

1 cup salted butter, room temp (or add 1/4 tsp salt to unsalted butter)

14 ounces Marshmallow Fluff

2 cups powdered sugar

1 teaspoon vanilla


PEANUT BUTTER FROSTING

Ina Garten
* If frosting a sheet cake, I like to halve the recipe since you’re not covering as much area. This frosting is rich!
Ingredients:
2 c powdered sugar
2 c creamy peanut butter
10 tbsp butter, room temp
1 tsp vanilla
1/2 tsp salt
2/3 c heavy cream
Directions:
Beat all ingredients except the cream in a mixer on low until creamy. Add the cream and beat on high until fluffy and smooth.


You are going to LOVE this!! Enjoy!
-L

MY GO-TO YELLOW CAKE RECIPE

This cake is m-o-i-s-t, slightly dense but light, buttery, and absolutely delicious. The frosting is my friend, Lori’s, go-to vanilla frosting. It’s sweet but not disgustingly so. Nice and fluffy. I’ve also used cream cheese frosting and it’s perfect and not too sweet. So simple, very few ingredients, in fact I bet you have all of the ingredients in your kitchen right now!
Scroll down for the recipe. Make sure to read the notes!
NOTES:
*If you want your cake to taste fresh and delicious, use fresh and delicious ingredients. I know that sounds like common sense- but seriously- use GOOD and real (read: expensive) vanilla extract, use the best butter, eggs, milk, etc. It truly makes a difference.
*UNDER BAKE this cake. My rule of thumb is set the timer 5-10 minutes under what the recipe says and keep testing every 2-3 minutes. The cake should be firm with a little JIGGLE when you gently shake the pan. It will KEEP COOKING in the pan!! Put a knife in the middle and it should come out with crumbs on it- NOT clean. Clean means you probably over baked it. But still eat it. Obviously.
RECIPE:
GO-TO YELLOW CAKE
INGREDIENTS:
1 cup unsalted butter, room temp
2 cups granulated sugar
4 eggs, room temp
2 3/4 cups all purpose flour
2 1/4 tsp baking powder
1/2 tsp salt
1 cup milk (you can sub half or all with buttermilk- YUM)
2 tbsp good vanilla extract
Milk soak: 1/4 cup milk + 1 tsp vanilla


1. Preheat oven to 350 degrees.
2. Butter and flour pans (I used 2- 9″ rounds).
3. Sift dry ingredients and set aside.
4. Beat butter for 3 minutes. Add sugar and beat another 3 minutes. Add eggs one at a time and beat thoroughly.
5. Add flour mixture on lowest speed one cup at a time, alternating with milk. End with the flour mixture. Add vanilla and mix well. Pour into prepared cake pans.
6. Bake about 20 minutes until a knife inserted in the center comes out with a few crumbs. DO NOT over bake- the secret to the yummiest cakes! The cake should jiggle a tiny bit in the middle.
7. Cool in pans on wire rack for 5 minutes only, then flip out on wire rack and cool completely.
8. Mix milk soak together and brush over the surface of the cake before frosting.
*adapted from THIS recipe
VANILLA FROSTING
INGREDIENTS:
1 cup unsalted butter, room temp
1/4 tsp salt
1 (32 oz) package powdered sugar
6-7 tbsp milk
1 tbsp good vanilla extract
1. Beat butter and salt on medium speed 1-2 minutes until creamy
2. Gradually add powdered sugar alternating with milk at low speed til blended and smooth
3. Mix in vanilla and food coloring if adding. Whip until desired fluffiness.
*adapted from Southern Living Magazine
Moral of the story: bake a cake for no reason.
-L

HOUSE WARMING IDEAS – FREE PRINTABLES

Our awesome friends, Drew and Kelly, just moved from New York to Nashville this month (everyone’s doing it, come on!), and I wanted to give them something special to welcome them to the South. If you need something easy and thoughtful, I designed some housewarming notes for recommendations around town to fill out. (Scroll down for download link.)
You could go all out and do a big basket of goodies with it, share homemade cookies, or just give something simple but much appreciated like a bottle of wine. 
I ended up getting Drew and Kelly THIS AHeirloom Tennessee cutting board I’m obsessed with! You can get a star, heart, or home shape on the city where you live. The perfect welcome to the state. They have states, countries, custom items, and I’m drooling over these gorgeous geo cutting boards. 
One of my fav house warming baskets/bucket I did for friends moving from California to Nashville: healthy snacks, homemade granola, yummy smelling soap, and a subscription to Nashville Magazine.
 I also baked them healthy vegan banana bread (recipe here) – SERIOUSLY delicious! I knoooooow it’s healthy and vegan, but for real… it’s insanely m-o-i-s-t and delish! Plus I added bittersweet chocolate chips, so how bad could it be? 
(Normally I like to bake yummy fatty cookies, but if you couldn’t tell… these people are health nuts!)
I wrapped the banana bread in saran wrap first, then wrapped that in a recycled paper grocery bag and tied with twine. 

Download the housewarming notes HERE and HERE.
Welcome to Nashville, y’all! 
I can type that… just not say it. That’s the midwesterner in me!
-L

THE ULTIMATE SUMMER SALAD

Hey you guys!! Hope you had a fantastic Memorial Day weekend! We sure did! It is quite surreal to sit down and breathe in just what it means to have FREEDOM. It sounds so cliche to say, but I truly am grateful for the men and women that fight for our freedoms and put their lives on the line daily! Their wives, husbands, kids and parents are just as much of a hero as they are themselves. Thank you thank you!!
 I wanted to share my new favorite salad recipe. I threw this together for a party we attended yesterday and amazed myself. I am not super adventurous with salads, but definitely want to start trying to be. You guys!!!! This salad….. you will be SO happy you gave it a try! It has the sweet fruity flavor mixed with the spice of onion and tomatoes. Love love love it!!! It was a hit at the party, and I must add that I even had a helping at breakfast this morning….what??? 

What you will need….
1 16 oz. pkg. of Spring mix salad
1/2 of a small seedless watermelon
1/4 of a red onion
1 16 oz. pkg. fresh strawberries
1 4 oz. pkg. of crumbled goat cheese 
half of a 10.5 oz pkg. of golden snacking tomatoes
Dressing of your choice! 
( I prefer a balsamic vinaigrette and the fuji apple dressing from Panera was a hit at the party. You could absolutely just do a small pour of EVOO and toss the salad and love it just as much. The fruit adds so much flavor!!)
How I made it….
** I made mine for a party, so it is pretty large! Feel free to just layer these things in a much smaller bowl with smaller portions for your own personal salad!**
In a large bowl, layer spring mix, watermelon, tomatoes, onion, strawberries. Do this THREE times. Then, on the top of the salad, add all of the goat cheese! It will work its way down to the rest of the salad. ENJOOOOY!
-J
Oh…. and here we are with our littles over the weekend!!
^^ after church on Sunday! -J ^^
^^ Digging for Roly Polies in the garden! -L ^^

THE ACCIDENTALLY AMAZING GLUTEN – FREE LEMON LOAF

Leah is definitely “the baker” between the two of us. I just fake it. I will get recipes from friends when they bake something I love, but there is no adding a little of this or that for me. I follow the recipe step by step!
I recently tried this lemon loaf that a friend made. I loved the texture and I loved how it wasn’t on the extreme side with the lemon flavor ( I am NOT a lemon fan). It is also gluten free!!! Something I am not necessarily trying to be either. However, when its good…. its good. I dare you to try this even if you  roll your eyes at gluten-free eaters. 😉 You can certainly choose a regular cake mix instead of a gluten – free one if you desire. We went to dinner at our friends’ house last night, and I baked the gluten – free recipe for dessert. I made substitutions where my friend did. It was so delish!! This would be a great brunch food for Mothers’ Day also!! I know my mom loves this.

**If you truly want it to be reminiscent of the Starbucks lemon loaf, then I recommend using lemon pudding instead of vanilla**
Recipe:
1 box cake mix ( I used gluten – free yellow)
4 eggs
1/2 c milk
1 box vanilla or lemon pudding mix ( I used vanilla)
1/2 c vegetable oil
8 oz. sour cream ( or you can substitute for mayo, which is what I used and it was still amazing!)
6 T lemon juice
Icing:
3 c powdered sugar 
4 T lemon juice ( I used less and added milk in its place – 2 T lemon juice & 2 T milk)
Preheat oven to 350 degrees. Bake for 50 minutes ( no less)
Are there any amazing gluten – free desserts that we MUST try?! Send them our way!!!
Enjoy!!
-J

WEEKEND RECIPE: CORNFLAKE MARSHMALLOW CHOCOLATE CHIP COOKIES

We had a huge box of Cornflakes that nobody was eating, so I made Momofuku’s Cornflake Marshmallow Chocolate Chip Cookies. That’s a legitimate excuse right? Crunchy and gooey at the same time, delightfully buttery, not too sweet, and a touch salty. These. Are. So. Good.
If you haven’t been to Momofuku Milk Bar in Manhattan, you simply must. But of course you can get their cookbook filled with incredible recipes. I added sprinkles, because according to 3-year-olds… okay and 30-year-olds, sprinkles make everything taste better! 
Here’s a close up of these babies… drool

I baked these in a cake pan because for some reason mine always turn out super flat and crunchy when I make them as cookies. Anyone else have this issue? 
Here’s the magic ingredient- the cornflake crunch! I can’t even… I mean… 
RECIPE
CORNFLAKE CHOCOLATE CHIP MARSHMALLOW COOKIES
Ingredients:
3 cups Cornflake Crunch (see below)
2 sticks butter, room temp
1 1/4 cups sugar
2/3 cup tightly packed light brown sugar
1 egg
1/2 tsp vanilla
1 1/2 cups flour (I made with gluten-free flour BTW!)
1/2 tsp baking powder
1/4 tsp baking soda
1 1/4 tsp kosher salt
2/3 cup chocolate chips (I always use Ghiradelli 60% bittersweet chocolate chips. None better)
1 1/4 cups mini marshmallows
1. Combine butter and sugars in the bowl of a stand mixer with paddle attachment and cream together on medium-high for 3 minutes. Scrape down bowl and add egg and vanilla. Beat 8 minutes. 
2. Reduce mixer to low and add flour, baking powder, baking soda, and salt. Mix until just incorporated- 1 minute. 
3. Stir in cornflake crunch chocolate chips, and marshmallows until just incorporated- 30 seconds. 
4. Press into cake pan and refrigerate for at least an hour. These will go everywhere if you don’t. Eat the dough in the mean time if you can’t wait 🙂
5. Heat oven to 375 degrees. Bake about 20 minutes until the top is golden brown. The middle will be slightly jiggly but that’s okay! Cool completely in the pan before cutting. 
CORNFLAKE CRUNCH (makes 4 cups)
Ingredients:
5 cups cornflakes
1/2 cup milk powder
3 tablespoons sugar 
1 tsp kosher salt
9 tablespoons butter, melted
1. Heat the oven to 275 degrees
2. Pour cornflakes in a medium bowl and crush them with your hands to one-quarter of their original size. Add milk powder, sugar, and salt and toss to mix. Add the melted butter and toss to coat. 
3. Spread on parchment-lined sheet pan and bake 20 minutes, at which point they should look toasted and smell buttery.
4. Cool completely before storing or using in a recipe. Store in an airtight container and keep in the fridge or freezer to keep fresh for a month for your snacking pleasure!
Have a buttery wonderful weekend!
-L