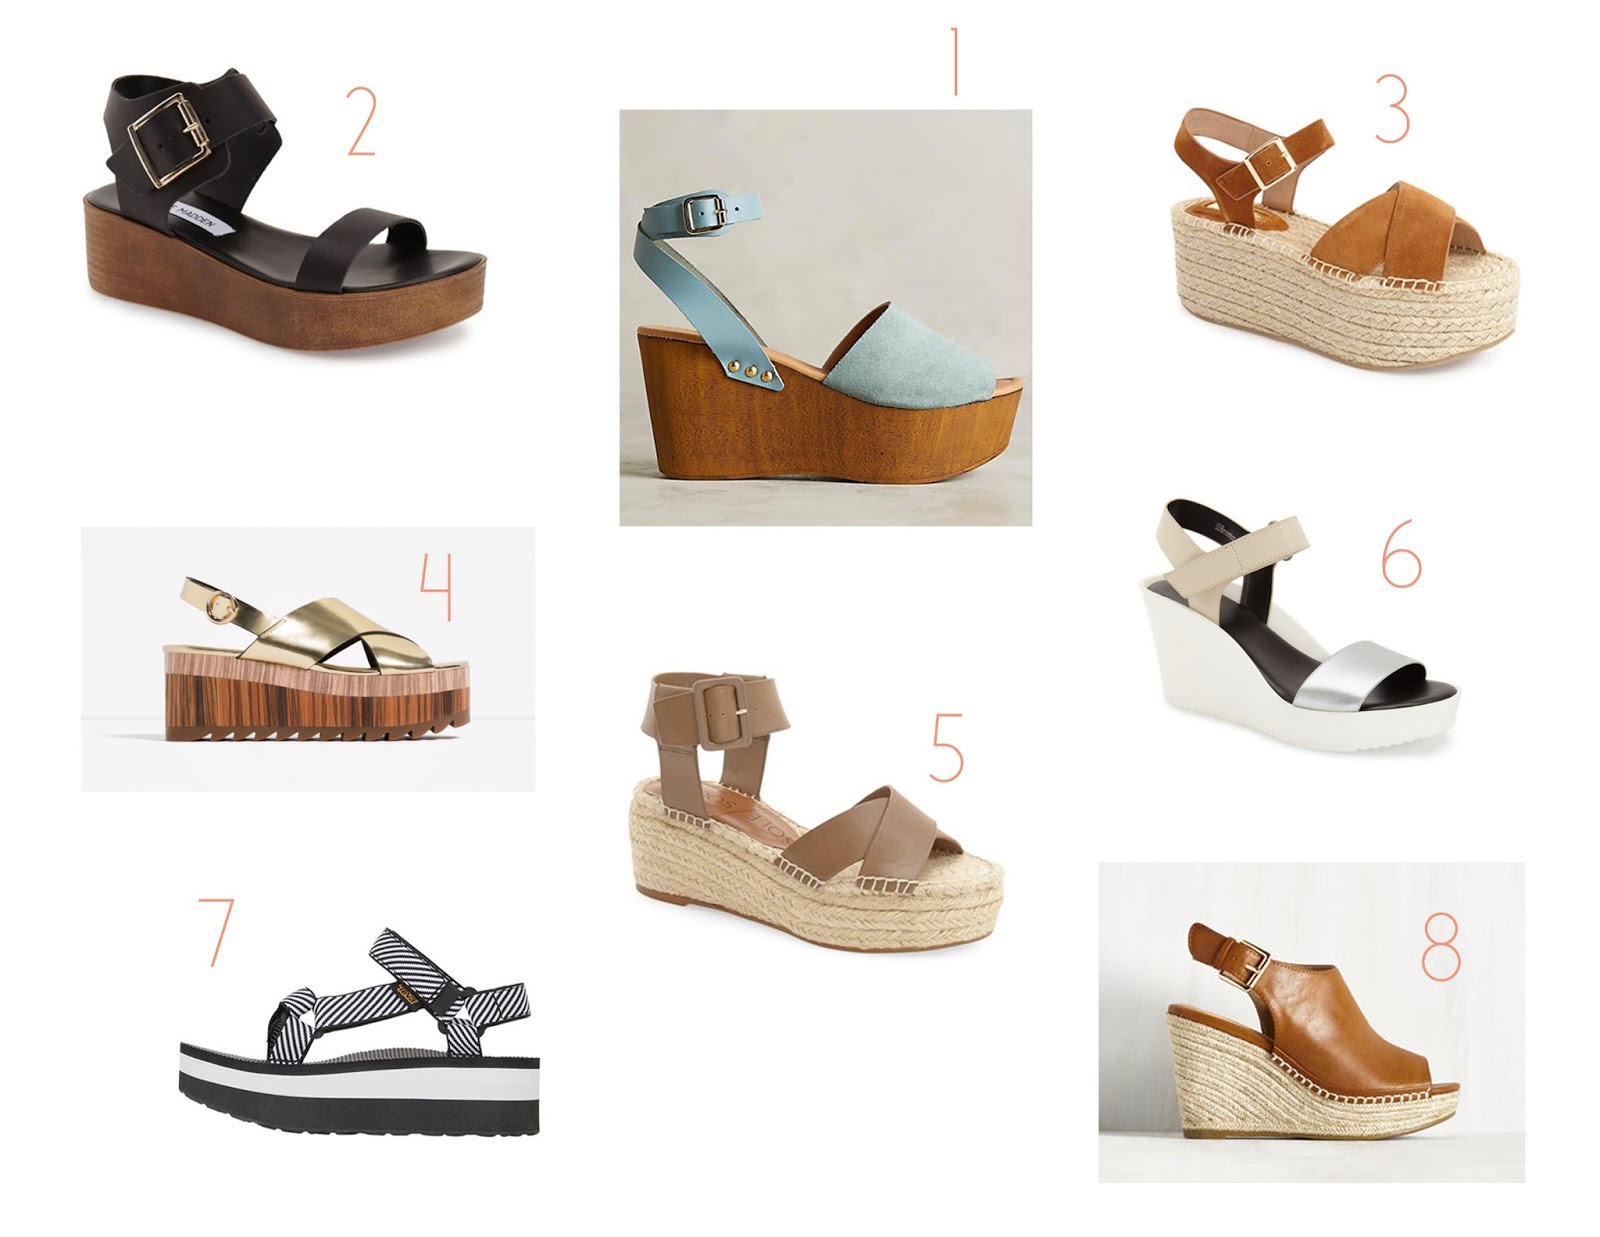
KID’S EASTER TABLESCAPE | UNDER $20

Hey guys! Happy Friday! We are ending the week with a suuuuuuper simple kids’ table setting for Easter brunch. It is usually a gloomy day on Easter, and the lighting for this table shoot is no different. ha! It has been raining here in Nashville, and that beautiful natural lighting is hiding out.
We got most everything you see here at…. wait for it…. Target!! Surprise, right? Honestly, when I came across these UUUUHMAAAZING paper plates that Design Love Fest did for Cheeky Home, I knew I had to do something with them. We scored in the dollar section, which is always so great for projects like this. Kids tend to destroy things, so you want the table to look great, but don’t want to break the bank. Of course we had to add in some of our custom tattoos (here in our Etsy shop) because they are just so fun! My daughter wanted to put all of these on, and didn’t understand that we needed them for the table as well. She is a huge supporter of the biz! 😉
What are your Easter plans? We always do our church service then head to brunch as a family. It is truly one of my MOST favorite holidays. I love getting the family dressed up, eating good food and just enjoying such a happy day.

xo!

ROOM TOUR: LAUNDRY ROOM + MINTED ART

I finally finished my laundry room!! This project was my baby. The project that my husband definitely didn’t understand at first but who now thinks it’s the best room in the house! Anyone else feel like they spend half of their life in the laundry room? Well I did, and mine was a sparse, sad, blah, beige room with no window. Luckily I was able to bring the outdoors in with a partnership with MINTED! Their art became my own little window. 
Scroll down for all links

We LOVE Minted! Their art is curated from independent artists which is SO cool. Minted prints the art in every size and even frames it for you. It’s incredibly easy to pick your art. You can search by color, style, medium, theme, etc. and make an art board to just try out the pieces you like together. I wanted cheery pieces with bright greens, pinks, and yellows. A mix of photography, paint, and prints give the gallery wall an eclectic look, but the color palette keeps it cohesive.


I chose standard art paper, and I opted to have the artists’ signatures on the prints. The frames are all Natural Premium Wood to give the room a little warmth.
 I got the cabinets and countertop from The Home Depot, who installed it as well. If there’s one thing we’re not, it’s handy. I wanted a totally clear counter for folding and drying but for some ease I have one basket for detergent and dryer sheets. Everything else is stowed away in the cabinets. 
 This was a robe/coat hanger that was peeeeerfect for the ironing board and other drying items! It’s always good to think outside the box and look for pieces that have multiple uses.
 I had my (very confused) handyman instal an L-shaped pipe in the wall to use as hanging space. It gives it an industrial look that I wanted and takes up no space so that I have full hanging for dresses, shirts, sheets, etc.
 I got these soft baskets to transport clean clothes. I’m a little OCD and using the same basket for dirty and clean clothes is not an option. No no no no no. Scroll down to see where the dirty clothes hide!
The sink is clutch in a laundry room. Eventually I’d like to get a sprayer faucet…more OCD tendencies here.
 One of my favorite parts of the laundry room are the hidden laundry baskets in the drawers! It is not okay in my book to mix dirty and clean clothes in the same basket. #issues. I had my handy man convert two cabinets closest to the mudroom to pull-out drawers. I found narrow trash bins for the dirty clothes! Even my kids like to put their clothes in there.. they think the secret bins are cool. Anything to help out, right?
LINKS:
Rug- sold out but similar here
MINTED ART LINKS left to right:
Landscape, 11 x 11″
Abstract, 18 x 24″
Glass Bottles, 11 x 14″
Hexagons, 11 x 14″
Green Woodshed, 16 x 16″
My little “window” in my laundry room! If anyone needs me, I’ll be hiding in here 🙂
xo
-L

JT + JIMMY PALENTINE CARD (FREE PRINTABLE)

Probably the most epic and most adorable bromance of our time: Justin Timberlake and Jimmy Fallon. Is there anything better than watching them just laugh hysterically with each other? Ugh. so cute.
Here’s one last Valentine’s Day free printable for your fav PALentine!
 1. Download the the card HERE.
2. Print on card stock for best results.
3. Cut using a PAPER CUTTER for perfect lines.
Download our other class Valentine’s Day designs below by clicking on the titles:

RECIPE: BEST EVER CHOCOLATE CHIP COOKIE

We all have our favorite chocolate chip cookie recipe that is our go-to. Jenni’s is soft and chewy with a brown sugar flavor, while mine is salty, chewy, and crisp on the edges. I have this dough in my fridge most of the time, just ready to scoop out what we want at the moment. So good for those late night cravings or for your kids after school treat!
I’ve made these with lots of variations as far as add-ins. These are perfect with just bittersweet chocolate chips, but I also love to add dried cherries… trust me on this one. So. Freaking. Good.
Although this has the most amazing flavor, you really need to let the dough refrigerate for at least 24 hours. Sorry. But it makes a huge difference. We’ve found that three days has the best flavor.
RECIPE and super helpful TIPS below!
PS. the towel is from my sweet friend’s company Earthin’ Out!
RECIPE:
Chocolate Chip Cookies
INGREDIENTS:
*Need to refrigerate at least 24 hours
– 2 c. minus 2 tbsp cake flour
– 1 2/3 c. bread flour
– 1 1/4 tsp baking soda
– 1 1/2 tsp baking powder
– 1 1/2 tsp kosher salt
– 2 1/2 sticks of unsalted butter, room temp
– 1 1/4 c. light brown sugar
– 1 c. plus 2 tbsp granulated sugar
– 2 eggs, room temp
– 2 tsp vanilla
– 1 c. bittersweet chocolate chips
– additional mix-ins if you want! The cookies pictured have crushed Heath bar pieces and chocolate chips.
– a pinch of fleur de sel or kosher salt for tops of cookies
INSTRUCTIONS
– cream butter and sugar for 5 minutes
– combine all dry ingredients besides mix-ins while you wait
– add in eggs one at a time to the butter and sugar, mix well in between
– add vanilla
– slowly add flour mixture
– when there’s only a little bit of flour left, add in the toppings and mix until JUST combined. Do not overmix at this point
– press saran wrap on the dough in the bowl and refrigerate at least 24 hours for best flavor (more in tips)
– when ready to bake, set oven to 350. Using a large ice cream scoop, scoop out dough onto a parchment paper lined baking sheet
– bake 16-18 minutes or until edges are golden and the center looks light
– sprinkle immediately with a little kosher salt or fleur de sel
– let cool on the tray for about 5 minutes, then slide the parchment paper off to cool completely… or eat warm… you’re welcome.
TIPS:
* Though the dough tastes amazing RIGHT away, you need to refrigerate for at least 24 hours for the best flavor when you bake. Three days is best! Just trust me!!
* Only scoop out what you want to eat! We keep the bowl of dough in the fridge with saran wrap pressed down on top of the dough. Just scoop out and bake what you want to eat at the moment. No need to let the dough come to room temp first.
* If you bake all the cookies and don’t eat right away, freeze them immediately to keep fresh. These are amazing fresh out of the oven, but get stale VERY quickly.
* Bittersweet chocolate chips are best with this in my opinion. The cookie is already sweet- it doesn’t need sugary sweet chocolate in there too. I love 60% Ghirardelli.
* A good cookie starts with good ingredients. Use GOOD vanilla, good butter, etc. It only makes sense right? What you put in, you get out.
* A sprinkling of fleur de sel on top after the cookies finished baking really brings out the chocolate flavor.
Enjoy!
-L

HEAD TO TOE | PLAYING IT GREY

We hope you guys had a fabulous weekend! Mine was packed full of birthday celebrations. Unlike last weekend, we enjoyed some Spring-like weather this weekend. I decided to break out my grey suede heels with a simple sheer button up. The wind was cray cray hence me holding my hair in every. single. pic. Also, I am SO obsessed with this crossbody bag that I scored at none other than Target. I just couldn’t resist the nude color and the tassels…. gets me every time. 

suede heels – sold out, but almost identical here | denim | shirt – sold out, but love this one | bag | rings – no longer available. 

GILMORE GIRLS VALENTINES (FREE PRINTABLE)

Anyone else marathon Gilmore Girls on Netflix? I just finished and pretty much cannot function. I miss my friends! All I can do is drink coffee and pretend I’m at Luke’s. All my Galentines (and my Valentine) will be getting these cards! 
1. Download the RORY or the LUKE version.
2. Print on card stock for best results.
3. Cut using a paper cutter for perfect lines.
4. Count the days until the Gilmore Girls reunion comes out!
-L
Download our other Valentine’s Day designs below by clicking on the titles:

VALENTINE’S DAY | MEN’S GIFT GUIDE

Travel Kit | Boost your man’s ego on the daily!
Prints | Leah and I are both married to Star Wars fanatics! These prints would look great in an office or media room.
Beard Maintenance Set | Our men need new beard care. We are hoping they might enjoy this peppermint scent.
 Cocktail Ice mold | For the cocktail lover in your life that likes an impressive looking glass.
Sneakers | duh! Anyone can wear these, no matter their style.
Beanie | For the baldy in your life. (raising my hand)
Mug | Obsessed! I may need to purchase a his and hers version. My husband wouldn’t even be mad if I woke up to Justin’s “mug” on my mug. Can we say Man Crush?
Marble Controller Skin | This is a game controller that would actually look sleek sitting out in your living room if need be.  MUCH cheaper version here. Great ratings also.
Wireless Speaker | Both of our guys work in the music industry, so music on repeat is a daily thing for us. How cool is this speaker?
Tee |  Fries… all day err day.
XO!

YODA BEST CLASS VALENTINES (FREE PRINTABLE)

 If your house is anything like mine, it’s Star Wars everything all the time! We found these mini glow sticks (light sabers!) and Yoda key chains at the Target dollar spot. You could really use any Yoda toy or our Yoda tattoos HERE.
Simply punch two holes for a light saber (glow stick) and thread through. Or if you’re tying a key chain, punch two small holes close to each other and use string to tie it on.
Download the Yoda Best free printable HERE
Cut using our favorite cutting board HERE
Glow sticks HERE
Find our Yoda tattoos HERE.

HEAD TO TOE | ALL ABOUT THE FUR

Happy Monday friends! Tennessee weather really showed off over the weekend. We got several inches of snow, which is such a big deal for us. Considering that it felt like Spring during Christmas this past year, we gladly welcomed all of the beautiful white stuff that kept us snowed in for a couple of days. I purchased this extremely warm faux fur vest just before Christmas, but it just has not been cold enough to wear it without looking ridiculous. However, a snow day makes for the perfect day to do so.
We are girls on a budget over here at L&L. We shop sales, so the items that are currently sold out are linked to similar or even better options :). 
Leah and I both have these earrings, and LOVE them!
We are huge fans of Just Black denim. They hug our donut eating bodies just right. Seriously, they are so comfy!!

Hat | Earrings | Button Up sold out, but loving this similar one. | Vest sold out, same length here | Denim | Backpack- Target last year, but wanting to purchase this one also… hello tassels! | Sneakers

THE PERFECT CUPCAKE

Yes, you read that right! We have theeeee perfect cupcake recipe for you today. Leah may have “stolen” it from a NYC bakery. Shhh! These are our go to cakes for any grown up secret eating time after our kids go to bed and no one is watching celebration, but ESPECIALLY Valentine’s Day, right? I am not a box of chocolates girl myself, but put a piece of cake in front of me, and its gone in two seconds flat. What can I say? These cupcakes will eat any other cupcake for dinner. And the frosting….. Ohemmmmmgeeeeee! The lightest, fluffiest, not overdone buttercream frosting we have ever tasted! 
Our secret baking tip (well, I guess its not a secret) is to under bake. Even if it means cutting off the last few minutes. It makes such a difference in the moisture of the cake here. Promise!!
CUPCAKE:
(Makes 30 cupcakes)
-1 3/4 c cake flour
-1 1/4 c unbleached all-purpose flour
-2 c sugar
-1 T. baking powder
-3/4 tsp. salt
-1 c (2 sticks) unsalted butter
-4 large eggs
-1 c whole milk
-1 t. vanilla
Preheat oven to 325 degrees. Combine flour, sugar, baking powder & salt. Add butter, mixing just until coated. In a separate bowl, whisk together eggs, milk, vanilla. Add the wet mixture to the dry mixture in three parts. Bake 17-20 minutes. REMEMBER… We underbake. I am always checking mine around the 15 minute mark. I stick a toothpick in and take them out just before the toothpick comes out completely clean.
*rotate pan half way through cooking for even baking!*
BUTTERCREAM FROSTING: 
(Makes 4 1/2 cups)
1 c butter, softened (not melted)
1/4 tsp. salt
1 (32 oz.) package powdered sugar
6 to 7 T. milk
1 T. vanilla extract ( alter if you like. I love the frosting with or without the vanilla)
Beat butter and salt at medium speed with an electric mixer 1-2 minutes or until creamy; gradually add powdered sugar alternately with 6 Tbsp. of milk, beating at low speed until blended and smooth after each addition. Get it to your desired consistency and then stir in vanilla. 
* The one thing I adore most about this frosting is that it is perfectly spreadable right after its made. No refrigerating necessary!*
We promise you….. you will thank us!
XO!

FOOD ERASERS CLASS VALENTINES (FREE PRINTABLE)

More non-candy class valentines for ya! We both stumbled on these erasers in the dollar section at Target at HAD to use them somehow! What’s more fun than everything in miniature?
You can also use our food tattoos HERE, food key chains, charms, or stickers. Or you could tie to a box of donuts because – duh. We go together like… burgers and fries, milk and cookies, peas and carrots, peanut butter and jelly… you get the idea.
Scroll down for sources and the free download!
The erasers don’t really stick with tape well, so we just threw them in a bag and taped the back with washi tape. Easy peasy!
SOURCES:
VALENTINE CARD: Download HERE and print on card stock for best results.
BAGS: purchase HERE or at craft stores in size 3″ x 5″.
ERASERS: purchase HERE
CARD STOCK: THIS one prints with super bright colors!
WASHI TAPE: purchase HERE
CUTTING BOARD: THIS is the easiest, because you can see right where you’re cutting
Download our other class Valentine’s Day designs below by clicking on the titles:

NOSE PENCIL SHARPENER CLASS VALENTINES (FREE PRINTABLE)

I have a five-year-old boy, so these were really a no-brainer. If I could have only found a toy that would have gone with a poop-pun, I would have won mom of the year for sure.  Butt but… this will do the trick until then.
INSTRUCTIONS
1. Purchase nose pencil sharpeners HERE on Amazon – only $6.50 for a pack of 12!
2. Download the free printable HERE FOR COLOR or HERE FOR BLACK AND WHITE .
3. Print on card stock (THIS lets you print super well) or heavy paper for best results.
for the color download and red/pink/kraft paper for the black and white download.
4. Cut out cards with THIS our favorite cutting board!
5. Punch a hole in the top left corner of your card and cut a small slit from the SIDE of the card to the hole. Slip the hole through the nostril (the side without the sharpener). If you don’t have the right size hole punch or it’s just not working for you, you could always use BAKERS TWINE
or CLEAR BAGS and seal with WASHI TAPE
6. Hand out to your pals and make booger jokes. Nice.
See our other free printables HERE!