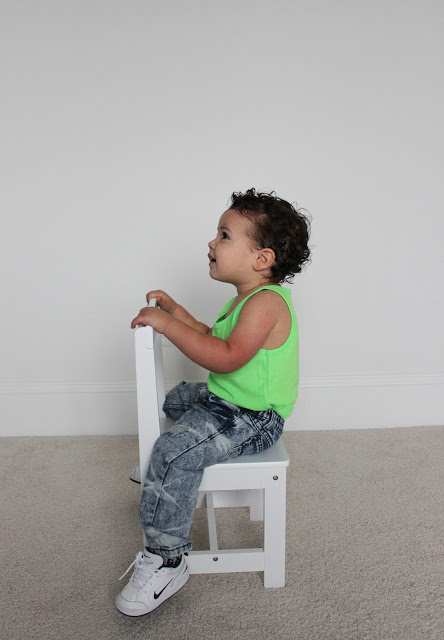
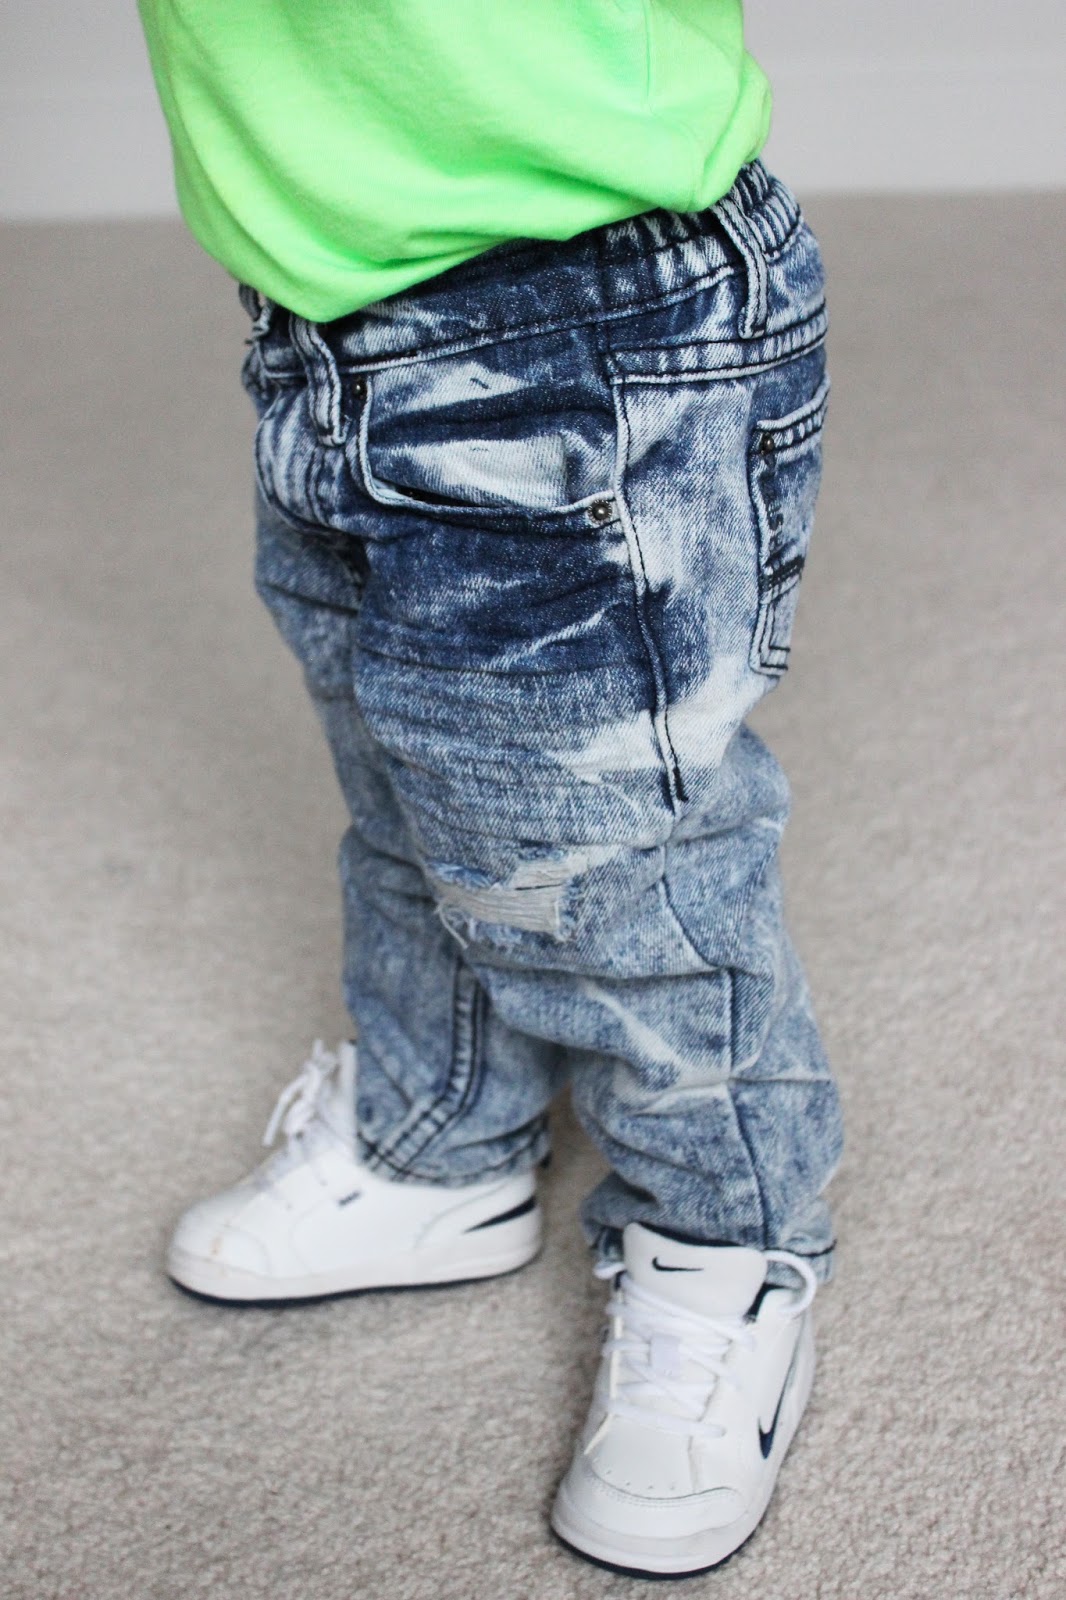
DIY HALLOWEEN COSTUME FOR LITTLES – SADNESS

Have you seen Inside Out? It’s. So. Good. If you’ve seen Inside Out and didn’t cry, then you are a robot my friend. Sadness is my son’s favorite character! He just thought she was hilarious. He has a stuffed Sadness doll he sleeps with every night and makes up jokes and songs in her voice. He’s having a Sadness-themed birthday party next month and it was an obvious choice for Halloween!
Try to find a Sadness costume. Just try. They don’t exist. So let’s make one, shall we?
First, you’ll have to give your wig a Sadness haircut. THIS is the one I ordered. The quality was amazing but it’s NOT at all what it looked like! It was super long! Chop the right side and the back short and straight across. The left needs to get longer in the front. I trimmed the bangs to just above Ari’s eyes. Then I used a curling iron to flip up the ends on long side and swoop the bangs over to the left. Spray with hairspray to set.
I ordered glasses from Amazon and they came in totally different from the image, but they worked really well I think.
There are NO children’s turtleneck sweaters anywhere! This is a woman’s sweater from Forever 21 that I’ll probably keep for myself.
The face paint went very easily and dried quickly. A little tricky to get off, but Ari didn’t seem to mind!
SOURCES:
Jeans – H&M
Shoes are old! Any blue shoes will do.
Sadness attitude:
“Trick or treeeeaaat. Halloween makes me saaaaaad”
See more of our DIY Halloween costumes HERE
-L

HOLIDAY CARDS + A MINTED DISCOUNT

Have you ever used Minted.com before? It’s so bizarre for us to hear that some people haven’t, because it’s an incredible company! Everything is just so. freaking. easy. We just recently went crazy on their art site which we’ll update you with later! Out of control good! 
Minted has an insane amount of designs for holiday cards. They use independent artists to design, so you can feel good about your purchase. The quality is also amazing, which appeals to these two paper snobs! They have foil pressed cards and we are suckers for anything shiny (hello rose gold foil… muah)! If you have moved, had a baby (and want to announce it 6 months later – insert raised hand here), married the love of your life, or just simply want to say Happy Holidays, there is a card for just that! You can filter it by the number of photos, whether you want it flat or folded, whether you want it to say Christmas/Holiday/New Years, if you want the writing on the top or the bottom… we could go on and on. And the coolest feature? You can upload your holiday photo and see what every single card looks like with your photo! Then you can chose a patterned back or more photos, you can order your return address label that matches your card. And the BEST part? YOU GET FREE RECIPIENT ADDRESS PRINTING. What??!!
Like we said, it’s SO easy! 
We don’t have our photos yet, but are planning which cards and which outfits go with our picks. Here are our favs…which one should we go with? Ah! So many good choices!
LEAH’S TOP PICKS:
Dashing Dots card HERE
Holiday Headliner card HERE
Not So Calm card HERE

Photo Booth Filter card HERE
JENNI’S TOP PICKS:

The More, The Merrier card HERE


Gold Illume card HERE


Santa’s Newest Helper card HERE

Silent-less Night card HERE

The other good news? 
Minted is giving you 15% off on holiday cards through 10/30/15 using code: LOVELION15
That’s something to be jolly about!
xo

MAX’S COW PARTY!

My little baby turned 2!! Eek! His favorite thing in the whole wide world (besides his big bro) are COWS. He has an entire backpack full of cow figurines that attend all of our outings. With every person he meets, he tells them about cows or the one time he pet a cow or cows say moo… I could go on. There was no other choice but to make him a cute little cow party and celebrate with family!
Cow PBJ’s, farm veggies, and cow cheese! I just used a cow cookie cutter to cut out the bread and black food dye for the spots. Just dab a corner of a paper towel in the food dye and dot on the bread.
 Milk bar anyone? Vanilla, chocolate, and strawberry.
 This is what I call a deconstructed cow cake… easy peasy. I used pink frosting and pink jelly beans for the udder 🙂
I cut out squiggles of black paper for the table decoration.
I had some leftover tattoo favors from Max’s little preschool buddies that I used as table decoration. Moooo Max is 2! We do custom packaging like this in our Etsy shop!
 Our party hat DIY is HERE. Just decorate with black squiggly shapes and a pink “2”.
 Max’s “aunt” Ashley got him this bouncy cow for his birthday! He obviously LOVED it!
I made Max his tee shirt with the tattoo image printed on iron-on transfer paper.
Sources – click below:
Letter balloons by Northstar Balloons
– L

RECIPE: VEGETARIAN CHILI + CORNBREAD

This is my go-to meal for my family, especially on a chilly fall day! My kids gobble it up, though I think the cornbread might have something to do with it. You can really add in whatever vegetables (or meat) you have in the fridge and it’ll always taste good. There’s a variation of this that I LOVE if you scroll to the bottom- you cook the cornbread dough directly on top of the chili so that each bite has a layer of cornbread on it! YUM.
VEGETARIAN CHILI:
1-2 tbsp EVOO
1-2 tsp minced garlic
1 yellow onion
1 bell pepper
couple handfuls of chopped kale (optional)
soy meat crumbles / real meat
1 can green chilies
2 can diced tomatoes
1 can corn / 4 fresh ears of corn
2 can of your favorite beans (I use black beans and navy beans)
1 tbsp cumin
salt & pepper
Optional spices (leave out if you’re cooking for littles): 
cayenne, chili powder, crushed red pepper, chipotle chili powder
Toppings: 
plain greek yogurt / sour cream, shredded cheese, avocado, scallions
Serve with corn muffins – the Jiffy box is my fav! (1 box makes 6 muffins, and you’ll need 1 egg and 1/3 cup of milk)
Heat olive oil on medium and add in garlic, chopped onion and pepper, and saute 5 min.
Add in meat crumbles and saute 5 min. You may need to add a little more olive oil at this point.
Add in all cans and spices you’d like.
Bring up to a boil then reduce to simmer for about 30 minutes.
I like to put a handful of chopped kale at the bottom of my bowl, put the hot chili on top to steam, then pile on the toppings. When cooking for my whole family, I leave all of the spices out except for cumin, salt, and pepper so it’s not too spicy for my kids. I’ll add crushed red pepper to my own bowl.
VARIATION:
Spread cooked chili in an 11×13″ pan (as much as can fit leaving at least 1″ room on top. I like to freeze the rest! Make 2 boxes of Jiffy cornbread mix (you’ll need 2 eggs and 2/3 cup of milk) and spread the dough on top of the chili. Bake at 400 degrees for 12-15 minutes or until cornbread just starts to brown. Don’t overcook, or your cornbread will be dry! 
Enjoy!
-L

FALL FASHION FAVES

It’s Fall, Ya’ll!! We love high fashion just as much as the next girl, but we are also moms on the go…. like all the time… does it ever stop? Therefore, wearing accessories that can withstand kids, keep us cozy AND still make us feel on top of our style game is an absolute MUST.  We threw together a few  quality staple pieces that are either sitting in our online shopping carts, in our closets ooooor maybe in our dreams. I am all about sneakers right now. They are the absolute perfect way to add a cool, laid back feel to even some of your feminine pieces. Either way, these are our fall favorites that will pair perfectly with your pumpkin spice latte! Btw, have you guys seen the new fall pattern on the Starbucks’ cups? In. love.
Scarves 1 | 2 | 3 | 4 | 5    Hats 1 | 2 | 3 | 4 | 5    Shoes 1 | 2 | 3 | 4 | 5
XO,

5 STEPS TO A STYLISH, KID-FRIENDLY HOME

We’re so excited to have Miriam Bornstein from Zillow help us make our own homes kid-friendly all while keeping it stylish! Miriam writes about lifestyle, home improvement and design for Zillow Blog. 
MIRIAM:

Designing a home around children comes with limitations, but that doesn’t mean you have to sacrifice your personal style. Embrace living with children by creating rooms that encourage you to think outside of the box and incorporate your child’s whimsical view of the world.

Here are five ways to create a stylish, kid-friendly home.

1. ORGANIZE STORAGE

Clutter and scattered toys are certainly an unavoidable part of family life, but your child’s toys don’t have to become part of your home décor. Establish order and organization by storing your children’s toys and art supplies in one designated place. Slide boxes or baskets into open shelves, place wicker toy bins next to standing lamps or use the extra storage in a hollow foot rest. Adding storage not only provides you with peace of mind, but also helps you establish a less cluttered lifestyle.

2. INVEST IN TIMELESS FURNITURE

Kids outgrow their clothes, but they don’t have to outgrow their furniture at the same rapid pace. Create a room that your child can grow with by investing in neutral furniture and timeless pieces. Avoid kid-themed furniture and décor, eliminating the need to update your child’s room every couple of years. Instead, invest in a black dresser, brass lamp or white nightstand – all functional items that a child needs for years, regardless of age.

3. INVOLVE YOUR CHILDREN

Embrace your child’s creativity by involving them in the home decorating process. What patterns and colors does your kid like? Let your child have a say in the kind of bathroom tile to buy, or the color of paint for the front door. Even flipping through magazines together can spark inspiration and creativity. Collaborating with your child on a project not only encourages quality family time, but also allows the whole family to create an environment that everyone can enjoy.

4. PURCHASE A DINING ROOM TABLE

Bring the family together by purchasing a dining room table equipped for the whole family. Look for tables accompanied by benches that can double as storage, or find a table that expands as your family grows. If you’re looking for function and style, purchase a table that you can refurbish. One way to do this is by purchasing a secondhand table to repaint and retouch.

5. DECORATE WITH DECALS

Incorporating playful decals is one fool-proof way to add character to your child’s room without having to paint or renovate. Decals are an exceptional option for renters because they’re safe over painted walls, removable and don’t involve a can of paint. Because decals are interchangeable, they’re great for a child with evolving interests. Swap out an animal display for images of the solar system, or combine the two for an exciting wall display.

Decorating with children may be a challenge, but it shouldn’t stop you from designing your dream home. Creating a home that’s both stylish and kid-friendly is attainable through organization, collaboration and investing in timeless pieces. For more inspiration, check out Zillow Digs.

DIY PLANT CONTAINERS + DINING ROOM UPDATE

Succulents remind me of Pacific Grove, CA where my husband and I used to live. We got engaged and married out there before moving to Nashville, and sometimes I just need a little reminder of our old home town. I went to Home Depot yesterday and picked up these little beauties, but didn’t like any of their planters. Solution: spray paint. Isn’t spray paint always the solution? This DIY is incredible simple.
All you need is flat spray paint, terra cotta pots, potting soil, and plants! Simply spray and you’re done. The flat paint on the terra cotta gives it an almost cement look which was exactly what I was looking for in the first place!
 I’m OBSESSED with Target’s new fall home line! How cool are these gold knick knacks?!
Dining room update! I sold my seagrass chairs on Craigslist and bought these mod molded plastic little guys. I know it’s dark but picture this with a colorful rug underneath… should I keep these??
Nashville marquee sign is from the Nashville flea market! That was a steal!
In the end I moved these mini ones in my kitchen to add some happy color. Happy planting!
-L

DIY HALLOWEEN COSTUMES FOR LITTLES

Update! I luckily had a third son so baby Harry Potter, here we are again!
Monthly pic… platform 9 3/4 never looked so cute!
Lightening bolt tattoo (and other super awesome HP tats) HERE.
His cardi and pants are from June & January in onyx.
Lightening bolt rattle HERE
Same scarf and glasses as below.
Here are some of my kids’ past Halloween costumes that are easy to DIY!
DIY HALLOWEEN COSTUMES
1. HARRY POTTER
This one is my absolute favorite! You know what a Harry Potter nerd I am. We tell Ari Harry Potter stories (the non-scary ones) now, so he loves looking at this picture of himself!
Last year, he decided to be Harry Potter again! Needless to say, we were thrilled!
OUTFIT: khaki or black pants, white button down shirt, black or gray vest or v-neck sweater. Cloak purchased here.
SCARF: I knit this using this pattern
GLASSES: here. I popped the plastic lenses out
SCAR: Purchase our lightening bolt tattoos HERE for the whole family!
2. MARTY MCFLY
I still giggle at this one. Ari obviously didn’t get who he was but people loved it! The Back to the Future Trilogy is one of Jeffrey and my favorite movies (next to HP obvs).
OUTFIT: jean jacket, white button down with blue/red plaid, maroon t-shirt, red suspenders, red puffy vest, tight light wash jeans, white Nike high tops
“Look at them moccasins!”
3. SADNESS
New fav!!! Link to the DIY HERE
4. AC SLATER
He has the curly hair, so why not? Links HERE
5. THE ORKIN MAN
Ari is obsessed with our Orkin man, George. I think he thinks of George as a grandpa?? George retired that year, so it was only fitting to pay homage to him.
Outfit: white button down, pleated khakis, red hat
Details: I made the epaulets out of red felt with a white button sewed on. I just winged it whip stitched them on the shoulders BUT I did it backwards. The button side is supposed to point towards the neck of the shirt.
You can download the Orkin logo I made here.
Stick on eyebrows/mustache found at a costume shop.
I covered Max in little plastic spiders to make it more Halloween-y!
Tutorial for the spray can is below. There was probably a way easier way like using a silver coffee can, but I used what I had!
Punch a hole through the oatmeal can top for the rubber tube (bought at a hardware store)
Tape the tube inside and on the top of the can
Punch holes for the string before you tape the top on
Wrap can and hose with duct tape
6. CARDINAL
I made this for Ari’s preschool costume, but count it anyway as a great Halloween DIY.
Tack/sew red boa around the turtleneck. I used yellow felt for the feet and attached it to Ari’s crocs. For the hat, I glued felt on top of a foam visor from the craft store. You could always just stick feathers on a red hat and call it a day!
7. BABY NERD
This was my laziest costume but effective. Max already had the white onesie, cardi, and bowtie. I just put masking tape on Ari’s Harry Potter glasses (above)!
8. HASHTAG THE PANDA
Our love for Jimmy Fallon is STRONG.
Similar panda costume HERE.
You can download the name tag I made HERE, but you could easily buy the name tag stickers and write “Hashtag”. If you don’t get it, you don’t get it. If you do, it’s pretty hilarious.
9. TINKER BELL
Ari adores Tinker Bell! His preschool had costume day, so we went with his hero!
Tutorial for the costume and educational art HERE.
This year is most likely directed by Ari who is now 5! Sad! So far, he wants to be Sadness from Inside Out. I’ll update you with the progress! Good luck, mamas!
-L

3 MONTH UPDATE + MY MUST- HAVES

I know everyone says this, but I seriously cannot believe my baby boy is 3 months old (except for when I hold his 15 lb self). It feels like we just brought him home. The first quarter of his life has been such a blur, especially that first month and a half because I was so sleep deprived. I truly experienced exhaustion on a different level. But now…. here we are! No more family of 3 talk. We are a full on operating family of 4, and I love it. 


Sleeping / tummy or side sleeper. Hasn’t been a fan of sleeping on his back from day one. He naps like a champ, and sleeps at night from about 10:30 – 3:30, then he wakes up for a feeding, but goes right back to sleep! 🙂 He is still in our room. He sleeps in his little co-sleeper ( when we don’t fall asleep together in our bed…. bad habit.)
Eating / Exclusively breast milk. It was still hard the first month, but we pushed through. It just hurts!! gah! I try to avoid the bottle as much as possible and give him that intimate nursing experience. I have been taking these supplements because my production slowed down once Remy’s feedings became more scheduled. They have worked great for me! Also, we were introduced to Gerber Soothe drops ( a probiotic) to help Remy’s tummy calm down and regulate itself. He didn’t have reflux, but definitely had gas issues. Amazon is definitely the cheapest if you have Prime. Any moment out of my day to STOP and feed him and just take a breath has been good for the both of us! Forced relaxation if you will. 
Favorites / He loves “standing” and facing out. Music is a huge part of our family life, and he loves a good serenade ( even from me… yikes!) He can go from whining to pure joy and excitement if you will just talk to him. Looks like I have another social butterfly on my hands. He also loves mommy’s nail colors on her nails, jewelry and grabbing big sis’ curls.
My favorites / His entire little man body! He is squishy in all of the right places. He was born long and lean, and we really had to work on getting him into tip top squishy baby shape. We call him our “chunky little man”. Hearing Amara say it is just the best ever!
I miss him so much when I am away from him. Having a little boy is so different already than a little girl. There is just a different connection there. He isn’t getting married until he is like 50. 😉
Ok… my MUST. HAVES!!! The second time around is so different. You are over all of the stuff that just clutters your house. These are all things I would consider a need, as they really helped get us through the toughest 3 months we have experienced as parents so far.
Aden + Anais burpy bib & swaddles | There is just nothing softer!! I own and love the Aden + Anais for Target swaddles and bibs, but even those are not as soft as the originals. I fell in love with the burpy bibs when we had Amara. So convenient and genius!
Solly wrap | It took me seeeeveral tries to get this thing right. Once you dial it in, it is so helpful. I have used this so that I could be hands free while cooking, cleaning and grocery shopping. I never wrapped Amara and after using this, I don’t know how I went without.
Nursing bras | these are the most comfortable nursing bras for sleeping!! I love this one in particular. These are the ones I use for daily wear.
Baby Sleepers | My MIL gave me one of these at my shower, and I went to purchase several more. They are the. softest. ever. They wash well also. The snaps are definitely annoying in the middle of the night, but I will choose softness over convenience for my baby any day.
Baby Shusher | I bought this a little later in the game. Remy was hating his car seat, having trouble falling asleep without being held, and he had his days and nights mixed up ( worst ever). I don’t know that this is a game changer, BUT we do take it in the car sometimes for long travel days and he uses it to fall asleep in our room during naps and at night. It just helps cut out the noise that the rest of the family makes just outside where he sleeps. I would buy it again for sure!
Avent Pacis | There is just no other pacifier that works.
Baby swing | We have a much older version of this one that we were given when Amara came along. We love this thing. For the longest time, it was the only way he would fall asleep at 3 am while one of us laid on the couch to be close to him.  We use it everyday… pretty much before and after each naptime.
Diaper Bag | I loooooove this diaper bag. I love how it looks like a handbag in front, but has all of the hidden compartments and space that a diaper bag does. I don’t need to take my own separate bag or pouch for my stuff. It has a mommy pouch! 🙂
Sanitizer & Paci wipes | any of these can be bought at any drugstore/Target. With a grabby toddler, we use lots and lots of sanitizer. I am a freak about washing hands, but when we can’t, we go through this stuff so quickly. It is absolutely necessary!
Carseat/stroller spiral toy & Playmat | Remy has just started grabbing at his spiral toy in the carseat. It provides endless entertainment for him, and it has truly saved me on some car trips. We just broke out the play mat last week. These are lifesavers when they are over the swings. 
Bassinet | We use this stroller and absolutely LOVE it. People stop me all of the time to tell me how “cool” it is. It is quite heavy to get in and out of the car, but that is a small price to pay for how convenient it is, how many different configurations it has, and how easy it glides. I can literally steer it with one hand even with both seats on. The bassinet was purchased about a month after I had Remy because he completely freaked out on our first Nordstrom trip since being born. He didn’t want the carseat, wrap or anything. I think that trip would have looked different had I had a “bed” for him to lay in. It was a nightmare because he stopped falling asleep in the carseat for the most part. The bassinet has been a game changer. It allows Remy to just stretch out and sleep while mommy shops.
Baby Bjorn | I have been using this lately because Remy is an angel baby when he is facing out. He doesn’t make a peep. The solly only works when he is sleepy. We just ordered this carrier, as we are about to embark on a week long Disney vacay and it is a sweatbox in FL when we go. We wanted something breathable, although, it doesn’t allow your baby to face out.  We will see how it goes. Also, the baby bjorn just has added waist support which is a huge must that the Ergo carrier already had. 
Tub | Remy has officially grown out of this, but man I love this thing. It makes it so easy to bathe your toddler in the bath (if they are somewhat independent) while bathing your baby in the sink. Such a lifesaver since I do most night routines alone. We just ordered this for the bathtub to accommodate his growing man body that I love so much. 😉
And last, but certainly NOT least…. boob care! ha. 
Breast pads & Boob Ease balm | I made sure that this go around I really was consistent with taking care of the “ladies”. It can be so annoying to continuously apply a balm, but it makes all the difference in the world. I had a jar for home and a jar that I kept in my diaper bag. Also, these disposable breast pads are just the best. They are thin, but super absorbent. I even tried swapping to the Target brand, but they are just not the same in my opinion. 
Hope this was helpful to you second time or even NEW mamas. We would love to hear feedback on this post!! What product(s) are you surviving on right now?
-J

RECIPE: THE BEST EVER OATMEAL COOKIE

I am a cookie snob. And I’m telling you… these are the BEST oatmeal cookies ever. I guess that’s bragging, but I’ve gotta share the love with you! I’ve tried to copy them from my fav bakery, Wild Plum, in Pacific Grove, CA where my husband and I lived before moving to Nashville. I can’t quite get the consistency the same, but the flavors are all there. In fact, every year we visit and if they don’t have them out… I beg them to make a batch before I leave town, and they always do!
You can use any mix-ins you like with these oatmeal cookies! This is just a great base. I used bittersweet chocolate chips, dried apricots, and dried tart cherries. If I’m not using apricots and using chocolate chips or m&m’s instead, I like to omit the cinnamon. Just doesn’t have the right flavor profile!
Please make sure to note that you need to let the dough refrigerate for at least 2 hours. I know…torture. You can eat the dough in the meantime. The longer you leave the dough, the better the flavors will combine. 12 hours is great, 24 hours is better. If you bake after 1 or 2 hours they’ll taste great but the dough will spread out pretty thin. I’ll stop blabbing… scroll down for recipe!

RECIPE:

The Best Ever Oatmeal Cookie

Ingredients:

1 cup unsalted butter, room temp
3/4 cups granulated sugar
3/4 cups brown sugar
1 egg, room temp
1 tsp good vanilla
1 1/2 cups + 1/8 cup bread flour
1 1/2 cups old fashioned oats
1 tsp baking powder
1/2 tsp salt
1/2 tsp cinnamon (I omit if using only chocolate mix-ins or if I’m not adding apricots)
fleur de sel / kosher salt
Optional mix-ins:
dried apricots, quartered
dried tart cherries
bittersweet chocolate chips
m&m’s
(I use 1 cup apricots, 1/4 cherries, 1/4 chocolate chips)

Directions:

1. Mix together dry ingredients and mix-ins in a separate bowl. Set aside.
2. Beat butter and sugars for 5 minutes.
3. Add egg and mix until combined. Add vanilla.
4. Add dry ingredients until just mixed.
5. Press plastic wrap down directly on the dough then cover the bowl. Refrigerate for at least 2 hours
(12-24 hrs is best for flavor and texture!)
6. Scoop 2″ balls and pack firmly together*
7. Bake 350 degrees for 18-20 minutes until edges are browned and the tops are starting to brown.
8. Sprinkle tops with fleur de sel or kosher salt and let the cookies cool on the tray for 10 minutes.
Eaaaaaaat!
*Bake only what you want to eat at that time for the freshest experience! Dough keeps really well in the fridge for a week.
-L