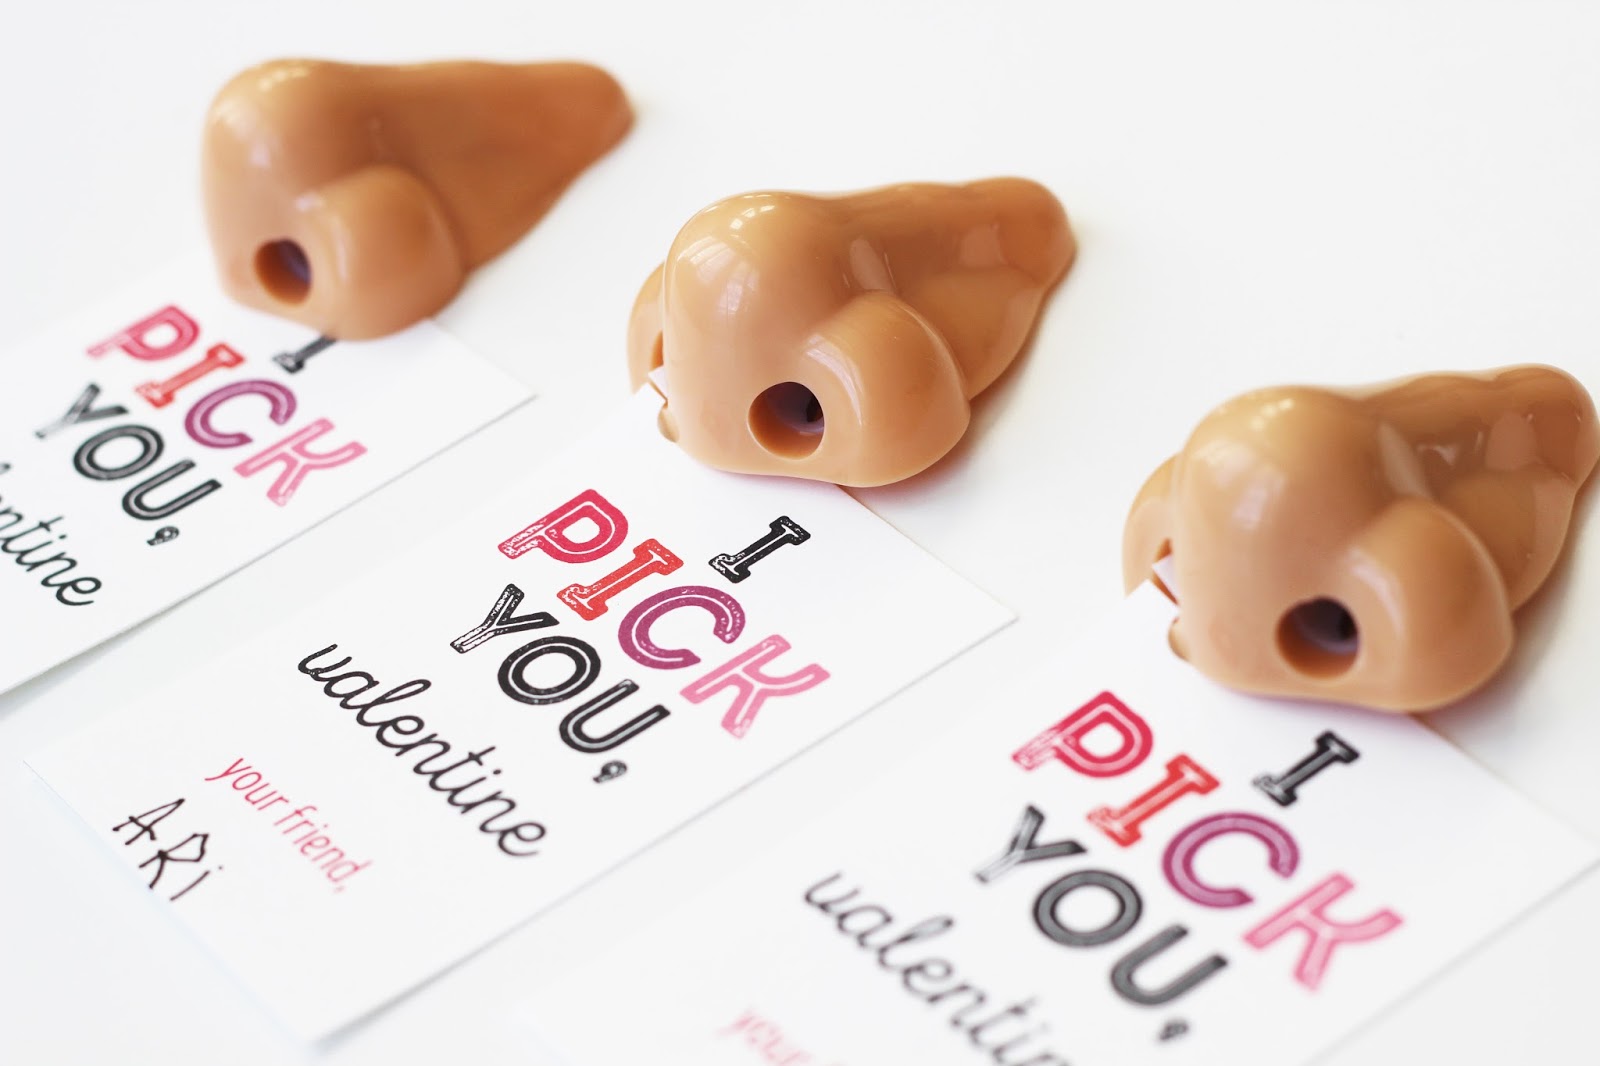
OUR NEW YEAR’S RESOLUTIONS

Our 2016 outlook is a positive one.  Here are a few things that Leah and I would like to see happen for us this year. Can you believe it is already 2016?? I remember NYE 1999 like it was yesterday. Time flies when you are having fun… and kids πŸ™‚
LEAH:
1. Take better care of myself – find my own doctor and get all of my annual checkups! I haven’t been to any since Max has been born two years ago… yikes! 
2. Have special one-on-one time with each of my kids. It’s hard to do age-appropriate activities and games when they are together being that they’re five and two. Ari (5) and I will start building an intricate tower and BOOM, Max (2) comes along and smashes it to pieces. They can concentrate better when there’s no sharing or fighting etc. I would love to focus on just them, make them feel special, and appreciate all of their eccentricities and qualities I love about them. 
3. Go on more date nights with my husband- not even with friends, just the two of us. It could be dressing up and going out to the hot new restaurant in town, or it could even be at home if it means putting up our computers and phones and not working after the kids are asleep. 
4. Work out – ugh.
5. Read more. This vacation when the shop has been closed, I’ve read two books and counting. I forgot how much I love to read! Every spare time I have that I’m not with the kids or doing housework, I’m working on Etsy orders and new designs. I will try to prioritize some relaxation time which will include just curling up with a good book and reading for a bit. 
JENNI:
1. Take better care of myself – this is at the VERY top of my list as well.  The biggest part of this is going to bed before midnight! yikes! I have so many little things “wrong” with me right now, that I need to go get checked out, but I just keep putting it off. I think a few checkups would result in a better quality of life ;).
2. Be a better planner – we don’t have a very typical work schedule. My husband or I. So, I usually just map out my plans day by day. I would love to start looking at my week as a whole, and plan our family meals ( to eat at home more and help save money), plan fun activities to do with or for my kids instead of just lugging them to Target with me all of the time. I feel like when I wake up “behind”, my kids pay the price and get less quality time with their mommy. Not good!!
3. Do something active at least once a week (to start out) – I am hoping the going to bed early thing will help this become a reality. I am tired all. of. the. time. We just recently moved into a new house that has a great park right in my backyard with a walking trail. I would love to just get out there a couple of times a week and get my heart rate up and clear my head.
4. Read A book – Yep, just ONE. Gah Jenni. Get with the grown up program.
5. Remodel our home – It is going to take patience, and I lack that. However, I really want to pay attention to detail, and make every little corner of this house be a well thought out one. 

LOLLI-POP, FIZZ & CLINK | NYE DRINK FOR KIDS

There is nothing fancy about this drink, but it sure was fun for my 4 year old to make. Any chance for that girl to get her hands on a lollipop… sheesh!
 What you need:
– Lime (for “salting”, but really sprinkling the rim)
– Sprinkles
– Sparkling juice of your choice
– Lollipop of your choice
– A fun drink stirrer or straw

CHAMPAGNE SLUSHIE + DIY DRINK STIRRERS

What is NYE without a cocktail? A slushy to get sloshed perhaps? And what is a cocktail without a fab little drink stirrer? Don’t worry! We have you covered. These take no time to whip up, just a little planning ahead. 

You will need: paper straws, ribbon, washi (optional), tissue paper and scissors. I fell majorly in love with the Christmas gift wrap from Sugar Paper for Target, so that is what I used! πŸ™‚

   Now for the drank recipe!

(fills 4 champagne flutes)
– 1 package of strawberries. I used fresh, but you could definitely use frozen if you are pressed for time.
– 1 quarter lime
– sugar ( I used coconut sugar)
– CHAMPAGNE!!
Simply puree the strawberries with half of the champagne bottle. Pour into ice trays and freeze! Then, blend them again after they are frozen with the remaining champagne. Add a squeeze of lemon and about a teaspoon of sugar to taste. Pour and enjoy!!
Drink responsibly friends!

NEW YEAR’S EVE LOOKS| ALL UNDER $100

Who is going out on NYE? Raise your hand if you wish you were…(I am totally raising my hand right now). There is something so fun, comfortable and sweet about staying in and sipping mocktails with your kiddos in your pjs while garnished in all of the tacky New Year’s $1 bin items. However, it has been quite a while (basically since our baby boy was born, which was 7 months ago) since my husband and I have been out on an actual date. You can imagine how much I am fantasizing about the one night where wearing sequins head to toe is acceptable. Here are a few looks that I would definitely feel comfortable wearing out. Somewhat sexy, but something that my “mom bod” would feel comfortable in.
ASOS
 This beauty of a playsuit would look stunning with a sleek black (or navy) blazer. I think it would class up a piece that is on the short side and shows a little more cleavage than normal. πŸ˜‰
I have been DYING for an ostrich feather skirt, or even a fringe skirt (loving this one), and this one seems to fit the bill. Can’t get enough white, ya’ll!  πŸ˜‰
If you have a little girl, this is just too cute to pass up!
Happy New Year everyone! We hope it is a fun and safe one for you!! We are definitely looking forward to 2016!
BTW, have you purchased your NYE tats from our shop yet? Hurry!!

THE BEST SPICED COOKIE RECIPE

If you saw my last post on hand lettered recipes, you’ll know how much I’m obsessed with Alyssa Makes Something‘s work! This order was super special. My husband and I had a friend, Jeani Cooney, who passed away this year. She was the mother bear of his whole office and was beloved by every single person who knew her. At company softball games she would bring her famous “sports cookies” and they are SO GOOD. And I am a major cookie snob. Oats, chocolate chips, and spices of cinnamon and nutmeg are a surprising and delicious combination. The cookies are dense and chewy will make your whole house smell like Christmas. 
We purchased the digital option of the hand-lettered recipe and had it printed as a keepsake for the entire office to enjoy for the holidays. I made the cookies this holiday season with my five-year-old and told him all about Jeani and about how we will always thing of her when we make these sweet cookies. So happy to pass on our memories of her through this recipe.
Download printable recipe hand lettered by Alyssa Makes Something right HERE.
* TIPS: All I had at the time was margarine and not Crisco, but it worked just as well. I use a little less nutmeg than Jeani calls for, and I also sprinkle the top of the baked cookies with a little fleur de sel or kosher salt right after taking them out of the oven. Like any cookie dough, it’s way better the next day and even better on the second or third day. We make the dough and just scoop out what we want to eat that day. Leave the rest in the fridge with saran wrap pressed against the dough.
Hope you can make these cookies and share them with the ones you love!
xo
-L

HOLIDAY CARDS WITH MINTED.COM

Have you ever used Minted? Ok, click HERE and you’re welcome. Oh and pppssst! 20% off your holiday cards through today at noon PST with discount code: CM2015.
Minted did my holiday cards this year, and I am beyond grateful!! I could just rave about the whole process forever, but I’ll try to keep it brief. First of all, the quality is SO good. My cards have silver foil, people! The options are endless depending on your photo and the number of photos you want. It’s all tailored to you with ease. I had too many good photos to chose from (captured by the brilliant Kate Davis! Family photo shoot HERE) so I chose a backing with space for 6 more photos. My favorite part? The envelopes are pre-addressed for you! For free. Whaaaat?? And the wraparound labels with my return address just make the whole card come together like a little package. Could not be happier! You can purchase my holiday card design HERE.
Happy Everything!
xo
-L

A B&W PLAID AND GREEN THANKSGIVING

Is it really Thanksgiving week you guys? Just like every holiday, it feels like this one really snuck up on us. I just wanted to share a couple of “unbloggy” (that is my new word  for non photoshopped and under styled) photos of my tablescape. To give you all the low down, Thanksgiving is at my wonderful MIL’s home. She recently broke her ankle and is recovering from surgery and 85% of my kitchen is packed up for our move, so we will be ordering in for the most part. I love doing a table every year, but this year had to be super simple and inexpensive. Between the dollar section at Target (holla!!) and what I had on hand, I was able to do something a little different. I knew I wanted plaid in there somewhere. I ended up going with a b&w plaid + green theme. Luckily, I found these uuuhmaaaazing placemats and water glasses in the dollar section. Literally, everything else is stuff that I have used years in the past. 
As for the centerpiece…. ha! Green apples and artichokes just seemed like the answer. No flowers over here this year. Super casual and perfect for us!
I took time to add a “thankful” tattoo to a black place card. I wrote to each guest letting them know what about them I was thankful for. It really is the better option for me because I am a crier, so I never make it when we go around the table to actually share what we are thankful for. Ha! Hope they like it! πŸ™‚

Happy Thanksgiving, friends! There is NO doubt we are incredibly thankful for you all! 
Be sure and take advantage of our 30% shop discount here for the month to show our gratitude.
xo!
-J

RECIPE: CHALLAH

This challah is the BEST. The recipe is actually by our close family friend, Carol. She made this challah for everyone at my wedding. Like every single table got one. Seriously. Not only do I love eating it, but I love the memories we have surrounding it. Friday nights with family and friends, eating this soft, chewy bread, spread with butter or dipped in honey.Β Every time my mom would make challah, the whole house was filled with the smell of baking bread! That’s probably my favorite smell in the whole world. That and my newborn babies. Equally delicious.
Full recipe below.
RECIPE:
Mom’s Famous Challah
INGREDIENTS
2 tsp honey
1 pkg yeast
1/2 c vegetable oil
1/4 c sugar
2 tsp salt
2 eggs
4 – 4 1/2 c bread flour
1 egg yolk
  1. Dissolve 1 tsp honey in 1/2 c. warm water in large mixing bowl which has been rinsed with hot water.
  2. Sprinkle yeast on top, mix, let stand 10 min.
    Stir in oil, 1/2 c. warm water, sugar, 1 tsp honey, salt, eggs, and 2 c. flour. Beat well.
  3. Stir in remaining 2 c. flour. Dough will be sticky.Β If it’s too sticky when you test it with your finger, add another 1/2 cup of flour.
  4. Knead 2-3 minutes with a bread hook attachment or turn onto a floured board and knead.
  5. Round up in greased bowl (I just use the same dough bowl and put vegetable oil all around it), cover, and let rise in a warm place for 2 hrs. It should have doubled in size. Gently put finger in top; if dough stays indented, it’s finished. If it bounces back, continue to rise.
  6. Punch down, cover, let rise again 45 min.
  7. Prep the counter with cooking spray.
  8. Divide the dough on the counter into three or four sections and loosely braid* (instructions below), tucking in the ends. Put the braided challah on a parchment paper-lined baking sheet.
  9. Cover loosely with saran wrap or a non-textured kitchen towel and let rise 20-30 minutes.
  10. Brush with beaten egg yolk and 1 tsp water.
  11. Bake 400 degrees 20 min or until it’s a good color on top. Cover the top with foil, put it back into the oven for 5-8 minutes until a toothpick in the center of a braid comes out clean.
  12. Immediately remove the challah from the tray and place on a wire rack so the bottom doesn’t continue to bake.
  13. Eat! Delicious with butter and/or honey. Perfect the next morning for french toast.
* Traditional challahs are braided in one row. On holidays or special occasions, it’s made into a circle.
* This video tutorial is super helpful! I usually do a 4 strand with a circle challah, but I LOVE the 5 strand technique for a straight loaf: CLICK HERE.
* Round challah braiding tutorial (above) CLICK HERE
* Four strand challah:
Divide dough into 4 equal sections
Leave the ends loose if you’re making this into a circle- you’ll weave these ends in at the end when you connect your circle
Take the strand at the left and weave it over-under-over the other three strands
Take the next strand at the left and do the same- weave it over-under-over the other three strands
Repeat until you can’t anymore, form it into a circle and connect the ends on each side- just sort of weave them together…as long as they stay together it’s fine! Just keep tucking the ends in.
xo, Leah

HOLIDAY PHOTOSHOOT – OUTFITS FOR THE WHOLE FAMILY

I think we all sort of cringe a little when we think about dressing up our resistant kids (and husband!) in fancier clothes and convince them to smile like they love taking photos. Just me? But honestly, it’s totally worth it in the end. I don’t always appreciate this stage in my life. The messy, whiney, poopy, busy days that just fly by without noticing any of the details. I’m too tired or stressed or frustrated to really take it all in. Seeing these photos (captured by the BRILLIANT and talented Kate Davis) will always be a fierce reminder of the beauty of our little family in this moment. 
With each photo we saw, we ooooh-ed and aaaahhh-ed and laughed, and omg-ed! Kate knocked it out. of. the. park. She made us feel right at ease, especially the boys! Max nicknamed her Katesadilla. I’m obsessed with her fashion blogger photos and love that casual feel more than the stiff posed look. I also loved taking pics around town instead of in nature like we normally do. Gotta love a good white background! This was shot all behind and to the side of Draper James and at Las Paletas. Ending the photoshoot with popsicles was basically the only way we got the kids through it!
Aside from finding the best photographer in Nashville (duh: Kate Davis) the next step is figuring out what to wear! Coordinating NOT matching is my personal preference. My best tip is to go into one store and use their color palette for the season. I guarantee they have similar colors in different patterns and textures that will be perfect for the whole fam. Start with yourself first. Find what YOU look best and feel comfortable in, then you can plan around everyone else. Selfish? Maybe. But kids and dudes look good in pretty much anything right? 
I’ve linked everyone’s outfits at the bottom of the post in case you want to go with our red, tan, and blue color palette!

 OUTFIT LINKS
Leah: poncho / dress (H&M in-store only) / boots or similar
Jeffrey: shirt (H&M in-store only) / jeans / shoes
Ari: shirt and sweater (H&M in-store only)  / jeans / shoes
Max: shirt and sweater (H&M in-store only) / jeans and suspenders / shoes
Goooood luck, Mamas!
-L

GRAND OPENING AT MAGNOLIA MARKET SILOS

Raise your hand if you’re a Fixer Upper junkie!! We at Love & Lion are total fangirls. We marathon the HGTV show and make our husbands watch too! Actually, it only took one episode to get them addicted. Chip and Jo are just SO SO GOOD. And such great people too!
I (Leah) was fortunate enough to attend their grand opening of Magnolia Market at the Silos this past weekend! My best friend from college got us tickets to go as a girls trip! Sometimes you just need those weekends away from our 5 combined children to actually get a whole conversation in, ya know? We met in Dallas on our layover, got on the plane for Waco and… it was cancelled. Torrential rain and strong winds meant that everyone was stranded! There were no rental cars left, so we had to cab it to a neighboring airport, rent a car, and drive in rush hour traffic to make it on time… well actually we got there after the party had already started! We were laughing the whole time about what a hot mess we were in- thankful to go through that with my bestie! We were Thelma and Louise!
In probably the biggest news in our little Etsy shop, we were honored to have our tattoos at the Silobration event! One of our sweet customers, Brittany Baker, hooked it all up –thank you!!– We would like to say that we didn’t jump up and down and call each other freaking out…. but we did.
Here are a few photos of my quick 24 hour trip! Not too many pictures of me, because after traveling all day in the pouring rain, I literally looked like I melted. Scary.
The silos were situated next to the shop and in between the two was a large space of turf and plenty of picnic tables. There’s a large barn-like space to the left and a small building to the right of the silos… the sign said “Something sweet coming in 2016”, so my only guess is a bakery? If that’s the case, I could probably just live in this combined space and never leave.
Right at the front door was a “welcome” sign perfect for all of us instagramers! You can see everyone’s pics at #magnoliawelcome. DYING to do this to my own floor at home!!
The shop is STUNNING, people! Everywhere you look, there’s a well curated table of goodies you suddenly must have for your home! Gorgeous, thoughtful displays and beautiful fixtures in every corner of the shop.
One of the most impressive things about the shop was the PEOPLE! Every person was just so friendly and happy to help! I could not get over it! And I live in the south. It was like some wonderfully happy cult that I wanted to join. Magnolia Market knows how to do it right. Joanna’s mom actually checked me out at the register. Love that it was a family affair!
Here are our tattoos! Eek! They set up a tattoo bar and had employees help everyone get tatted up!
When we sent the tattoos, we also sent these face tats of Chip and Jo… hope they didn’t get too creeped out LOL!
On to the party! 
Johnnyswim (whom we are both HUGE fans of) performed and blew everyone’s minds. They’re also suuuuper gorgeous. And talented. And nice! What a combo. Then Joanna gave a beautiful speech and said Chip had hurt his back so he wasn’t able to come. Psych! He repelled down from the silo, naturally. Chip and Jo were so sweet, humble, grateful, and funny together on stage. They sang a song (hilariously off key) with Johnnyswim and even brought Jimmy Don and Clint Harp on stage thanking them for their work on the show! I could not wipe the smile off my face. It’s incredible to see such successful people be so down-to-earth and thankful of where they are in life.
My bestie, Meredith, and me trying not to look like we traveled for 9 hours in the pouring rain.
The next morning before our drive back to Dallas, we woke up early and hit Common Grounds coffee. The owners were on the show and it was one of our favorite home transformations! Common Grounds is cute as can be. It was eclectic, cozy, and even had a huge outdoor space in the back for concerts and parties! The coffee was out-of-control good. I got the “no bull” which had their chocolatey secret sauce. Again, if there was a cult, I would join.
Obsessed with this sign attached to Common Grounds! Verdict: YES. 
Waco, you are positively charming! Can’t wait to visit again and see the rest of the sites!
-L

TEN STAGING TIPS FOR SELLING YOUR HOME

Happy Friday friends!! Gosh, I am so happy to have this week behind me. We put our house on the market about two weeks ago. Since then, we have been hustling around to accommodate showings and open houses. Truly one of the most exhausting things to do with kids. Live perfectly, and get your house to look like a magazine throughout the day so people will want to buy it???? yeah. umm. ok….
I am overjoyed to share that our house is SOLD! Now that things have slowed down for us (temporarily), I wanted to share my top 10 tips on staging your home to SELL. I stress the “sell” part because it is important to remember that you are not staging your home for yourself and your family. You have to think about those coming to see your home. It was very hard for me to get into that mindset.
So, here goes…
STAGING TIPS:
1. Depersonalize
Take down or change out all photos of you, your family or friends. I took quite a few frames off of the walls and off of tables/counters/dressers and went ahead and boxed them up. Don’t be afraid of empty walls. That is a good thing for a buyer to see so that they can visualize their own photos instead. My larger frames that made up my gallery walls like the one above stayed in place. I just opened the frames, and inverted the existing photo. Then, I simply added free printables, wallpaper, etc. It will make going into your new home and rehanging everything a breeze.
2. Declutter
 Decluttering was the best thing that ever happened to our home. Ha! I am NOT a hoarder. In fact… a purger by nature. However, there is always something that needs to go. We followed the “rule of 3”. No more than 3 items on each shelf or table. It really opens up your space!
3. Kids’ toys
Have your kids pick their “favorite” toys. Keep it to just enough to fill a bin in their room or playroom. This made it easy for our daughter to throw her toys in their designated bin when we got a call for a showing appointment. It also keeps everything looking tidy. We had toys hidden in ottomans too! πŸ™‚
4. Remove everything from closet floors
This will make your closets not look or feel cluttered. You can even move items on the floor to the top if you have room. Just make it look neat. You want the buyer to open the door and see space. Walk-in closets – line your clothes from light to dark. Lighter clothing pieces being closest to the entry. If you want to go the extra mile (we did not), get matching hangers. 
5. Define spaces
The way that your furniture is set up for your family may not create the best “flow” for potential buyers. Be sure and create defined spaces. For example… we have an open living floor plan. It was important for us to make it feel like there were three separate rooms in one large space. Dining room, kitchen and living room. We ended up moving our sectional sofa up to separate
the dining room and also to create a walk way from our front door to our kitchen. Walking into the room and not having to walk AROUND something to get to the other side of the room was key to making each space feel larger and more open. It is all about “shifting weight”. Don’t have too much on one side of the room. Even things out. Make sense?
^ These frames anchored the entry way, so I decided to keep them up. However, I switched out photos of my daughter with free printables that I found online.^
6.  Put valuables in a safe place/file away personal files
 You have people walking through your home! Strangers!! I had necklaces hanging on hooks in my closet. I removed those, and packed up most of my jewelry. I figured I could live with my every day dainty pieces for a couple of weeks. We also have a coin machine (we kept it in our coat closet) to just dump extra change in, then we save the rolls in a jar until it is worth going to cash them in. We took that out as well! Better to be safe. We had our calendar hanging on our fridge, and my desk was full of business mailings. I made sure to put all of that stuff away as well. Nobody needs to know where you will be on what day at what time, ya know? 
7. Remove signs of animals
We love our sweet dog, but not everyone is an animal lover. Nor do they want to see their dirty food bowls. We simply took dog food out to the garage.
8. Curb Appeal 
 Remove weeds, trim back hedges, maybe even add fresh mulch. Touch up paint (if you have the exterior color available) around doors.
9. Let the light in 
Open all of your blinds/curtains and turn on all of the lights. Let the natural light shine into your home. It creates an airy feeling, and of course makes each space feel larger.
10. Get a laundry basket
 At any given time, you WILL have random things out on the counter or on the floor when you get the call to show your home. With kids, I didn’t always have the time to do a perfect cleaning sweep. Lots of things when into drawers, cabinets, under beds. However, when I would come home I would forget where I placed things. Simply keep a laundry basket handy and just throw everything into that, and throw the basket into your car so you can get out of there quickly. It seems crazy, but it is soooo much easier.
Just remember that you are still living in your home. People get that! I put a lot of pressure on myself to make my house look like a model home each time. It is IMPOSSIBLE! 
Our buyers left us a sweet note during one of their visits to our home, and my family and I couldn’t be happier about the people coming into this home to love on it as much as we have. We have spent the majority of our married life here, brought both of our babies home to his house, and shared countless memories and holidays here. I sure am going to miss it. So, knowing that another family is ready to love on this place is heartwarming to me. 
Good luck selling your house!! 
-J

DIY HALLOWEEN COSTUME FOR LITTLES – AC SLATER

Hey Preppy. As soon as my littlest started growing curls, I was like… AC Slater! I was (okay, still totally am) a huge Saved by the Bell fan. Kelly Kapowski is basically my idol, and when you’re a kid of the 90’s, it’s pretty hard not to fall in love with Zack Morris. AC has this tough guy personality but is actually a softy- that describes Max to a T. He’s a bruiser but the sweetest little boy. 
AC is an easy peasy costume. Scroll down for sources. 
More DIY costumes HERE and HERE!
Sources:
High tops- similar
Accesories: buddy band, tiger tail, football, and lots of hair gel!