DIY

DIY HALLOWEEN – ELEVEN’S EGGO WAFFLE PURSE, STRANGER THINGS

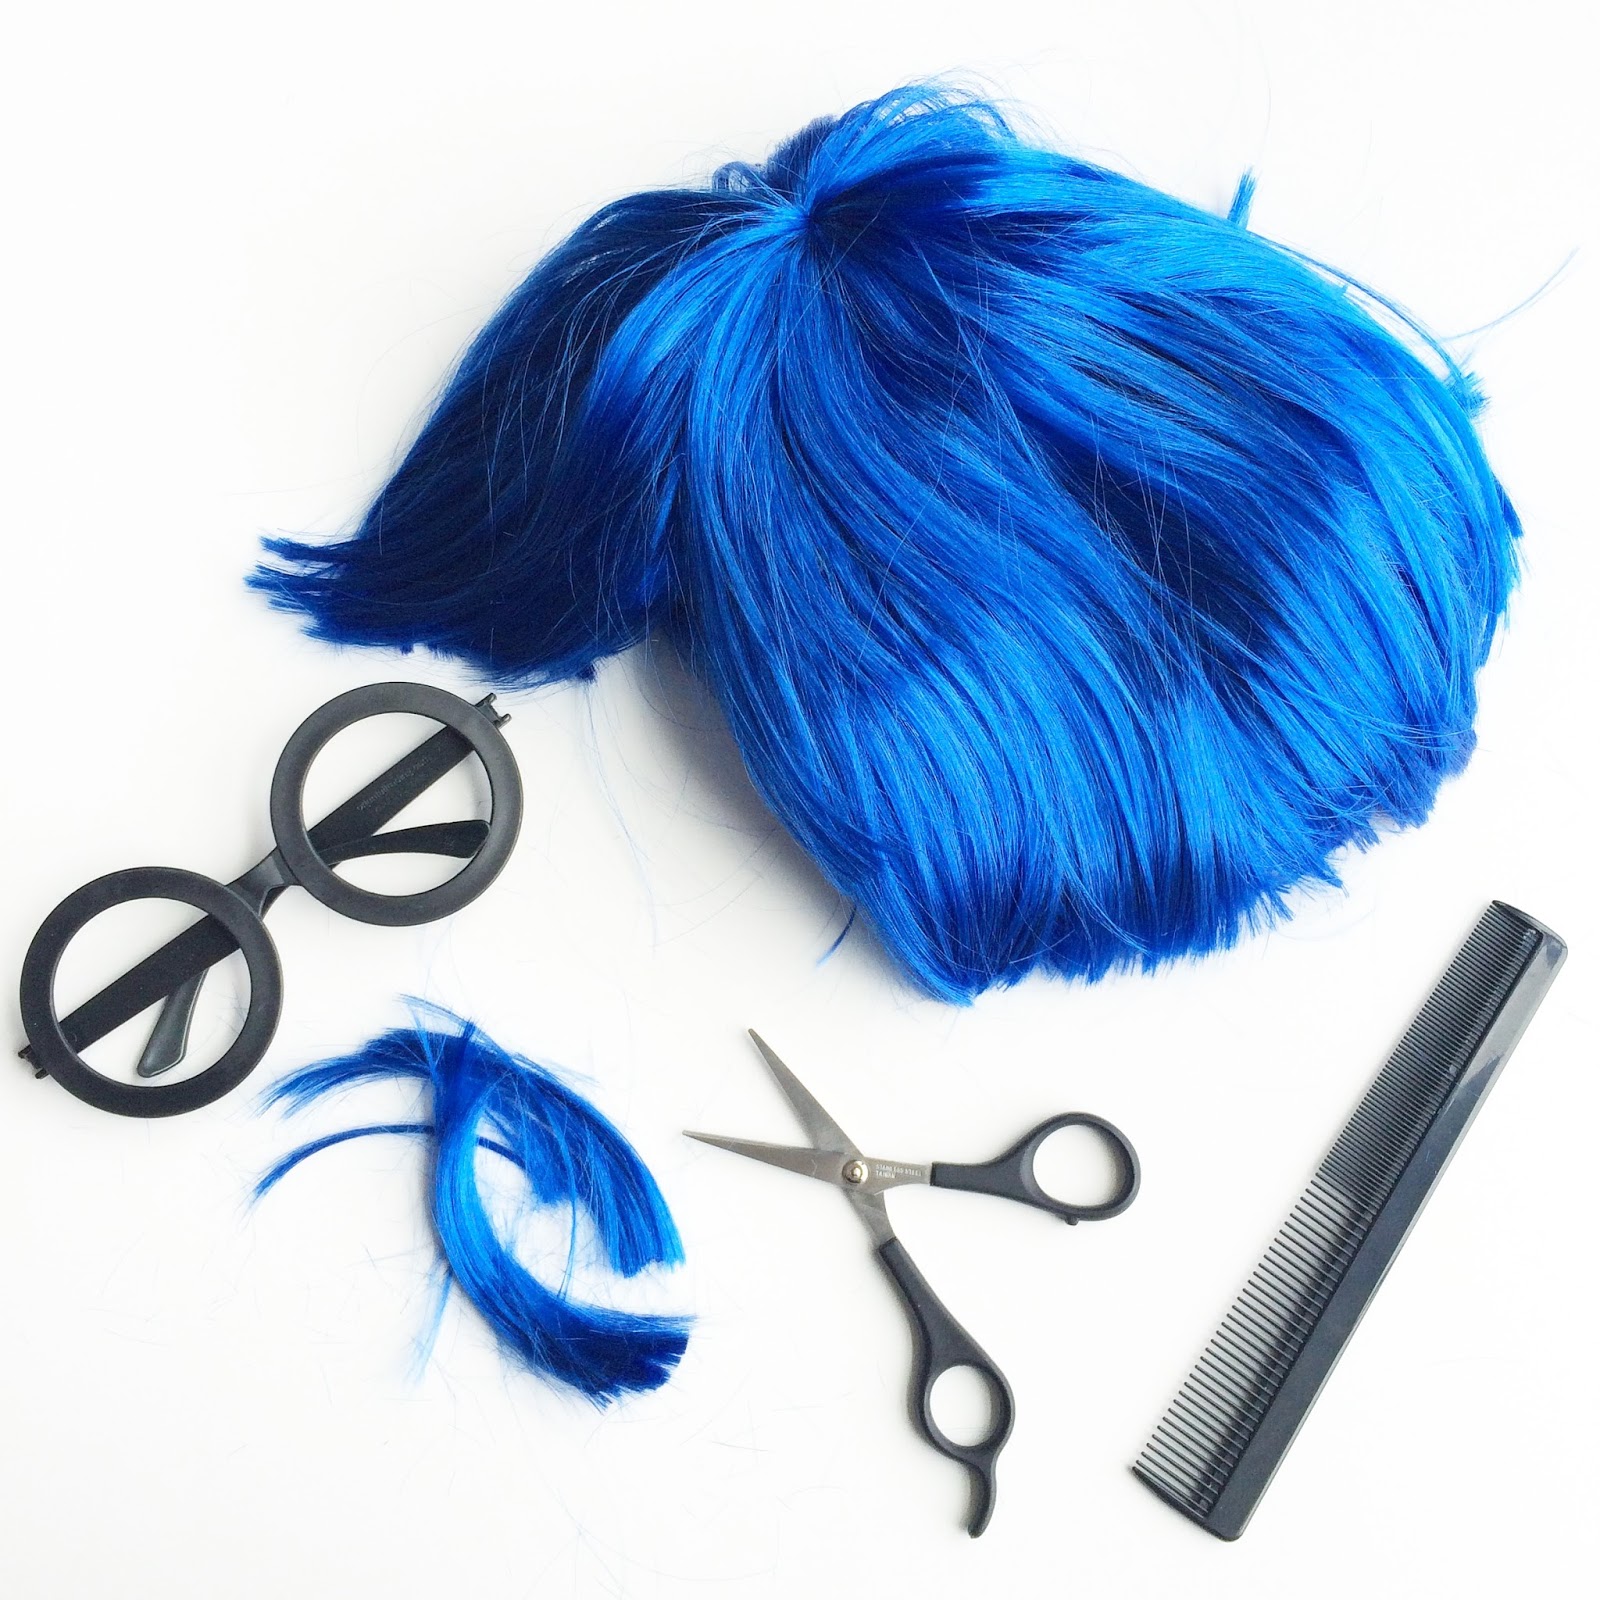
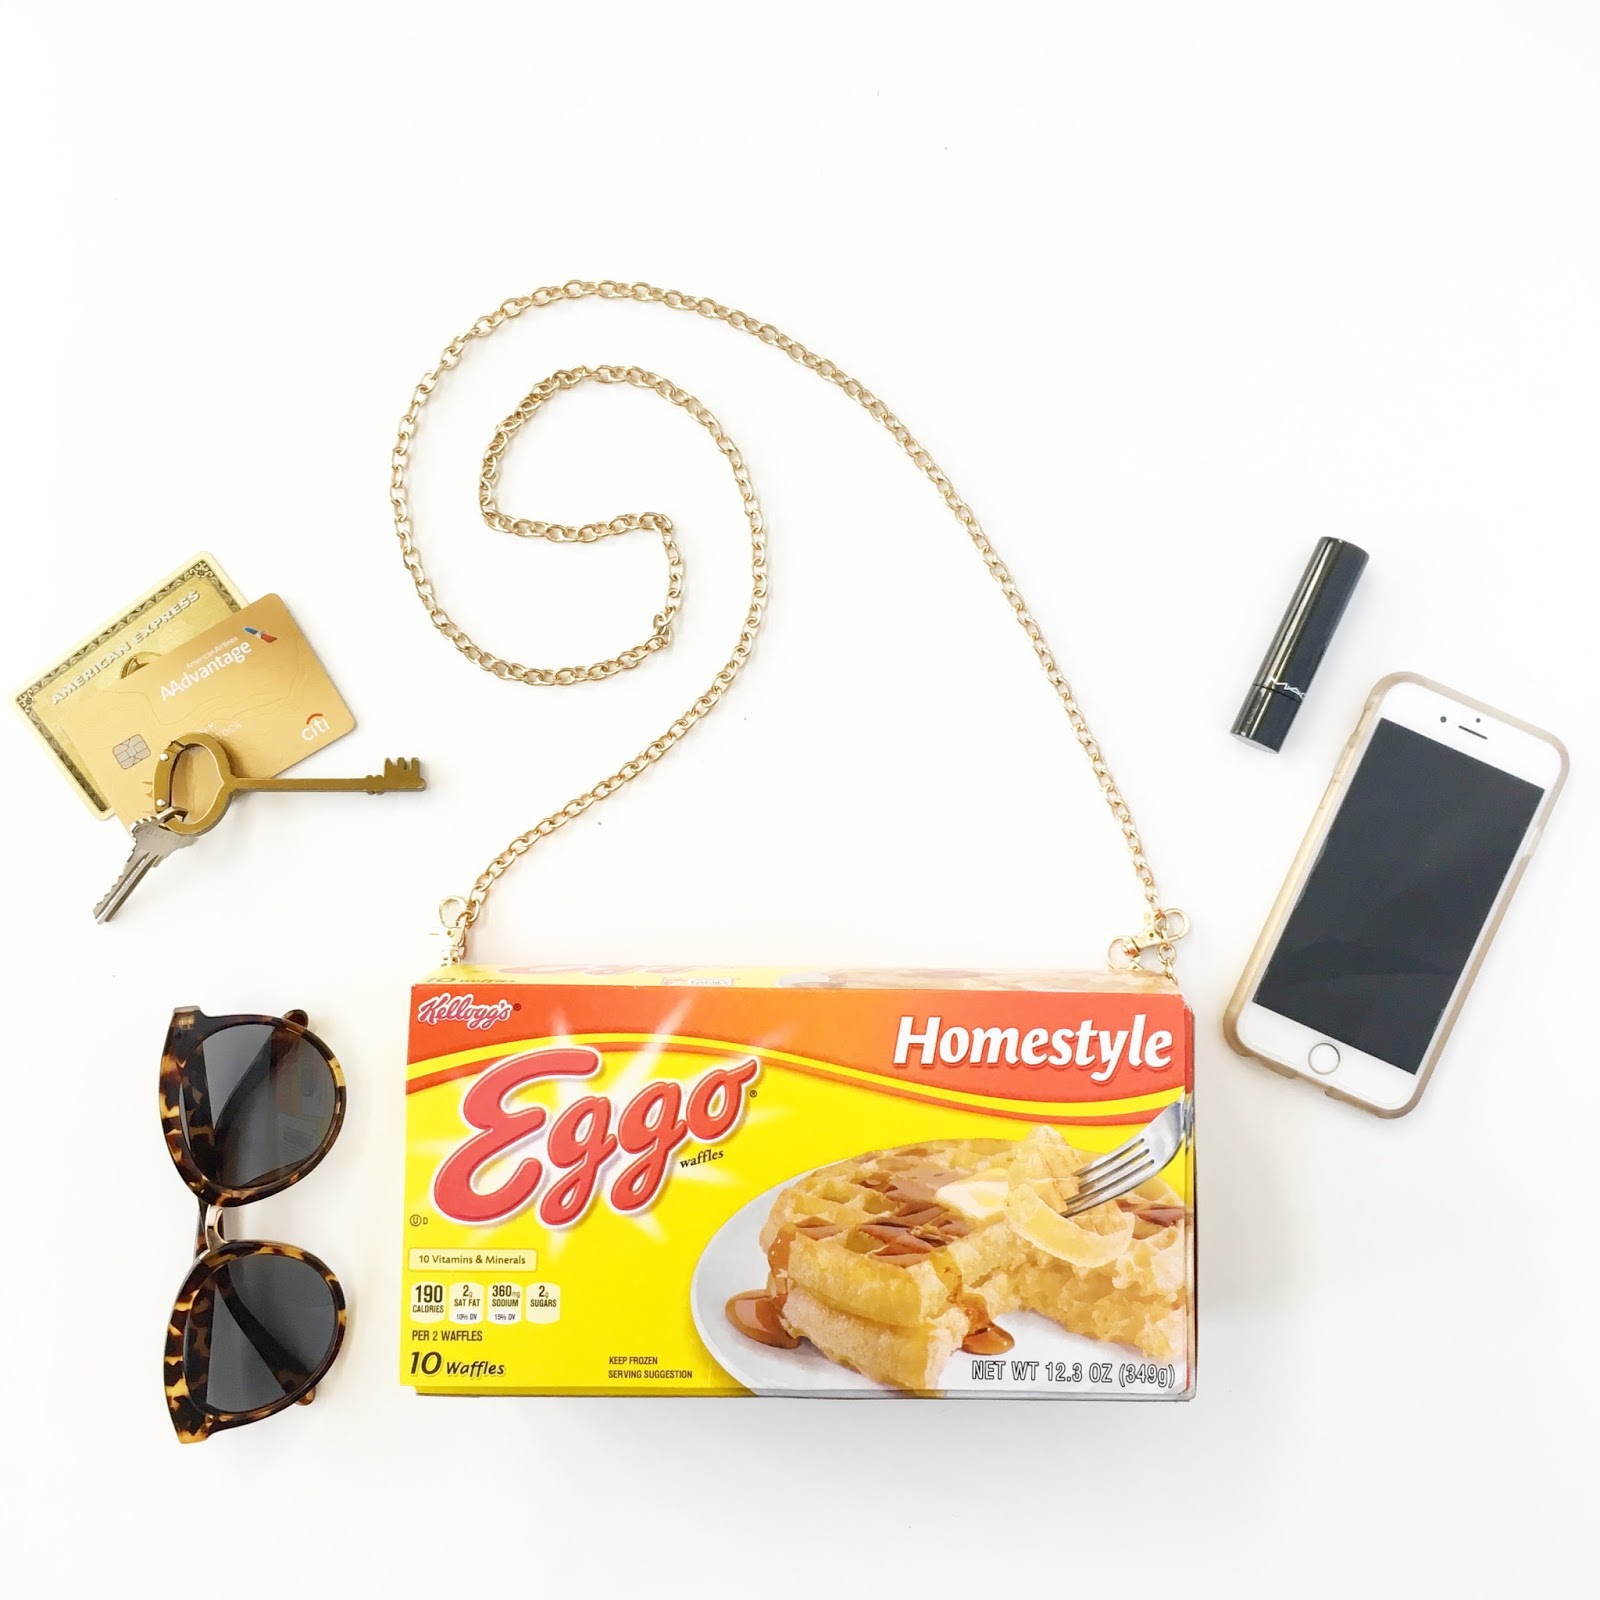
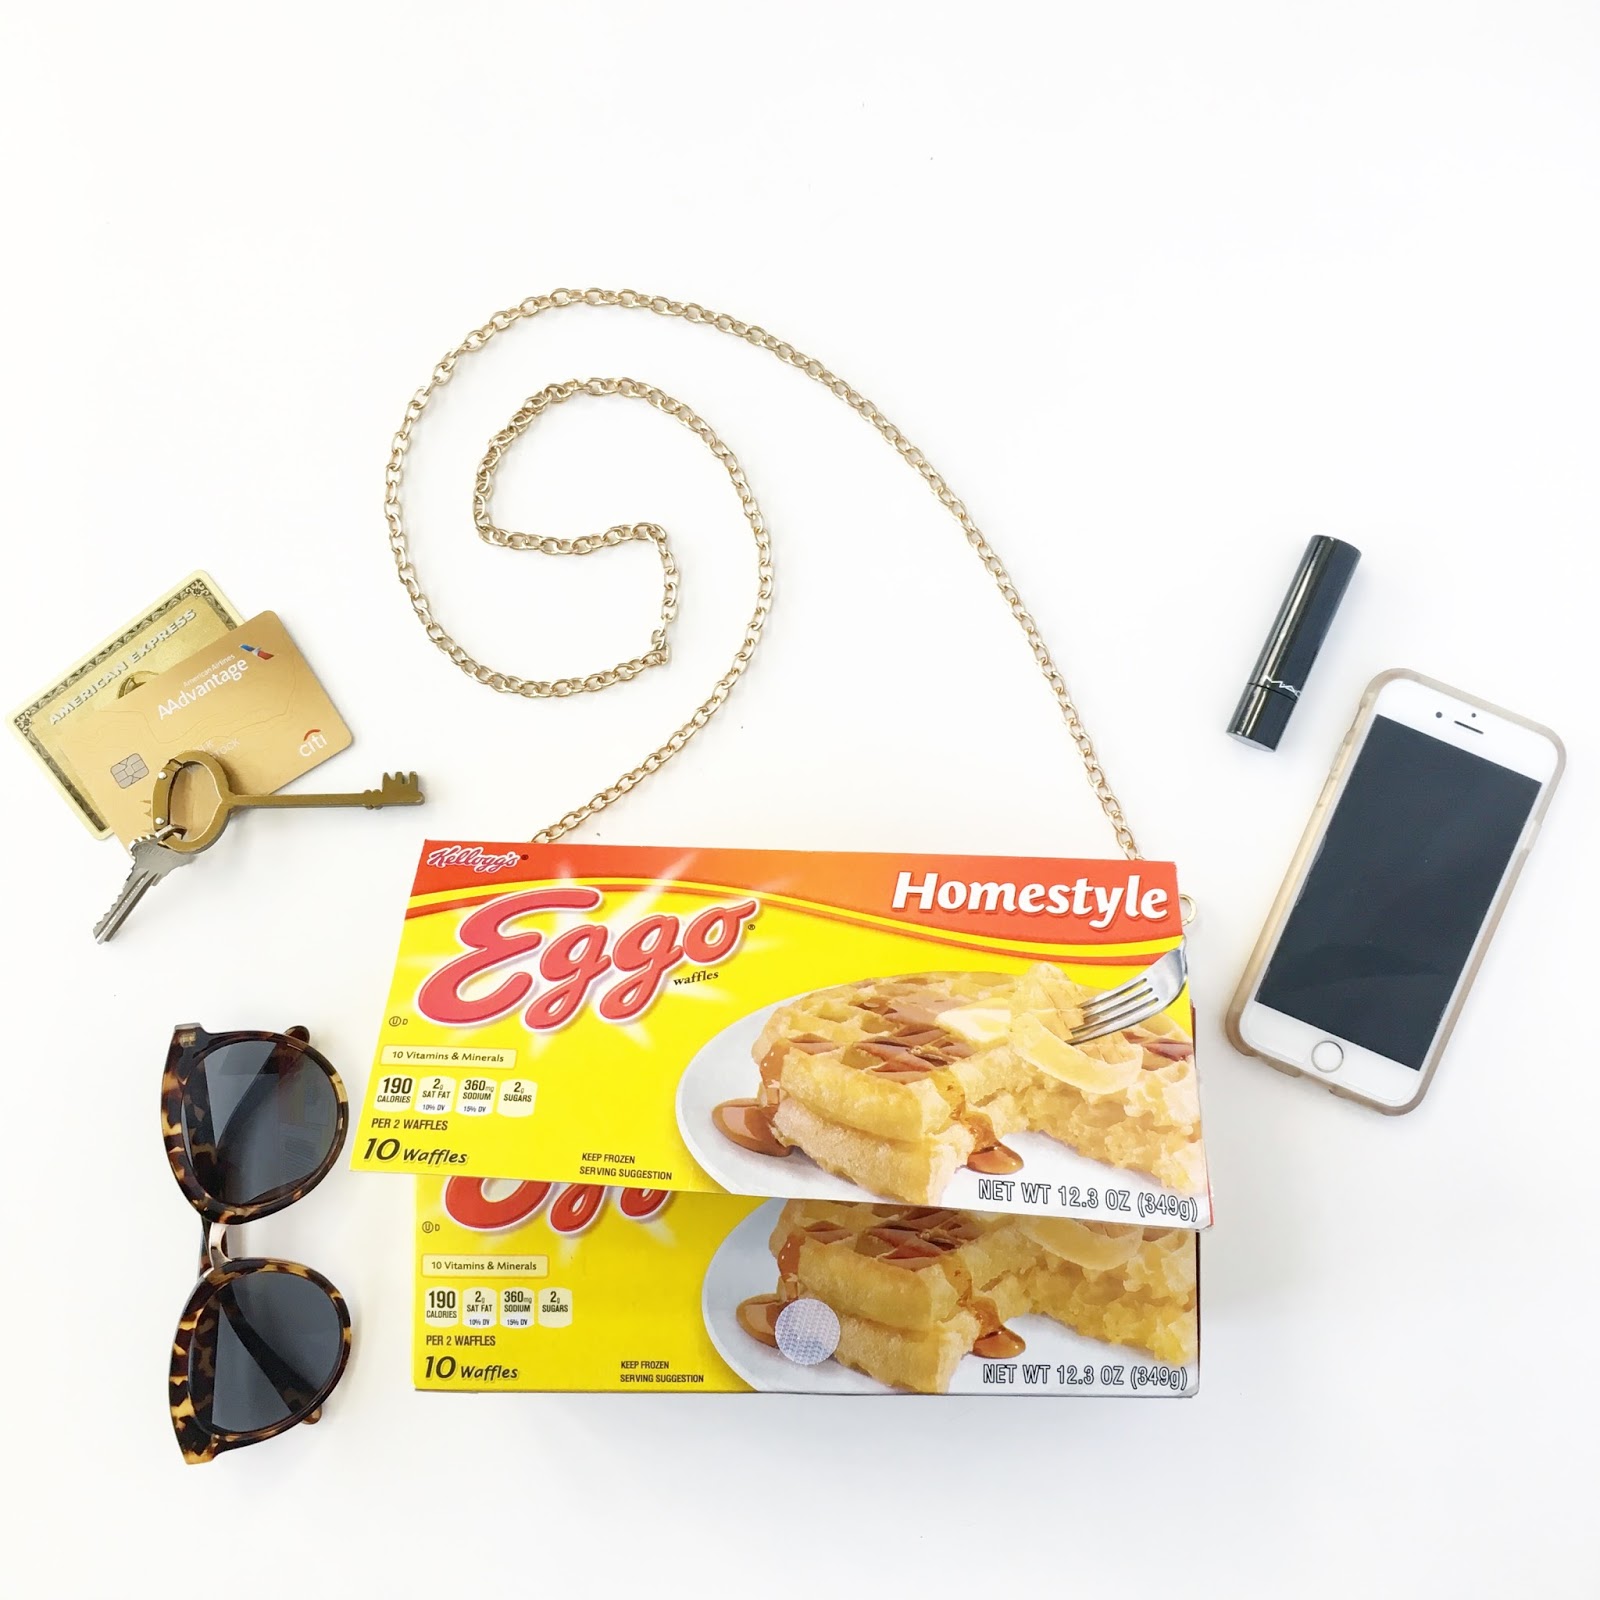
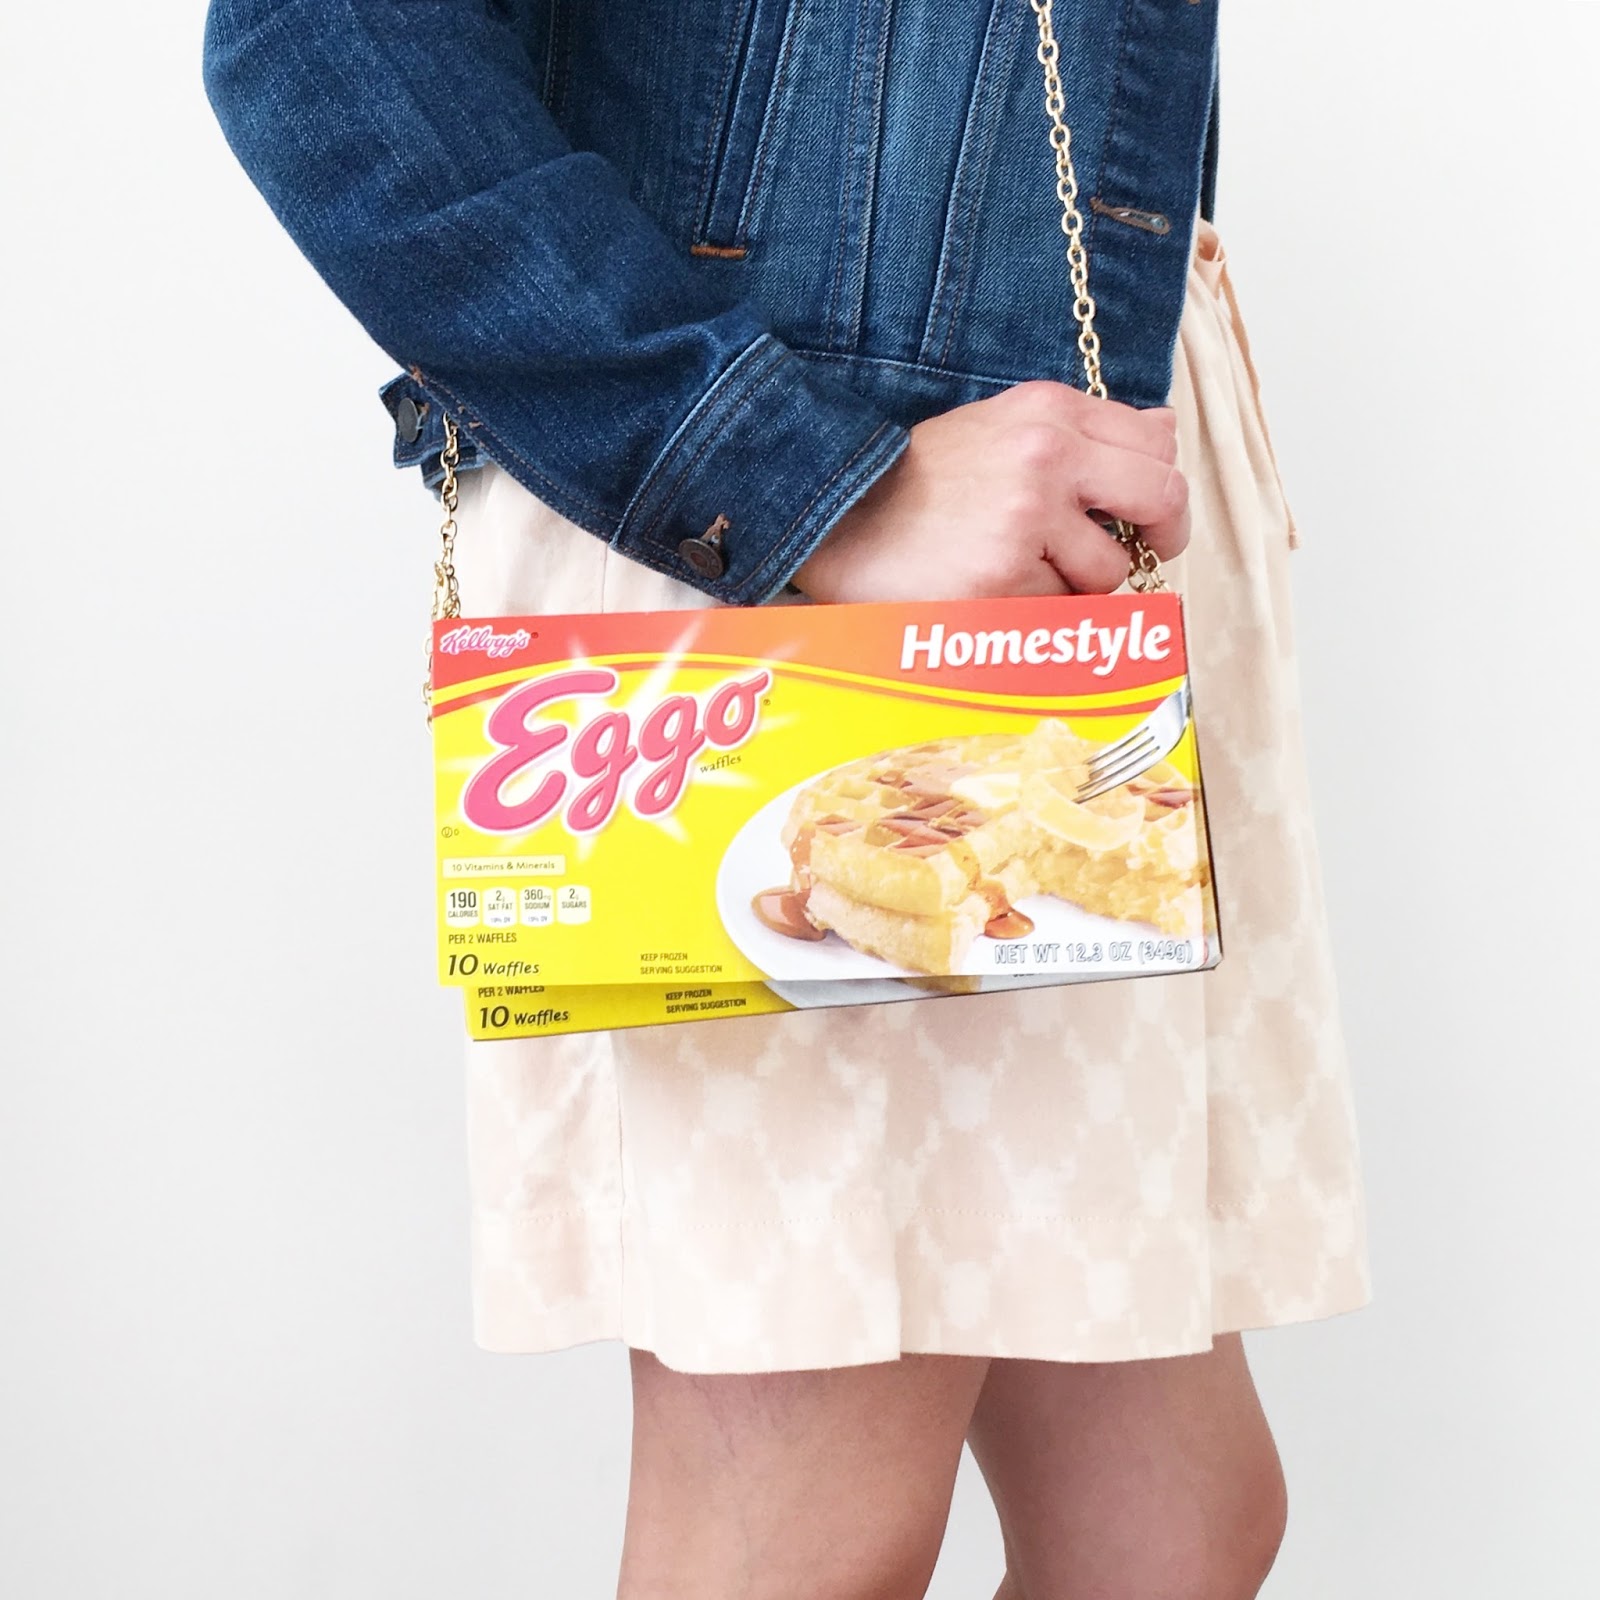
Who’s dressing up as Eleven for Halloween? Well you’ll need an Eggo waffle purse to complete the look. Obviously. 
This purse actually works!! You can open and close it- probably just put the essentials in there since it’s not too sturdy. It’s easy to make and will be the talk of your party! Don’t forget the bloody nose. 
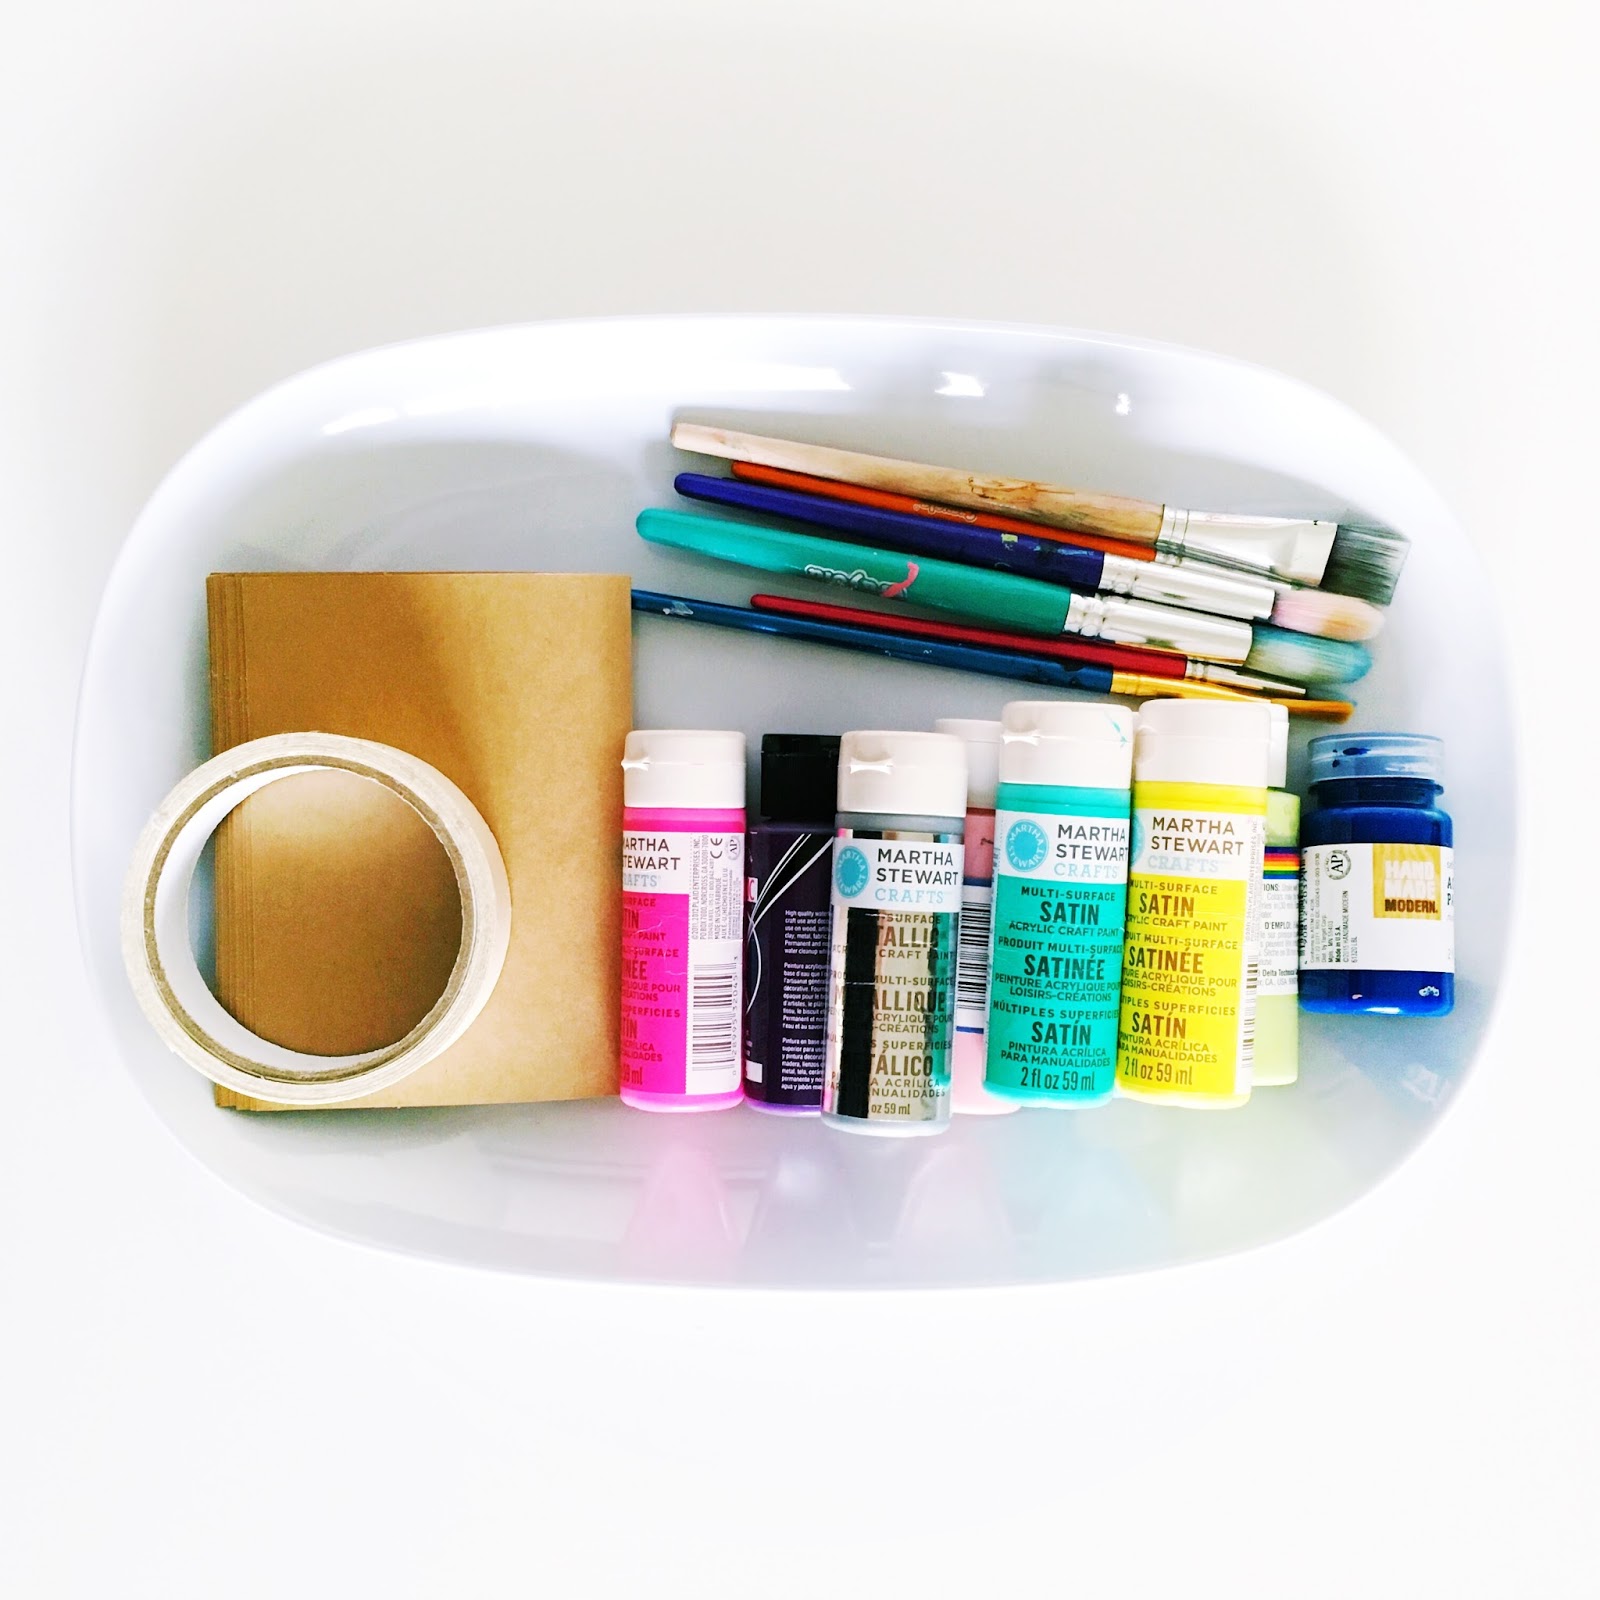
WHAT YOU NEED:
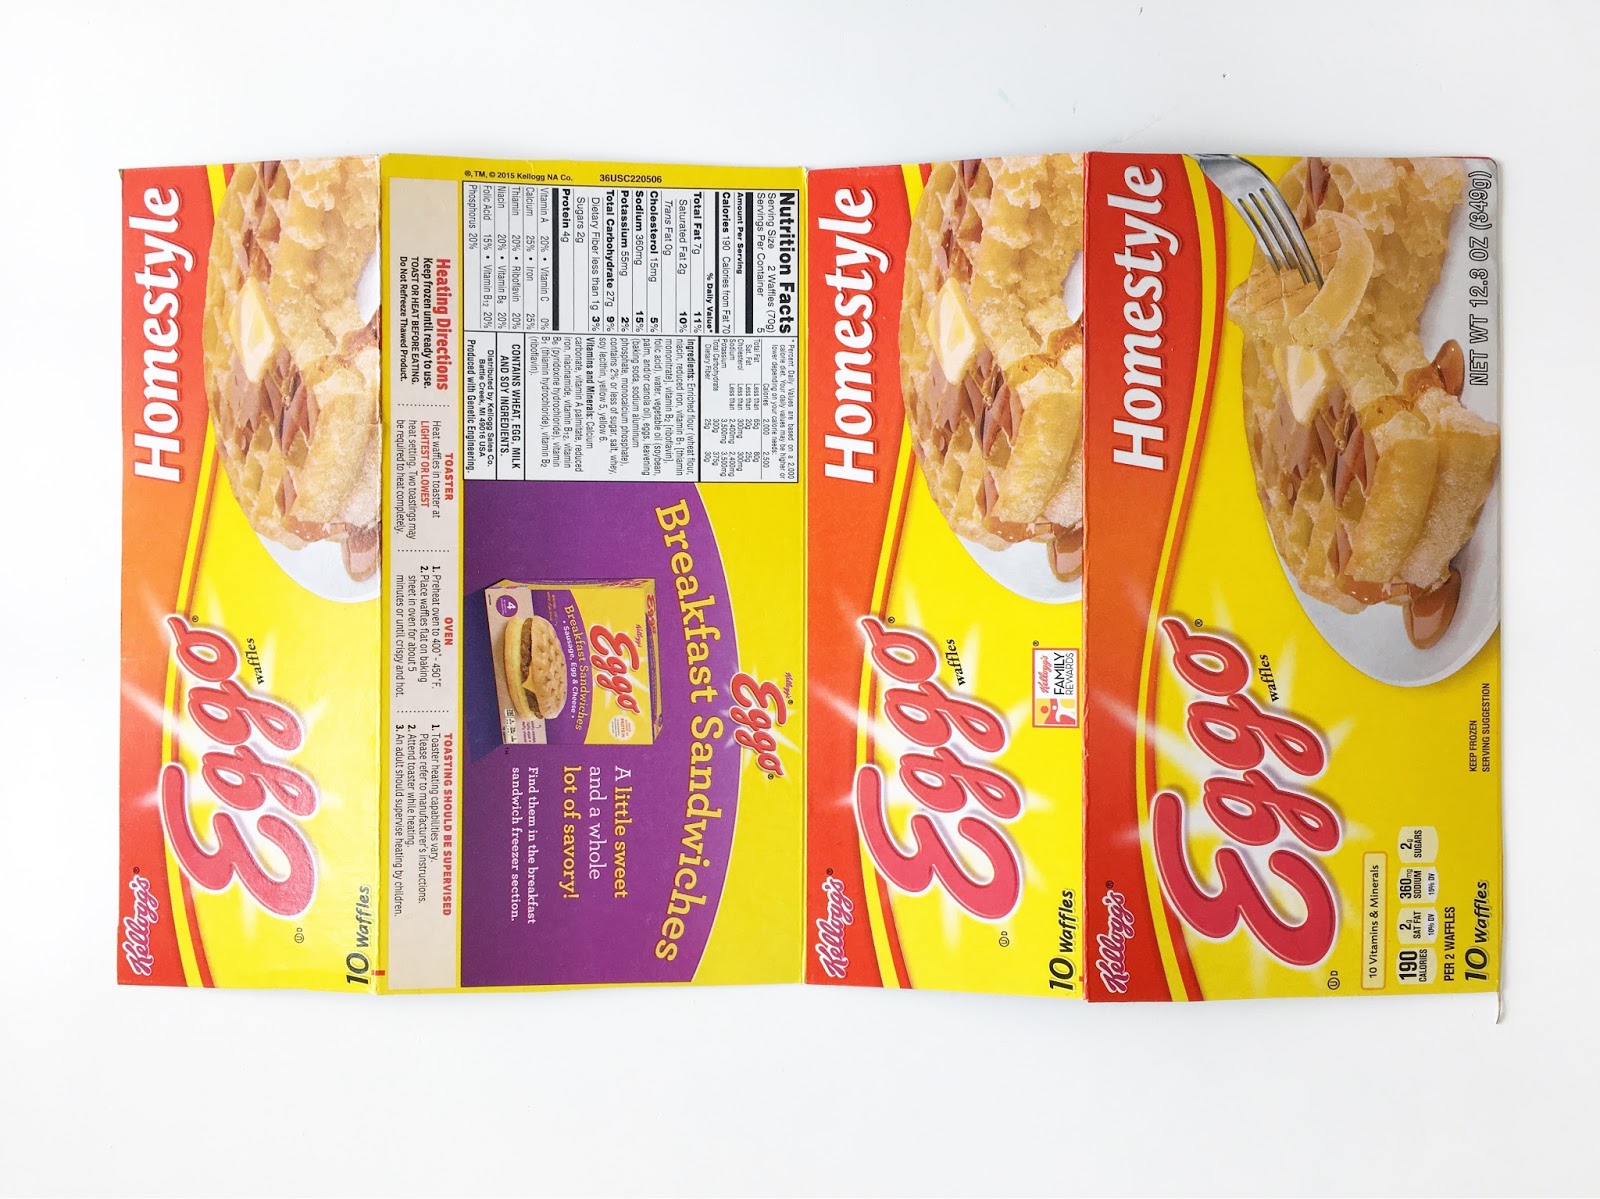
– 2 empty Eggo waffle boxes
– scissors / exacto knife
– hole punch
– double stick tape
– clear packing tape
INSTRUCTIONS:
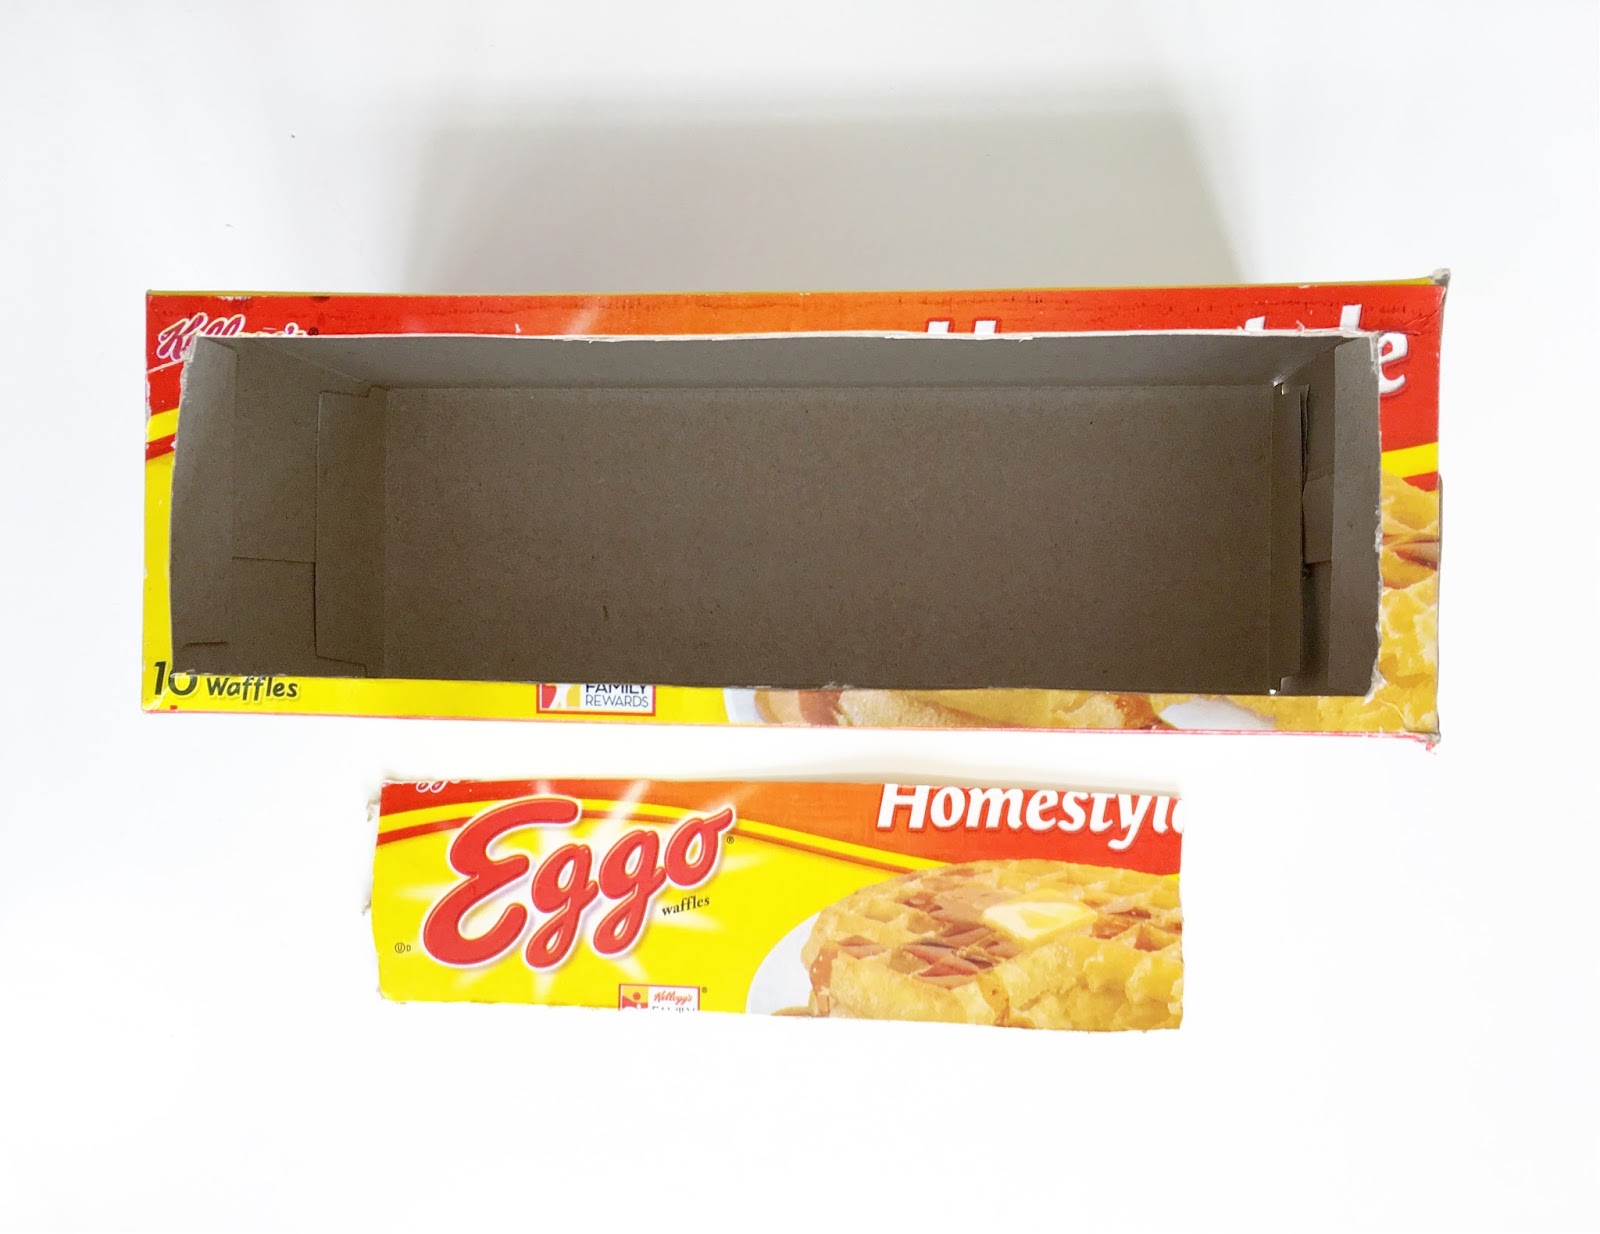
1. eat all the waffles.
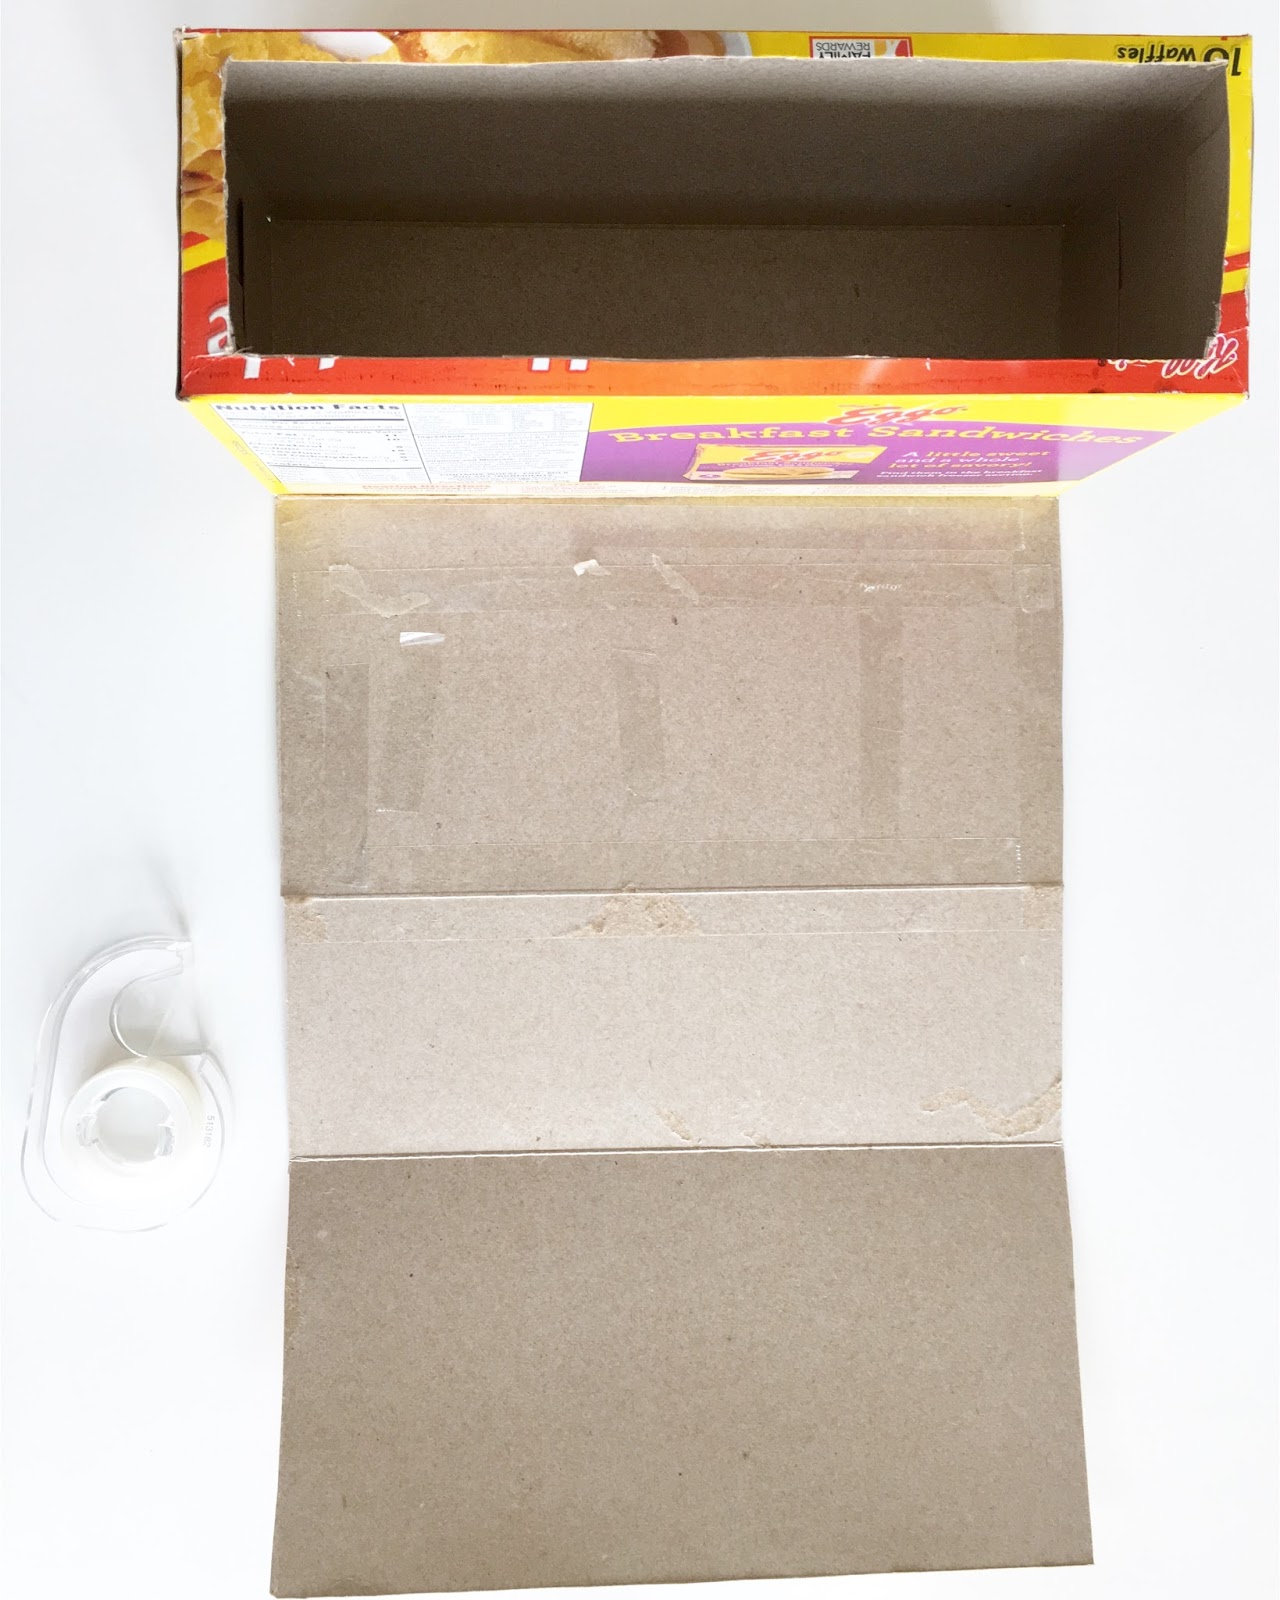
2. using double stick tape, secure the side of the box that you opened to get the waffles out.
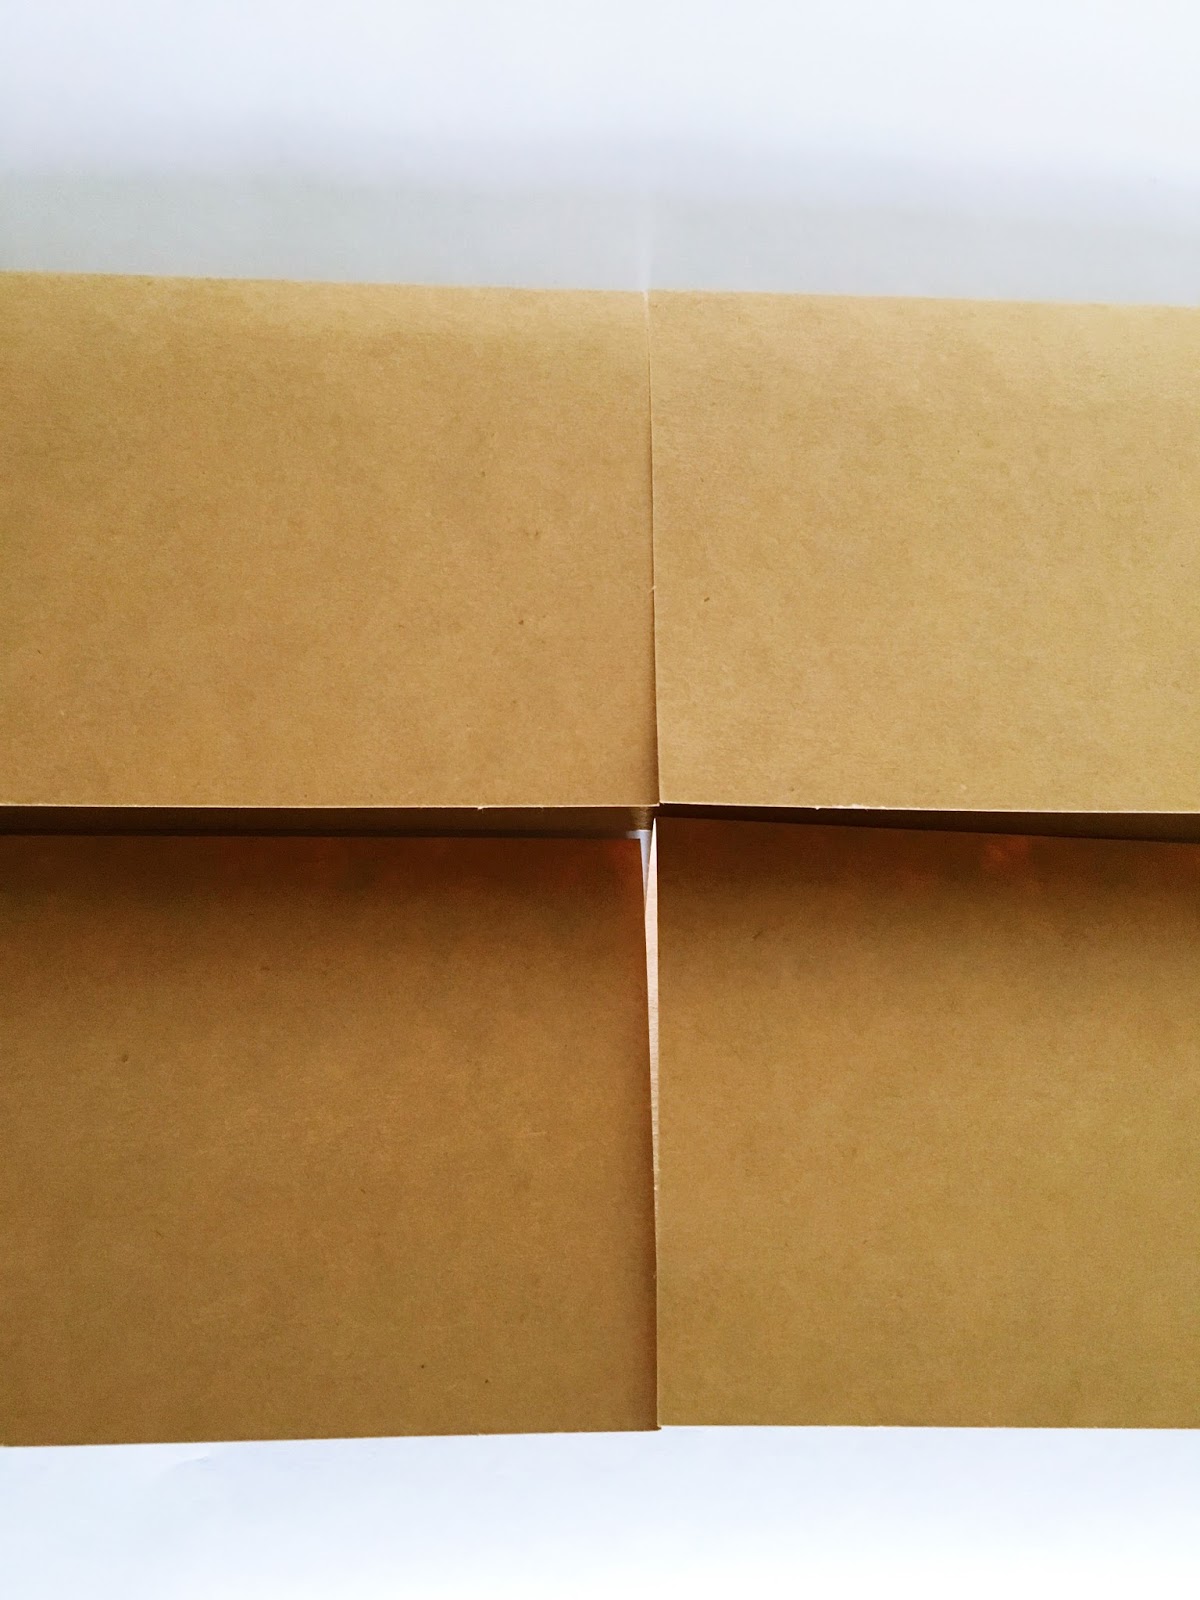
3. cut the top off of the first box. You can leave a little border around it but you don’t need to.
4. cut all of the sides off of the second box. Keep the sides to reinforce the purse even more.
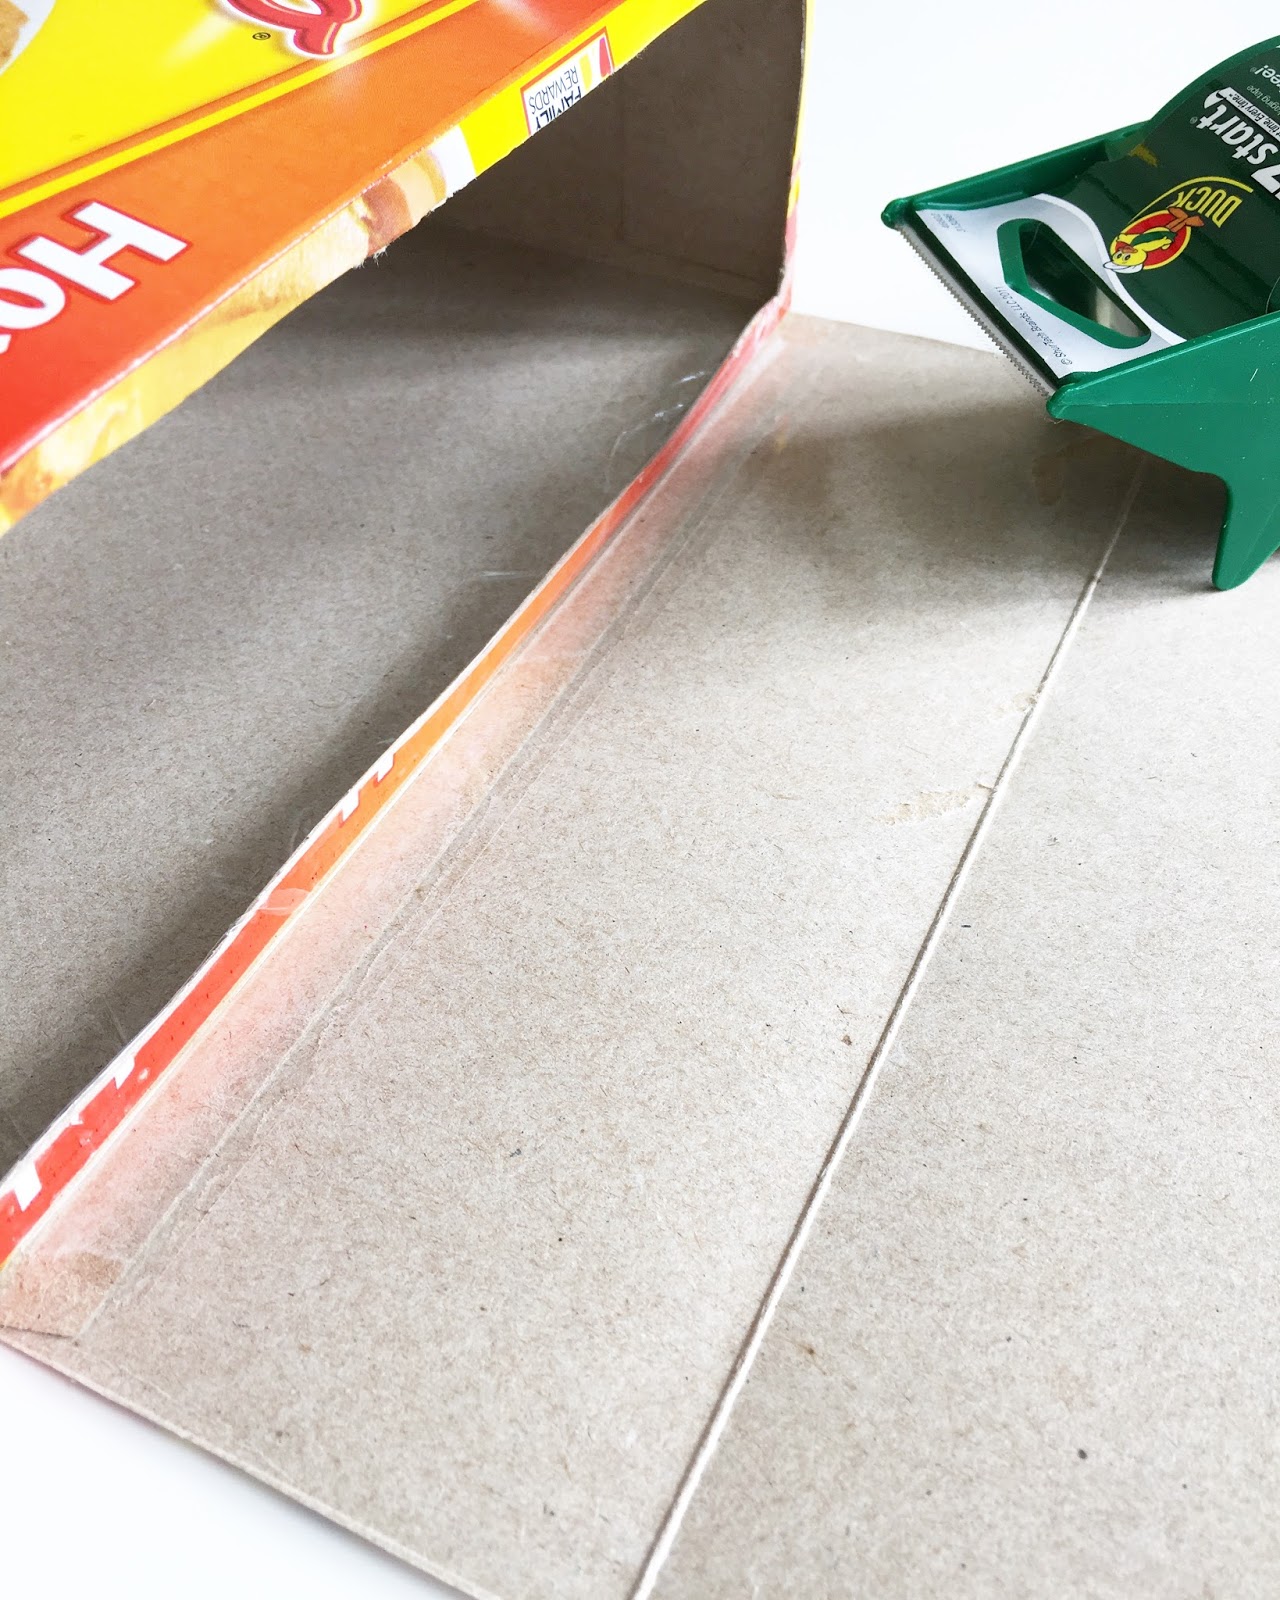
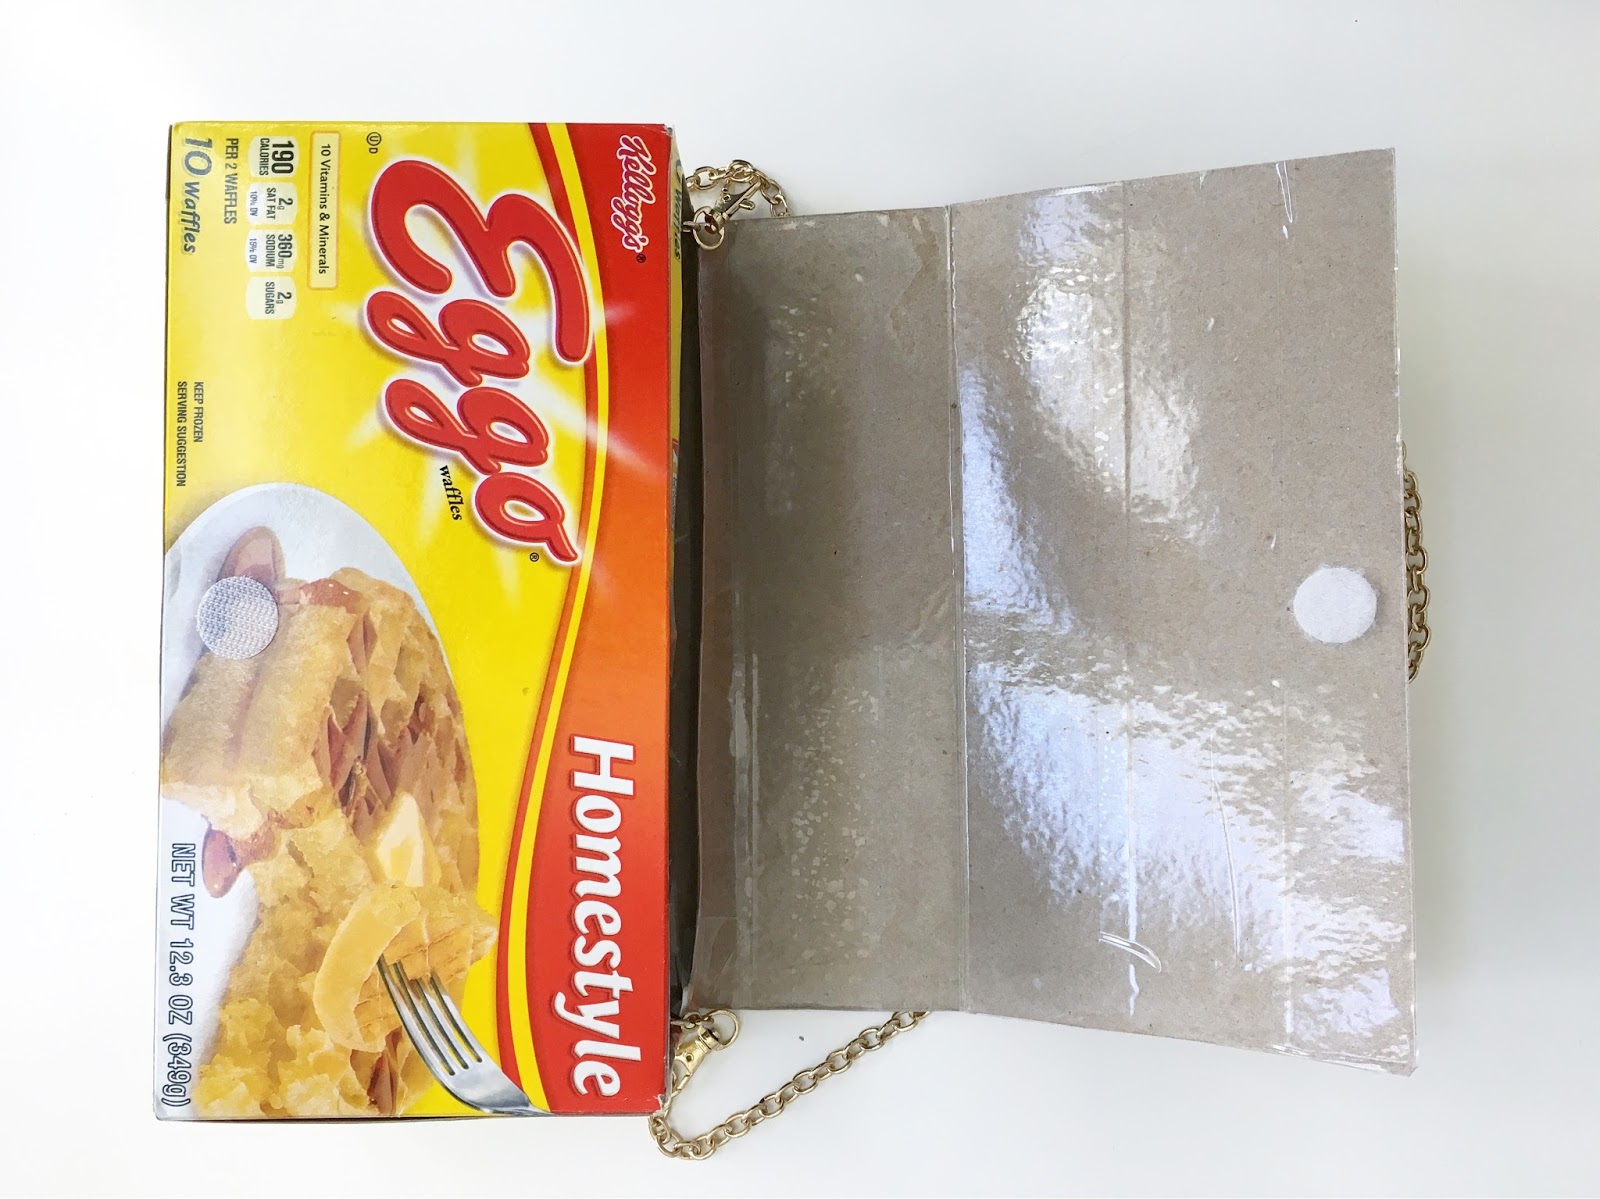
5. you have 4 flaps now. Line the insides of the BOTTOM and BACK flaps only with double stick tape. Make sure to leave the top two flaps without tape since that’s where the purse will open. I made that mistake if you can’t tell by the torn cardboard!
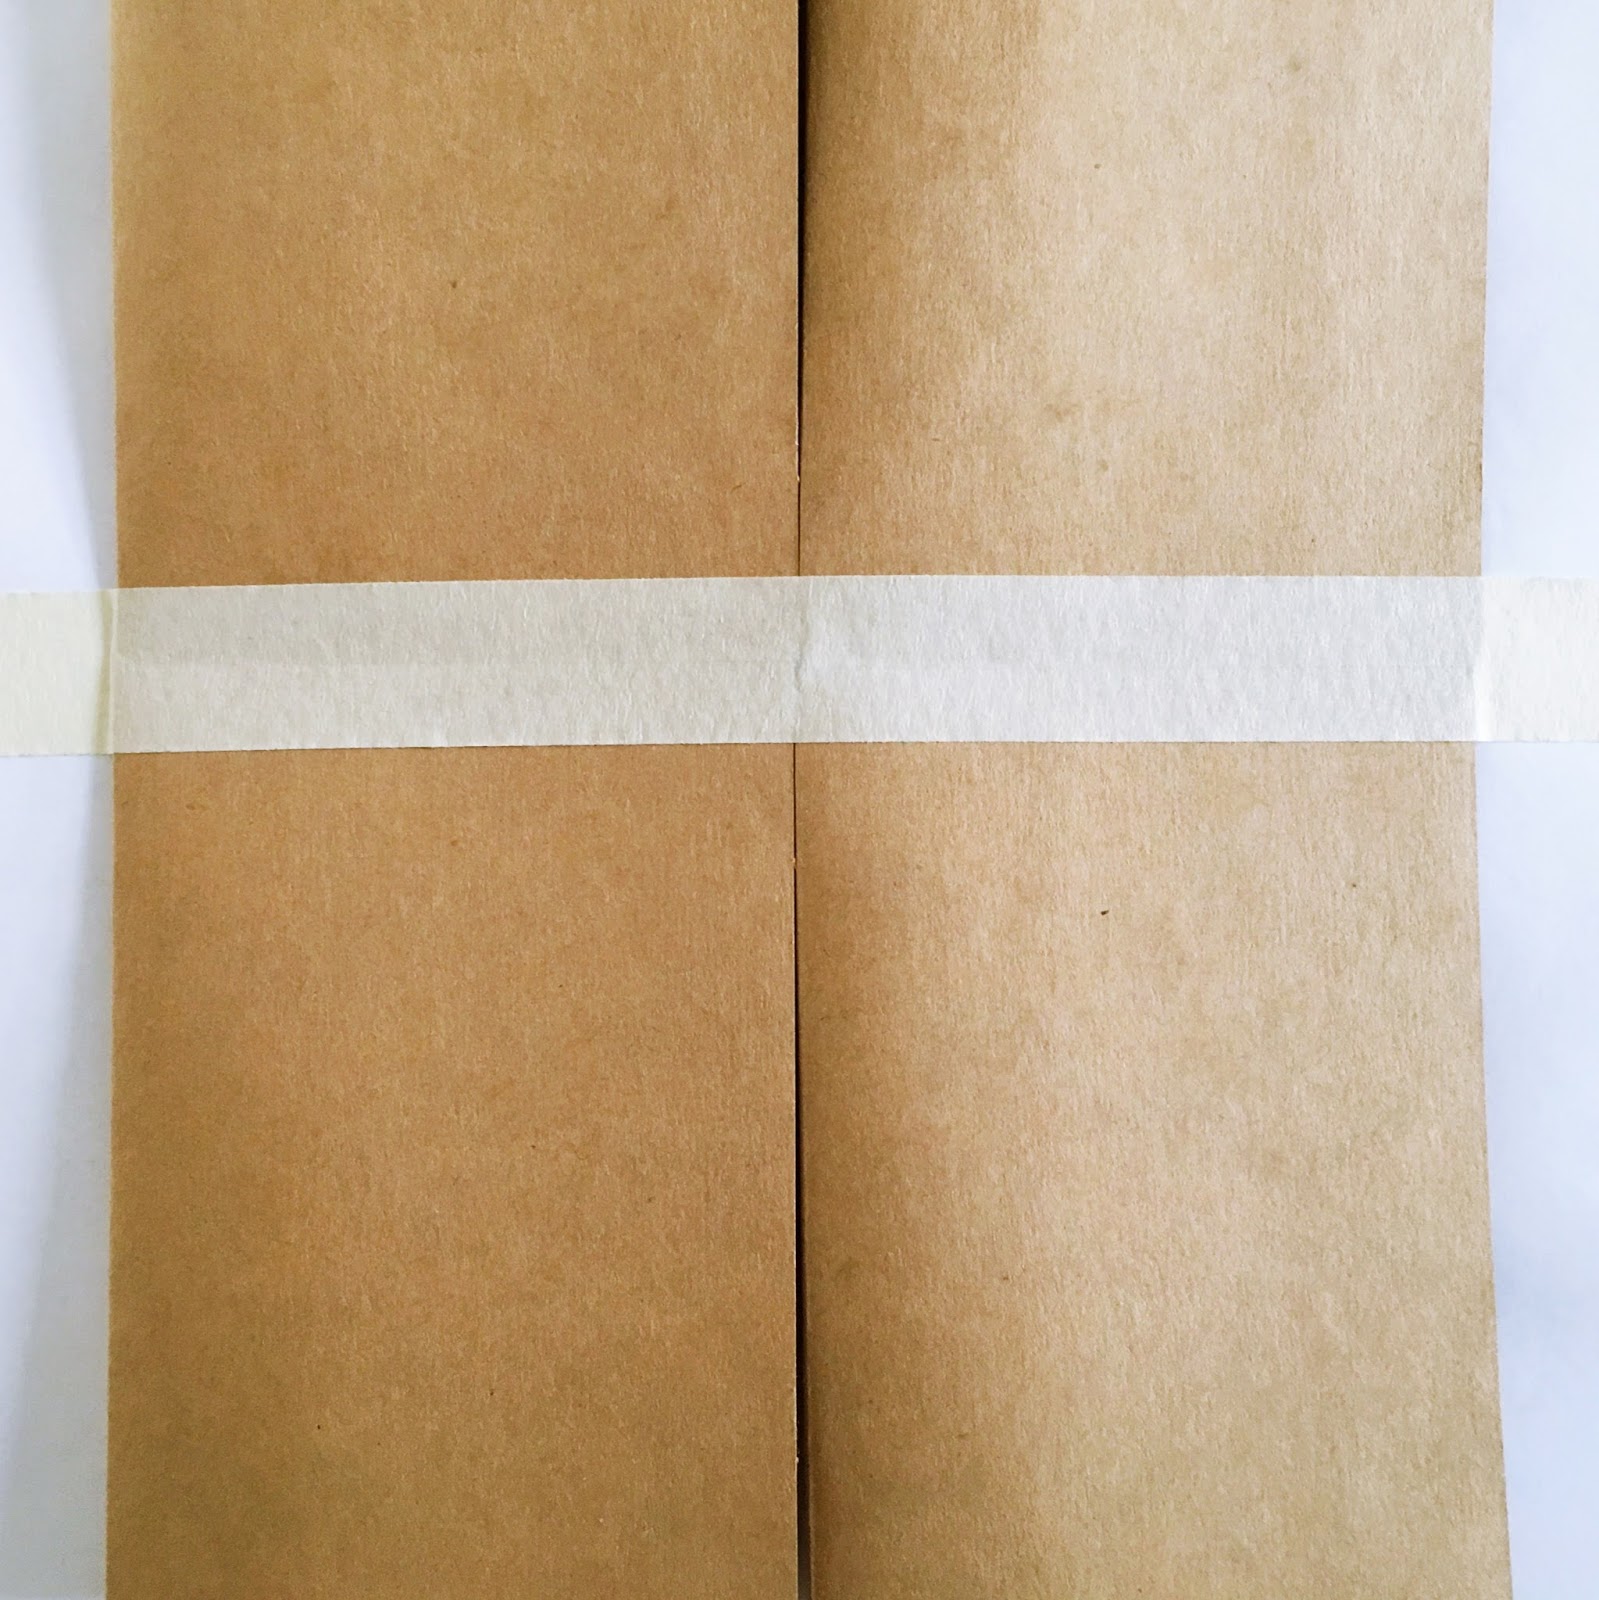
6. stick the second box to the first using the tape. Bottom to bottom, back to back. Again the top two flaps should remain tape-free.
7. reinforce the flap of the second box to the first box with clear packing tape. For extra security and some shine, you can line the whole inside flap with tape.
8. For the chain…since your hole punch probably isn’t strong enough to punch a hole through three layers, you’ll need to go one layer at a time. Punch a hole on each side of the box about an inch down from the top. Depending on size of the chain attachments, you may have to make a couple slits on either side of the hole like I did, but you can’t really see it. Using double stick tape, attach the extra sides from the second box on top of the first box sides to make it sturdier. Line up your hole punch and punch a hole through the new side. Put clear packing tape on the inside of the box sides and punch a hole through that. Now you should have three layers (two box layers and one tape layer) all lined up. 
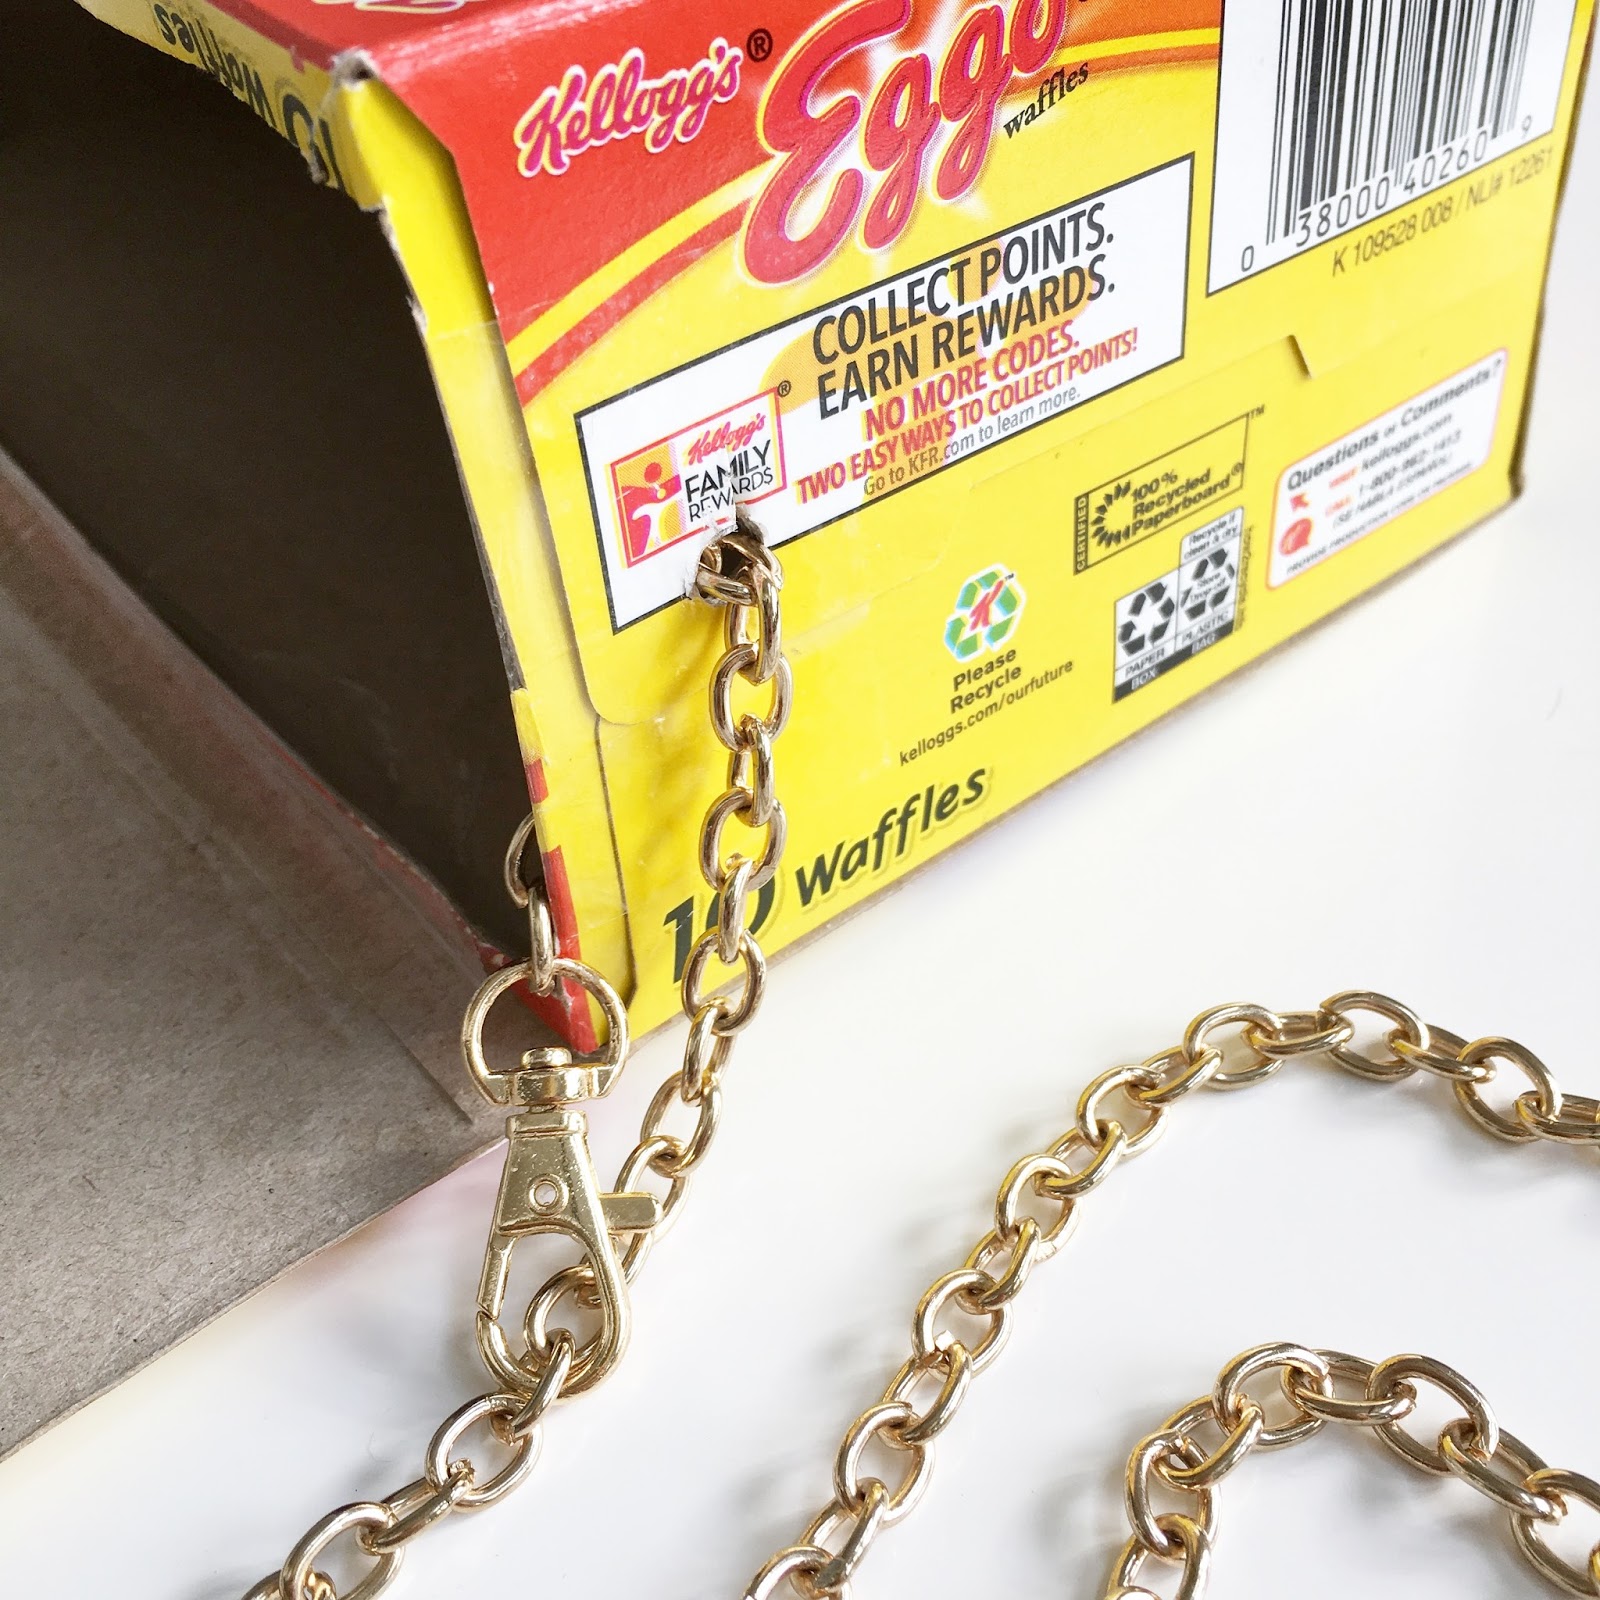
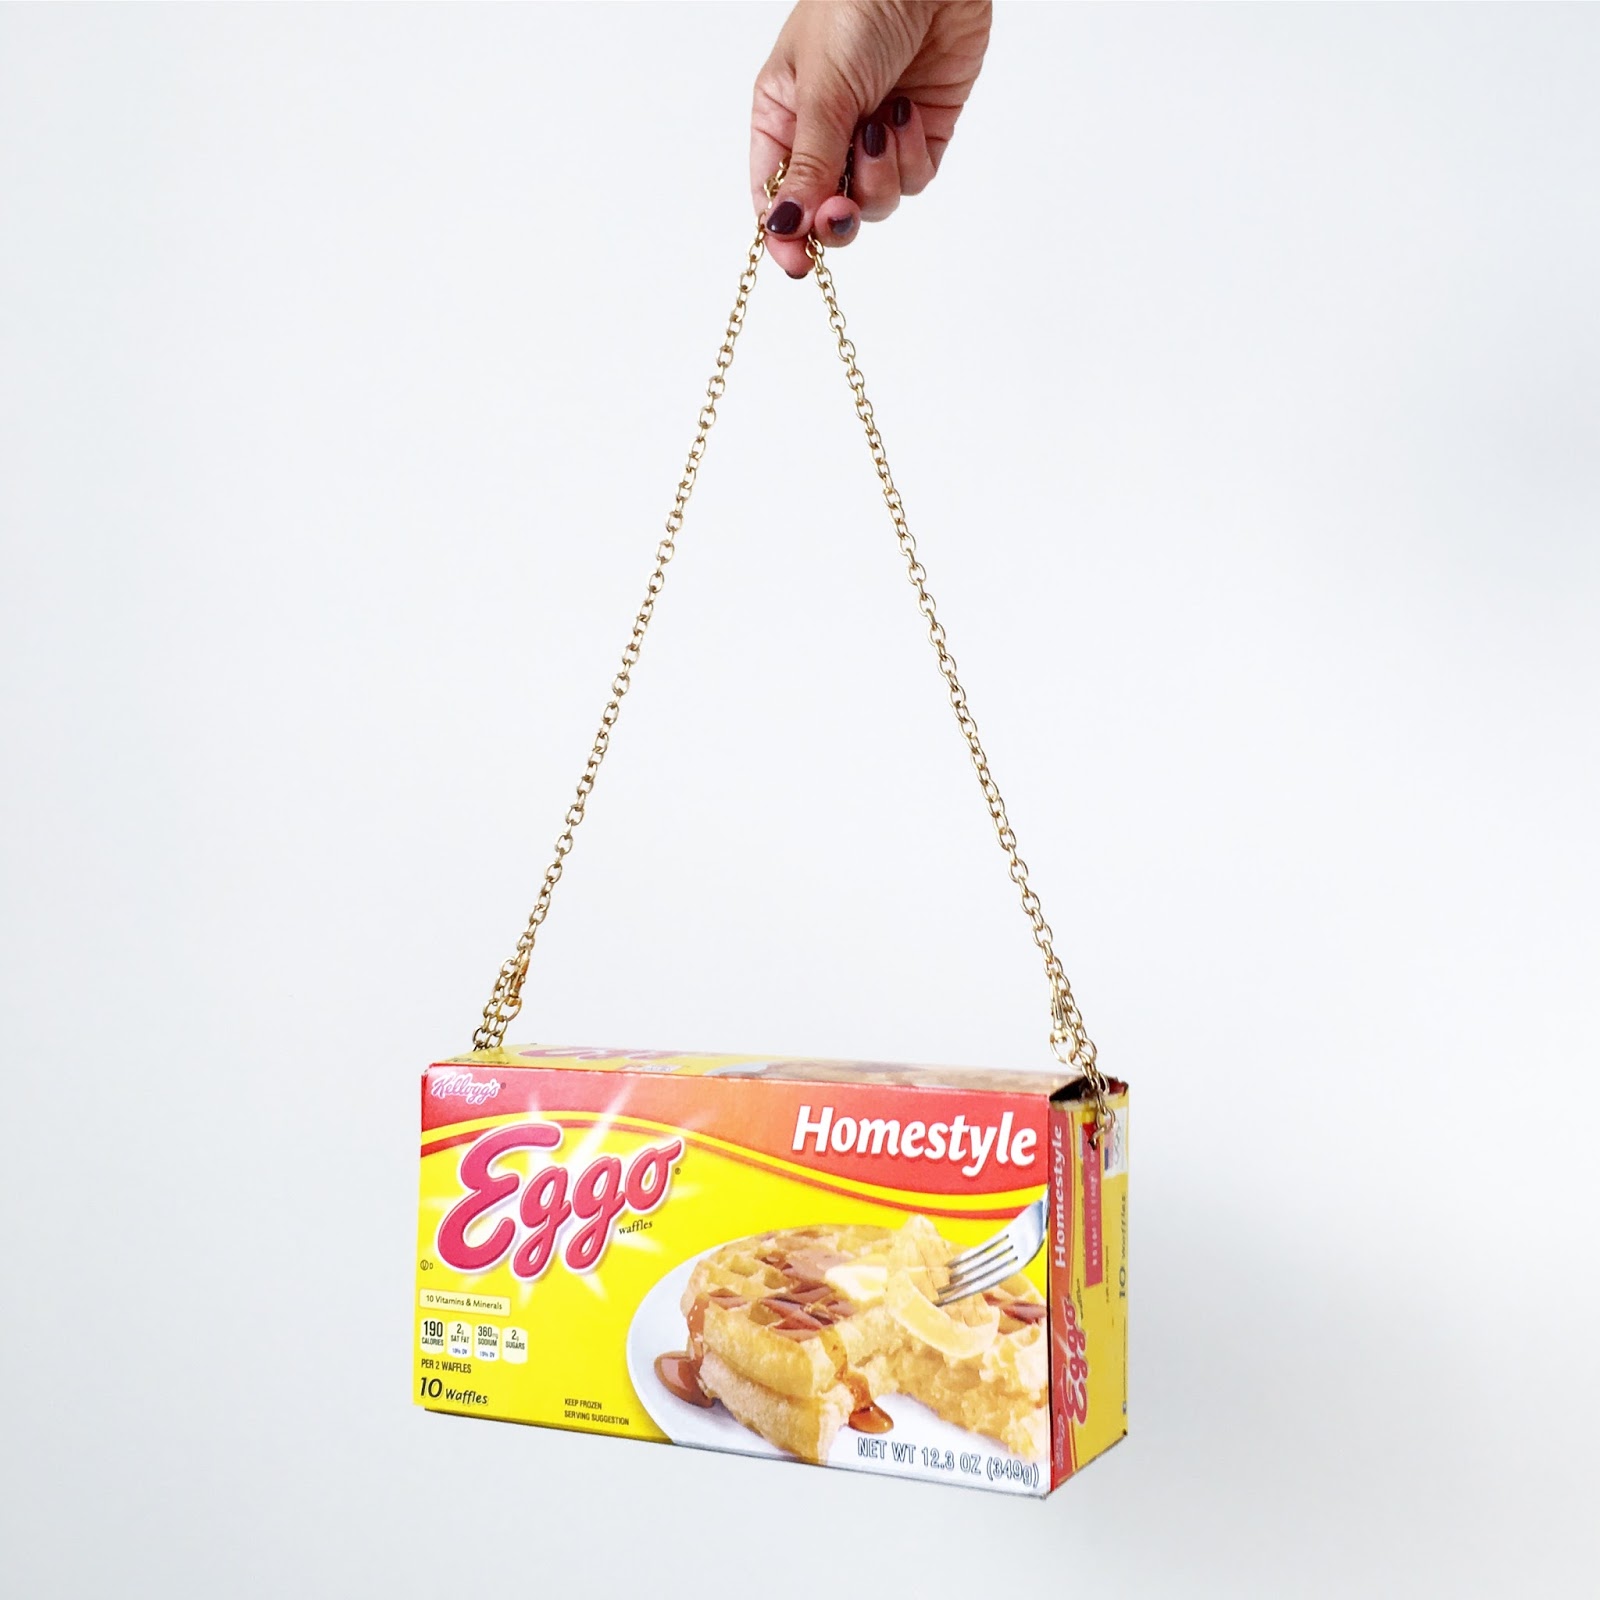
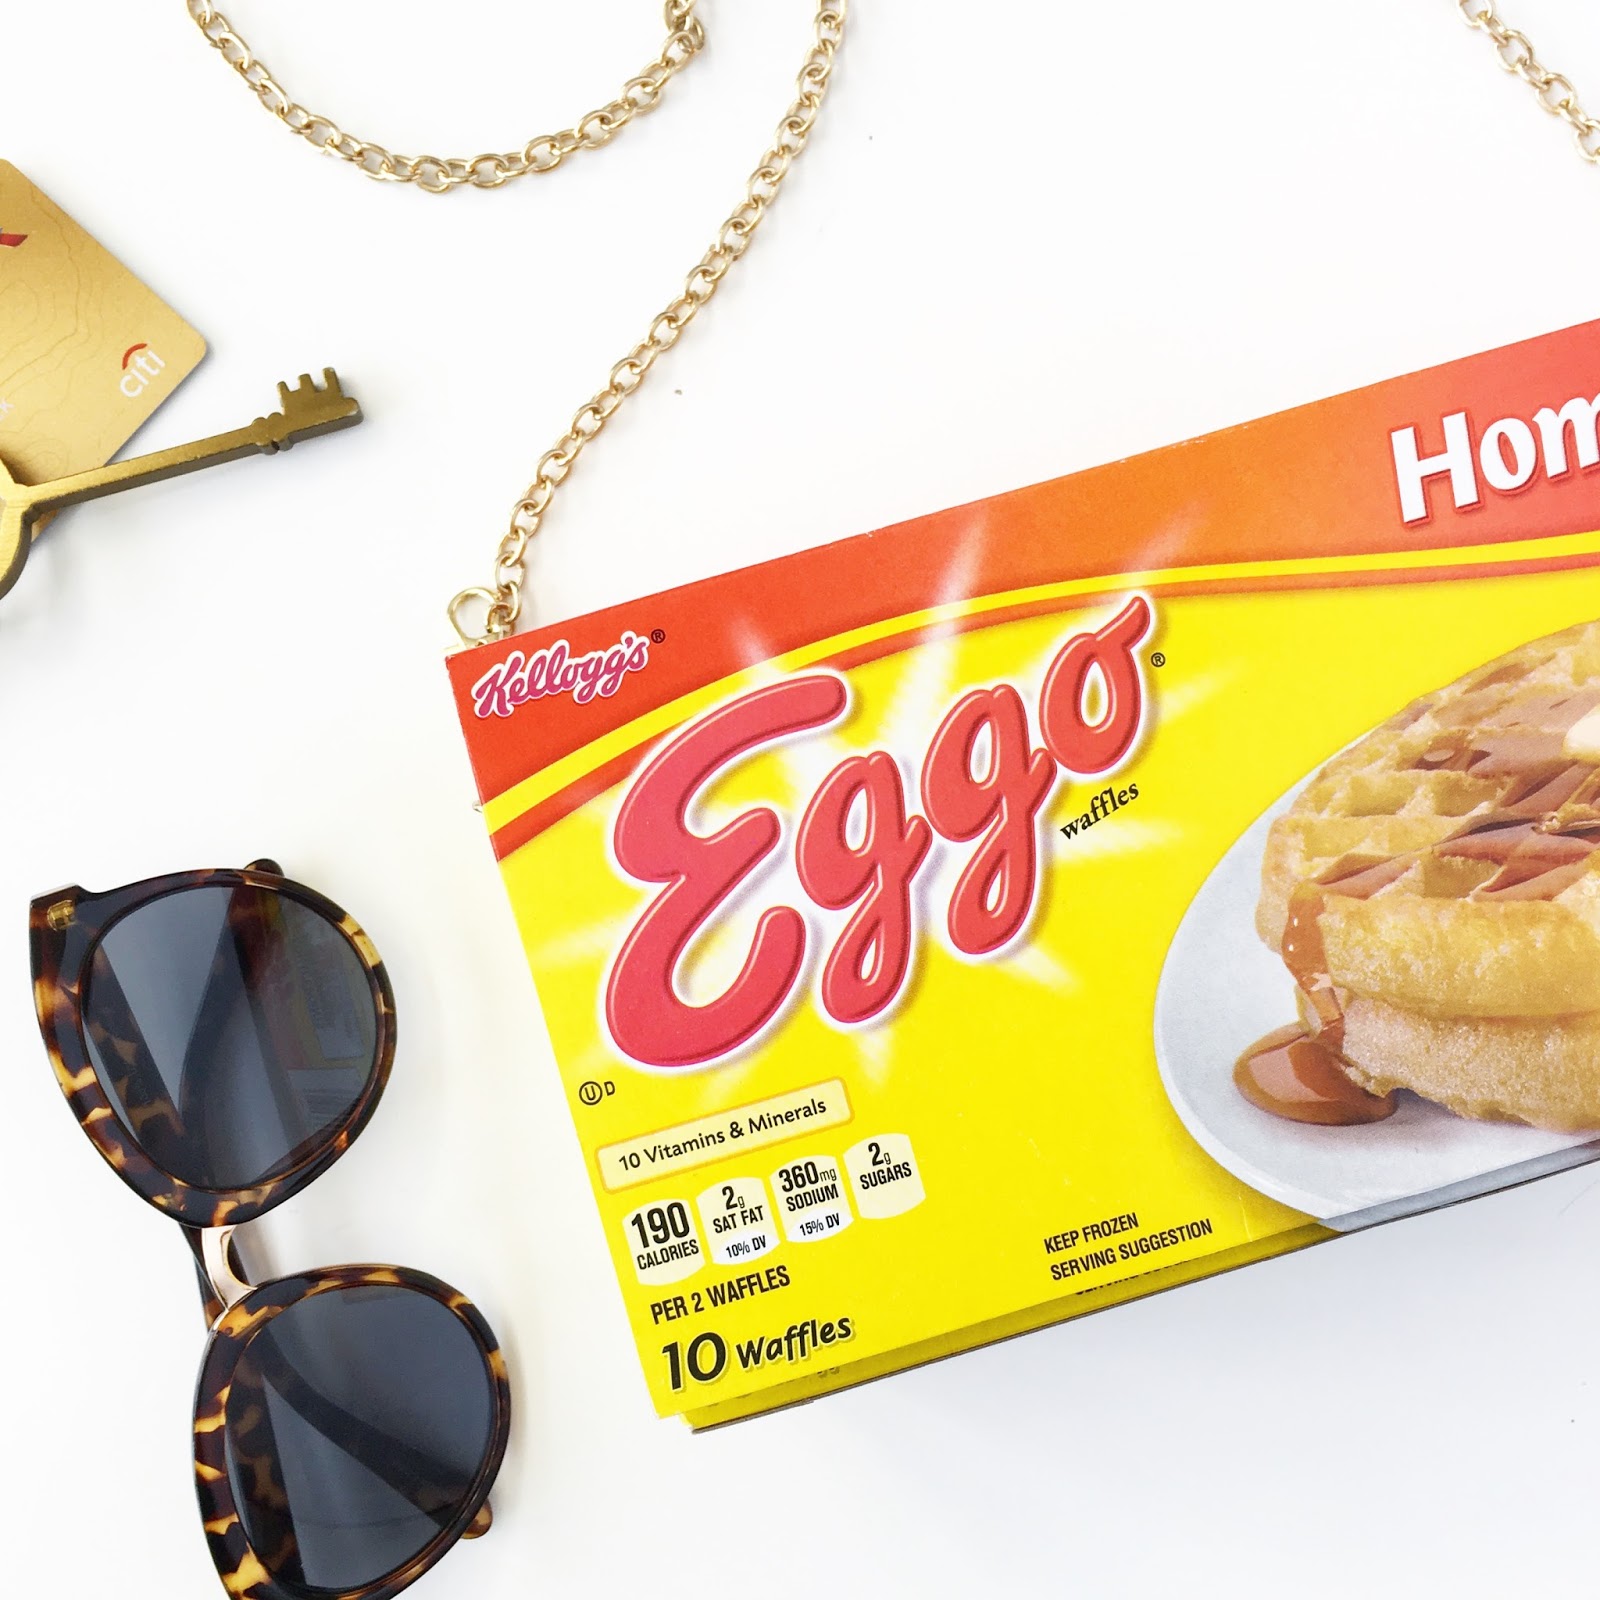
9. Now you can thread your purse chain through and attach it to itself. You can adjust the chain strap at this point. Link to purchase the chain strap is below. This one is actually from clutch I own!
10. reinforce any or all sides on the inside of the box with clear tape if you want it to be really sturdy.
11. attach the velcro to the opening.
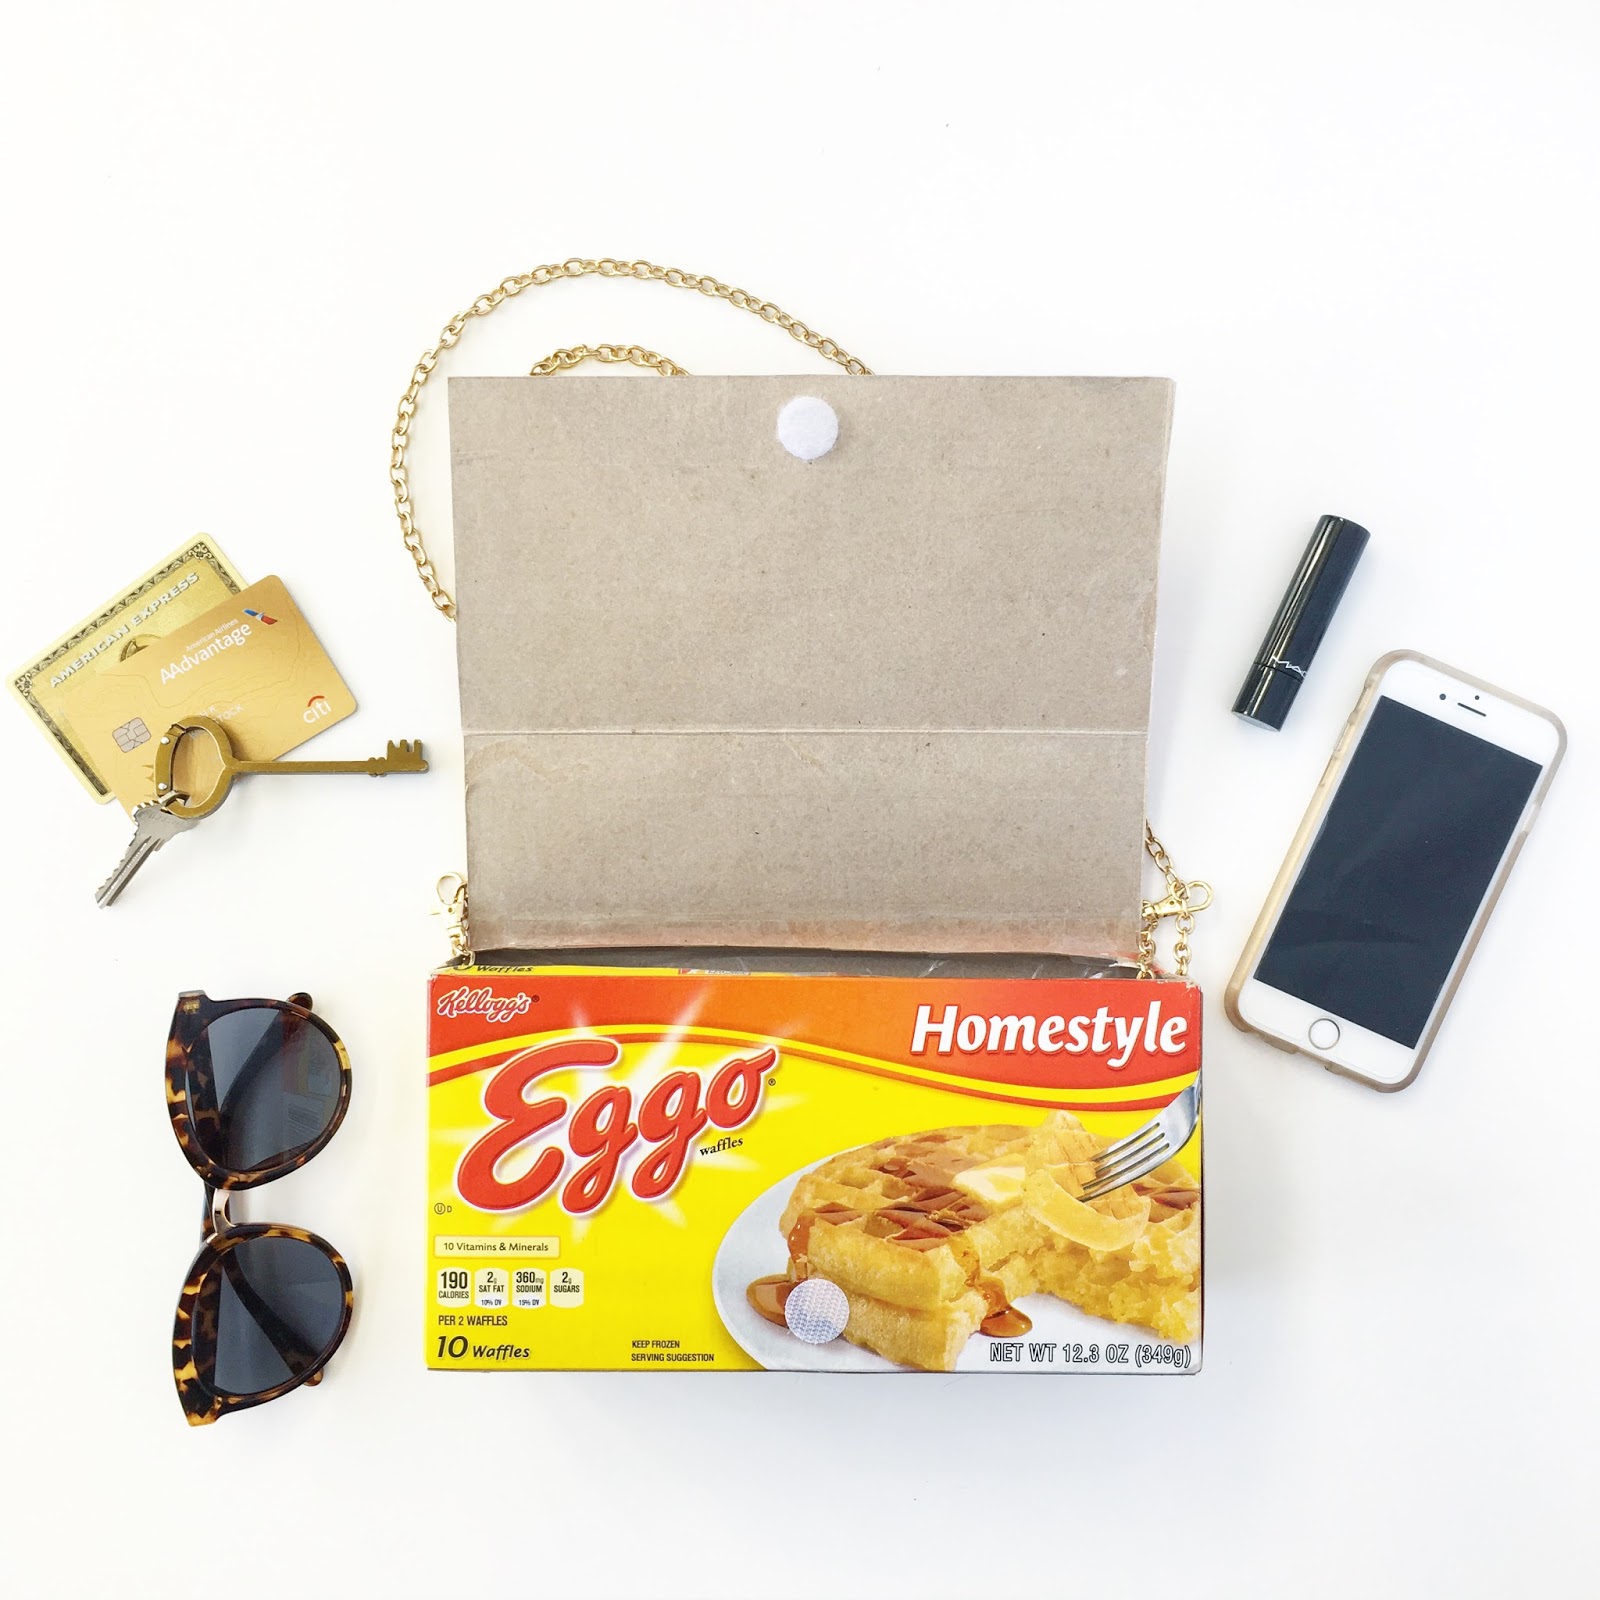
12. be the chicest Eleven at your Halloween party!
Please tag us on instagram @loveandlion in your costume photos!! We would love to see what you come up with!
xo

DIY HALLOWEEN COSTUME FOR LITTLES – DUSTIN, STRANGER THINGS

Dustin, the most endearing character on Stranger Things!! As soon as he came on the screen I was like… bam. Halloween costume. If I had a girl you KNOW she would have been dressed up as Barb. Ummm anyone have a baby I can borrow?
My almost 3 year old, Max, kind of exudes Dustin’s personality. Silly, funny even when he doesn’t mean to be, totally into farts and chocolate pudding and thinking both are awesome… plus the curly hair! If only I had let it grow longer the past couple months! But hey, can’t plan everything.
Everything is linked at the bottom, but the key pieces here are the hat and shirt. 
The hat is from Sweetgrly Designs and actually comes with the A.V. Club button! How nice is that? Love this Etsy shop! Lots of Stranger Things buttons, 70’s/80’s/90’s trading cards. She sent me a Back-to-the-Future card which I obviously love (see Ari’s Marty McFly costume here). Just tons of retro fun! The hat is adult size but fits Max just fine on the tightest setting.
The shirt is from Tattaaboo, retro clothing for all ages! They shipped super fast, so plenty of time for your Halloween costume. They come in adult sizes in case you want to adapt this for yourself!
I couldn’t find the exact jacket, so I layered a plaid shirt on top of this JACKET which is on sale now! I think any pants and sneaks would work. The tooth paint was the best part hahahaha! I’m still giggling about how it turned out, and I can’t believe it, but Max totally laid still while I painted it on there. It just brushes right off when you’re done. Add a backpack and flashlight, and you’re all set! Now to teach him some of Dustin’s famous quotes….
“She’s our friend, and she’s crazy!”
“Mike! I found the chocolate pudding!”
“Why are you keeping this curiosity door locked?”
“I told you a million times, my teeth are coming in. It’s called cleidocranial dysplasia.”
PS….Truth be told, Max will be trick-or-treating as a Ninja Turtle 🙂
LINKS:
More Halloween costumes for littles HERE and HERE
xo
-L

DIY HALLOWEEN COSTUME FOR LITTLES – BEANIE BOO

My kid has a ::small:: obsession with Beanie Boos. Anyone else get asked EVERYWHERE they go to buy one? Because they’re literally everywhere. At Walgreens, at the craft store, at book stores, gah! Those glittery gigantic eyes follow me everywhere! No really, they’re pretty freaking cute, and I must admit I get into when their birthdays are etc. Okay! Okay! He sold me on them!
Naturally his Halloween costume would have to be a Beanie Boo. There are very few animal onesie costumes that don’t already have a face or eyes on them. This lion costume is from Party City- it’s actually the Cowardly Lion from Wizard of Oz with the badge snipped off. So that part was easy.
Scroll down for the tutorial, free printable, and links to purchase supplies!
What you need (click each item for links)
Hole Punch
TAG
Download the Beanie Boo tag HERE and just print one sheet.
Trace and cut around each shape- outer heart, inner heart, t, y.
Cut carefully around “Beanie boos”.
Using your foam glue, attach the foam pieces: larger heart in gold on the bottom, then red, then letters.
Punch a hole in the corner (you may have to lift up the red part while it’s not totally dry and do separately since it’ll be pretty thick.
String a red ribbon through the hole and make a necklace.
 
GLASSES
I made him regular glasses for night time since it would be too dark to trick or treat with sunglasses on!!
Paint the outer rim carefully with glitter glue.
Glitter over a piece of paper so that you can funnel it back into your glitter tube when you’re done. Let dry completely.
Paint over one more glue coat and let dry.
FACE PAINT
Add as much or as little (maybe just the nose!) as you want.
 “Mommy, I bet people can’t tell which one I am”.
xo
-L

TURN YOUR KID’S ARTWORK INTO ART

A perfect art project for Teacher’s Appreciation Day or Mother’s Day. By simply taping the edges of fold-over notes, it creates a clean border for the chaos within. Then write your sweet note inside and send! Or make a few and bundle them together with twine and give as custom stationery. Step-by-step tutorial below.
WHAT YOU NEED:
acrylic or oil paints
paint brushes
masking tape or painters tape
foldover notes or cardstock
willing children
STEP 1:
Line up all notecards so that the sides are touching
STEP 2: 
Put one piece of tape down in between two cards just to save yourself time and supplies. Tape ALL edges down so that you have a tape border around each card.
STEP 3:
Have your kids fill each card with paint edge to edge. I like to choose the paint colors myself so that they turn out sort of nice no matter what! Start with warm tones, then cool, then have them finish with a clean skinny brush for a metallic paint. 
STEP 4:
Carefully peel off the tape and voila! A nice clean boarder that looks pretty enough to gift!
xo

TEACHER OF WILD ONES (FREE PRINTABLE)

Show your kiddo’s teacher some love with this free printable coffee mug! And throw in a gift card to Starbucks… because that’s what they really want! This is perfect for my preschool-aged kids. Trust me, they really are wild ones.
Scroll down for the link to download and to purchase the coffee mugs.
Simply print out the free download on cardstock, cut along the lines, and insert into the inner layer of the coffee mug (it just screws off really easily). It would be fun to have glitter or confetti in there too. Or you have your kiddo color the paper or put a photo in there… the options are endless.
For another free printable for teachers, click HERE!
Treat yo teachers!
xo

DALMATION WALL STENCIL | BEFORE & AFTER

      We recently purchased a fixer upper of our own, and have big plans for it. However, we are having to start small. One thing we did not have that I felt was an immediate need was a place to hang our jackets and bags and put our shoes. Our laundry room is the room we enter into from our garage, so I decided to make a small utility wall in there. The entire room is getting a makeover… new floors, cabinets, countertop, light fixture…. the works. Until then, I just needed a space to hang all of the crap that would make its way onto our sofa and living room floor. No Bueno!
    
 I recently became obsessed with all things dalmatian, and wondered how I could incorporate this print into my home. I just wanted that one scene stealing wall in my home. I toyed with doing removable wallpaper, but truthfully, it was a bit pricey for a laundry room. Also, what if I want something different in the future? I just didn’t want to deal with removing wallpaper. With stencils, you can use paint and just paint right over it and even use the stencil on a different wall if you want. The more research I did, I felt confident that I could handle doing a stencil… on my own….for the first time. Well, I was at least going to try. 
     
I came across the amazing stencils from Gypsy Mint, and fell. in. love! They were kind enough to send me their dalmatian pattern to try, and I could NOT wait to get it up on my wall. The best part was that they let me customize my stencil. They have such great designs ready for purchase, but customizing is their specialty, and it allowed me to get my stencil just the way I wanted it. I also really love this one for a little kids’ room as well as this one. They are just all so good friends!
 First, I had to pick the colors that I wanted to use. White is not just white, and black is not just black guys. I wanted a specific warm white with a softer black shade. I ended up going with BM’s White Dove and Space Black. Space Black actually looks like a true navy when it is put up against something black, but on the wall…. it is “black” and perfect! This was my wall before ( kind of). I may have gotten a little paint happy before snapping this photo. It was just a dark grey room with no windows that needed some serious brightening. 
The stencil comes with clear cut instructions on how to transform a wall in no time. I altered those instructions a tad so that I could work with what I had on hand rather than buying more supplies. For instance, I used painter’s tape to hold my stencil up rather than spray adhesive. It worked just fine. There was a little bleeding here and there, but I am such a perfectionist, that I was planning on doing touching up afterwards anyway. The stencil was extremely sturdy and such great quality!! I was really impressed!
From left to right: I placed my stencil in the center of my wall as instructed. Then, I got the paint on my mini roller. I used a mini roller cover for a roller handle I already owned. I used a knit roller, NOT a foam roller. I rolled over the stencil after getting as much excess paint off as possible. I didn’t want it to bleed underneath the stencil. It is really really important to go slow and not get impatient. SO. HARD for me. I left the stencil on while the first (very thin) layer dried enough for me to add a second coat. Then, I removed the stencil and just laid it down until I was ready to place it in the next space. The great thing about this pattern is that you can’t really mess up! There are arrows on the stencil to help you with placement, but if there were spaces that had less spots, I just went back and added them at the end. I did the edges of the wall very last. I got as many full stencil coverings as possible first. 
Here is what this tiny little Gypsy Mint box allowed me to create in my own home. I am obsessed with it, and it is by far my favorite thing to look at around my house. I can’t thank them enough!

For our coat hooks, we simply took 2 1×4 planks, stained them with our stain of choice, and after searching, purchasing, hating, returning, and searching some more for the perfect brass hooks…. Target saves me. Have you guys seen their new brass hardware? Sigh…. I love you Target!! I cannot wait to reveal the entire room with you guys here in the next few weeks. Sad to say, I spend a lot of time doing laundry. An efficient room that is pretty to look at is just a must!
Sources:
Stencil – be sure and check these ladies out! | Basket | Brass Hooks | Mirror  

RECIPE: DONUT CAKE

 This cake may look insane and tricky, but it’s the EASIEST cake you could make! Decadent? Yes. Delicious? Yes. Difficult? NOT AT ALL!
INSTRUCTIONS:
1. Buy a store bought cake or make one from a box… normally I’d say absolutely not, but when you’re going to cover it with donuts, you might as well. I made this one with an angel food cake box mix since that’s my mom’s fav and it was her birthday!
2. Buy plain or glazed donuts in regular and mini sizes from the store. Donut holes would have been really cute, but they didn’t have any that day. The minis were from a Hostess bag!
3. Make the glaze (recipe below). I divided the glaze up into three bowls and tinted them with food coloring
4. Pour the glaze just on top of the cake and let the sides drip down. Top with sprinkles and let dry.
5. Dip the tops of the donuts in the glaze and top with sprinkles and let dry.
6. Pile up the donuts on top of the cake and secure with tooth picks. That’s it.
GLAZE RECIPE:
2 cups powdered sugar
2 tbsp butter, very soft
1 tsp vanilla
1 tbps hot milk
Mix all together. If the glaze is too thick to be drippy, add a little more milk. If it’s too runny, add more powdered sugar. Divide the glaze into three bowls with a little more glaze in the color you’ll use for the cake. The glaze dries pretty quickly so make sure to cover with saran wrap pressed to the top if you make ahead of time.

This is a great glaze for frosting sugar cookies too!

This would be so yummy with a chocolate ganache or caramel or peanut butter… yum the list goes on!
ENJOY!
-L

JT + JIMMY PALENTINE CARD (FREE PRINTABLE)

Probably the most epic and most adorable bromance of our time: Justin Timberlake and Jimmy Fallon. Is there anything better than watching them just laugh hysterically with each other? Ugh. so cute.
Here’s one last Valentine’s Day free printable for your fav PALentine!
 1. Download the the card HERE.
2. Print on card stock for best results.
3. Cut using a PAPER CUTTER for perfect lines.
Download our other class Valentine’s Day designs below by clicking on the titles:

DIY HALLOWEEN COSTUME FOR LITTLES – AC SLATER

Hey Preppy. As soon as my littlest started growing curls, I was like… AC Slater! I was (okay, still totally am) a huge Saved by the Bell fan. Kelly Kapowski is basically my idol, and when you’re a kid of the 90’s, it’s pretty hard not to fall in love with Zack Morris. AC has this tough guy personality but is actually a softy- that describes Max to a T. He’s a bruiser but the sweetest little boy. 
AC is an easy peasy costume. Scroll down for sources. 
More DIY costumes HERE and HERE!
Sources:
High tops- similar
Accesories: buddy band, tiger tail, football, and lots of hair gel!

DIY HALLOWEEN COSTUME FOR LITTLES – SADNESS

Have you seen Inside Out? It’s. So. Good. If you’ve seen Inside Out and didn’t cry, then you are a robot my friend. Sadness is my son’s favorite character! He just thought she was hilarious. He has a stuffed Sadness doll he sleeps with every night and makes up jokes and songs in her voice. He’s having a Sadness-themed birthday party next month and it was an obvious choice for Halloween!
Try to find a Sadness costume. Just try. They don’t exist. So let’s make one, shall we?
First, you’ll have to give your wig a Sadness haircut. THIS is the one I ordered. The quality was amazing but it’s NOT at all what it looked like! It was super long! Chop the right side and the back short and straight across. The left needs to get longer in the front. I trimmed the bangs to just above Ari’s eyes. Then I used a curling iron to flip up the ends on long side and swoop the bangs over to the left. Spray with hairspray to set.
I ordered glasses from Amazon and they came in totally different from the image, but they worked really well I think.
There are NO children’s turtleneck sweaters anywhere! This is a woman’s sweater from Forever 21 that I’ll probably keep for myself.
The face paint went very easily and dried quickly. A little tricky to get off, but Ari didn’t seem to mind!
SOURCES:
Jeans – H&M
Shoes are old! Any blue shoes will do.
Sadness attitude:
“Trick or treeeeaaat. Halloween makes me saaaaaad”
See more of our DIY Halloween costumes HERE
-L

MAX’S COW PARTY!

My little baby turned 2!! Eek! His favorite thing in the whole wide world (besides his big bro) are COWS. He has an entire backpack full of cow figurines that attend all of our outings. With every person he meets, he tells them about cows or the one time he pet a cow or cows say moo… I could go on. There was no other choice but to make him a cute little cow party and celebrate with family!
Cow PBJ’s, farm veggies, and cow cheese! I just used a cow cookie cutter to cut out the bread and black food dye for the spots. Just dab a corner of a paper towel in the food dye and dot on the bread.
 Milk bar anyone? Vanilla, chocolate, and strawberry.
 This is what I call a deconstructed cow cake… easy peasy. I used pink frosting and pink jelly beans for the udder 🙂
I cut out squiggles of black paper for the table decoration.
I had some leftover tattoo favors from Max’s little preschool buddies that I used as table decoration. Moooo Max is 2! We do custom packaging like this in our Etsy shop!
 Our party hat DIY is HERE. Just decorate with black squiggly shapes and a pink “2”.
 Max’s “aunt” Ashley got him this bouncy cow for his birthday! He obviously LOVED it!
I made Max his tee shirt with the tattoo image printed on iron-on transfer paper.
Sources – click below:
Letter balloons by Northstar Balloons
– L

DIY PLANT CONTAINERS + DINING ROOM UPDATE

Succulents remind me of Pacific Grove, CA where my husband and I used to live. We got engaged and married out there before moving to Nashville, and sometimes I just need a little reminder of our old home town. I went to Home Depot yesterday and picked up these little beauties, but didn’t like any of their planters. Solution: spray paint. Isn’t spray paint always the solution? This DIY is incredible simple.
All you need is flat spray paint, terra cotta pots, potting soil, and plants! Simply spray and you’re done. The flat paint on the terra cotta gives it an almost cement look which was exactly what I was looking for in the first place!
 I’m OBSESSED with Target’s new fall home line! How cool are these gold knick knacks?!
Dining room update! I sold my seagrass chairs on Craigslist and bought these mod molded plastic little guys. I know it’s dark but picture this with a colorful rug underneath… should I keep these??
Nashville marquee sign is from the Nashville flea market! That was a steal!
In the end I moved these mini ones in my kitchen to add some happy color. Happy planting!
-L