Archives for December 2014

ICE CREAM SOCIAL – SIP AND SEE

My oldest friend, Rebecca, just had Ada, the sweetest little bean you ever did see! Remember her baseball themed bridal shower HERE? We had an ice cream bar then (her fav), so my mom and I went with a whole ice cream theme for her sip and see! I basically have no imagination and wanted ice cream. BTW a sip and see is a baby shower AFTER the baby is born- you sip drinks and see the baby. Get it? Might be a southern thing, I don’t know!
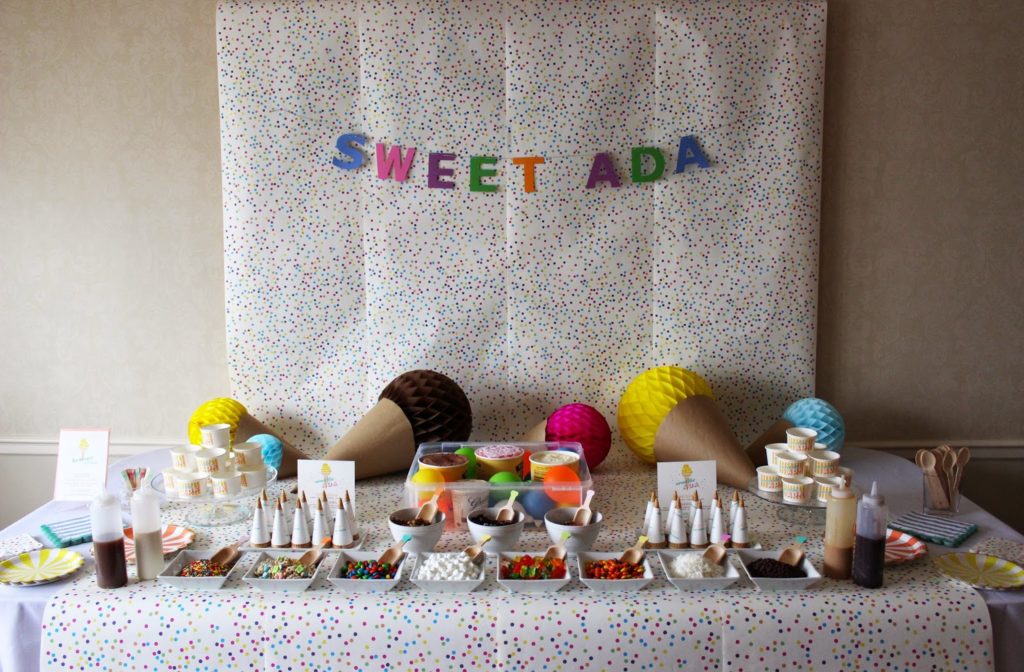
Colors and design began with this adorable invitation by Rock Paper Scissors.
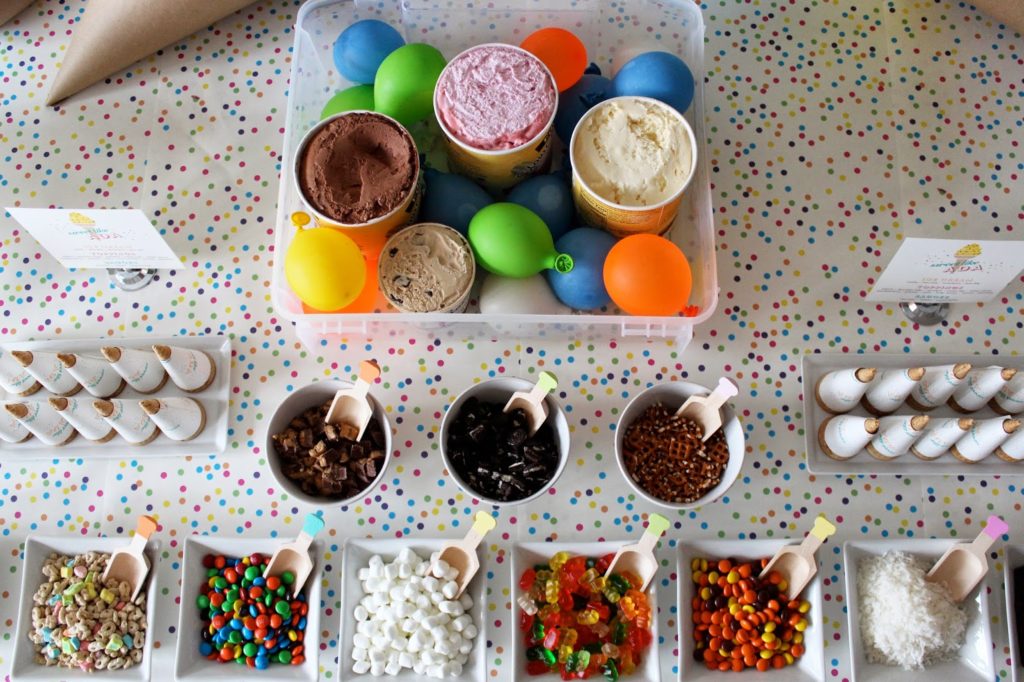
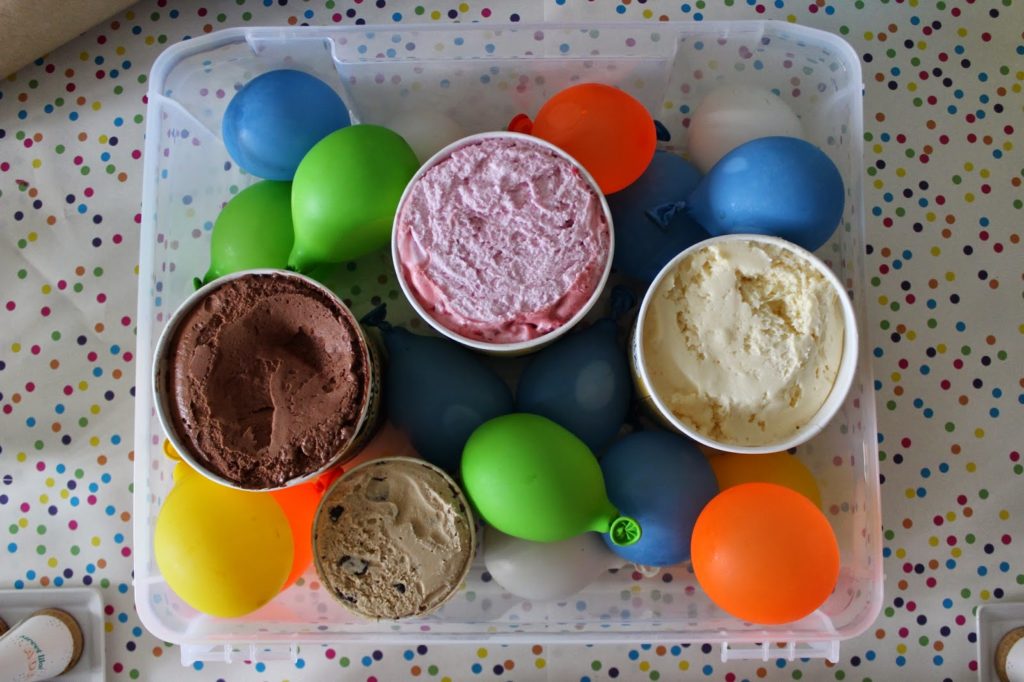
Frozen water balloons = the cuter cousin of ice cubes.
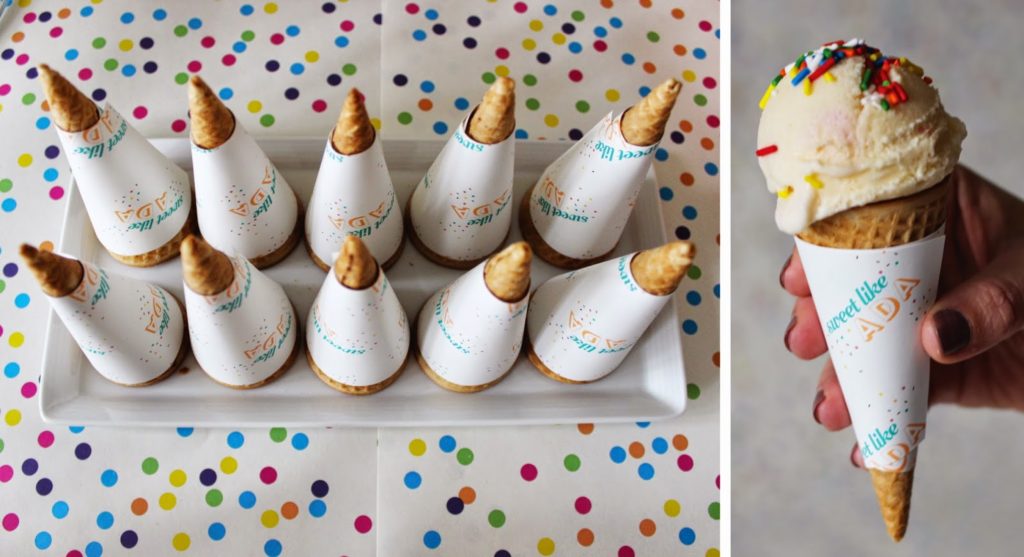
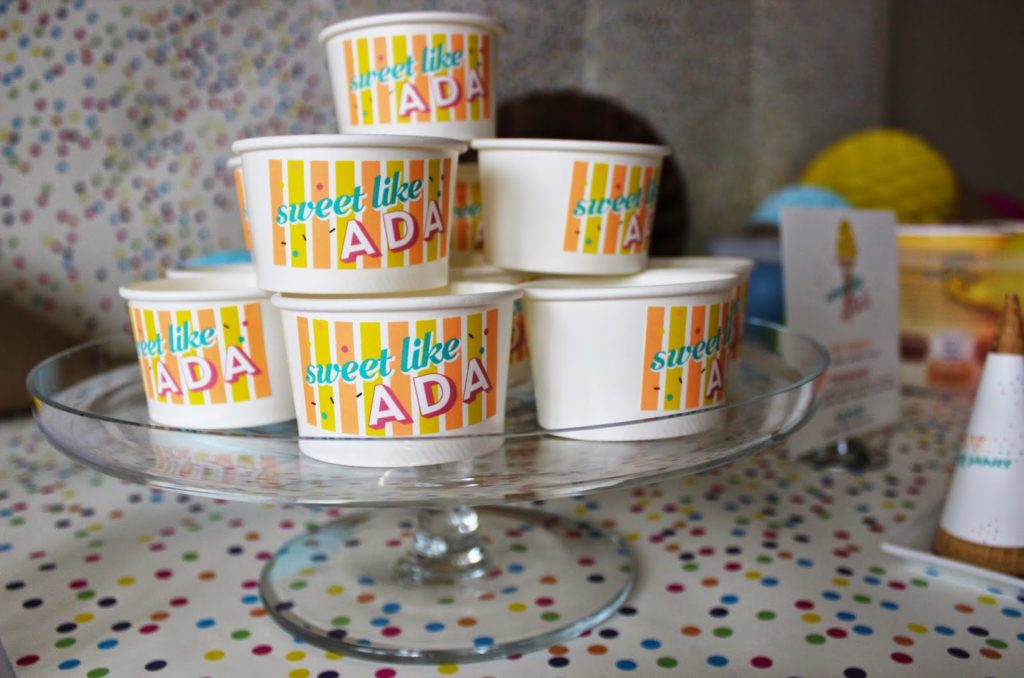
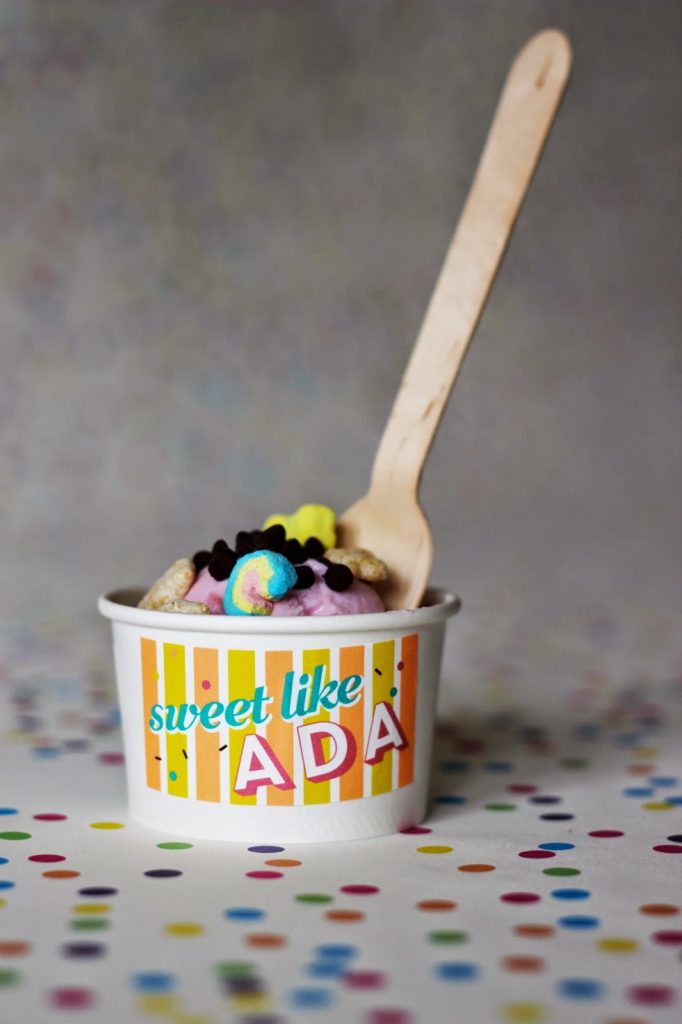
Loooove how Rock Paper Scissors designed the ice cream cup labels and cone wrappers!
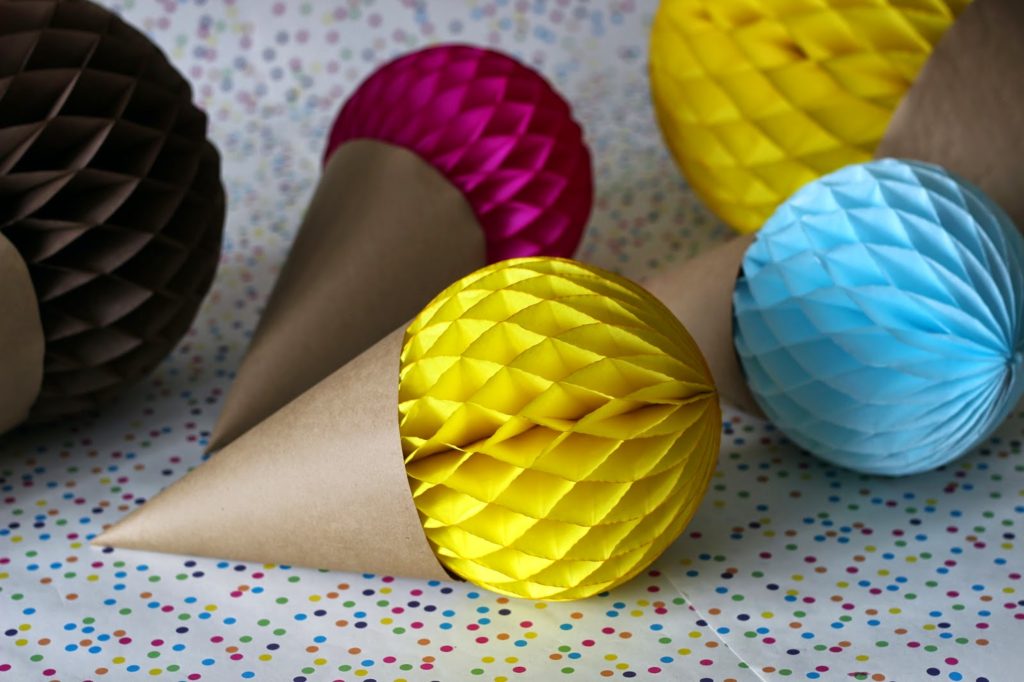
DIY GIANT ICE CREAM CONES:
-honeycomb balls (here and here)
-kraft wrapping paper
-double stick tape
For the cone, follow THIS template… just eyeball it and make it giant! It’s a little tricky, not gonna lie. Cut out and tape the ends of the cone together. Stick the honeycomb ball in and gently tape with double stick tape. I was laying mine flat on the table, so I didn’t need to secure it well. If you’re hanging them, I’d make them with the tiny honeycomb balls so they’ll be lighter.
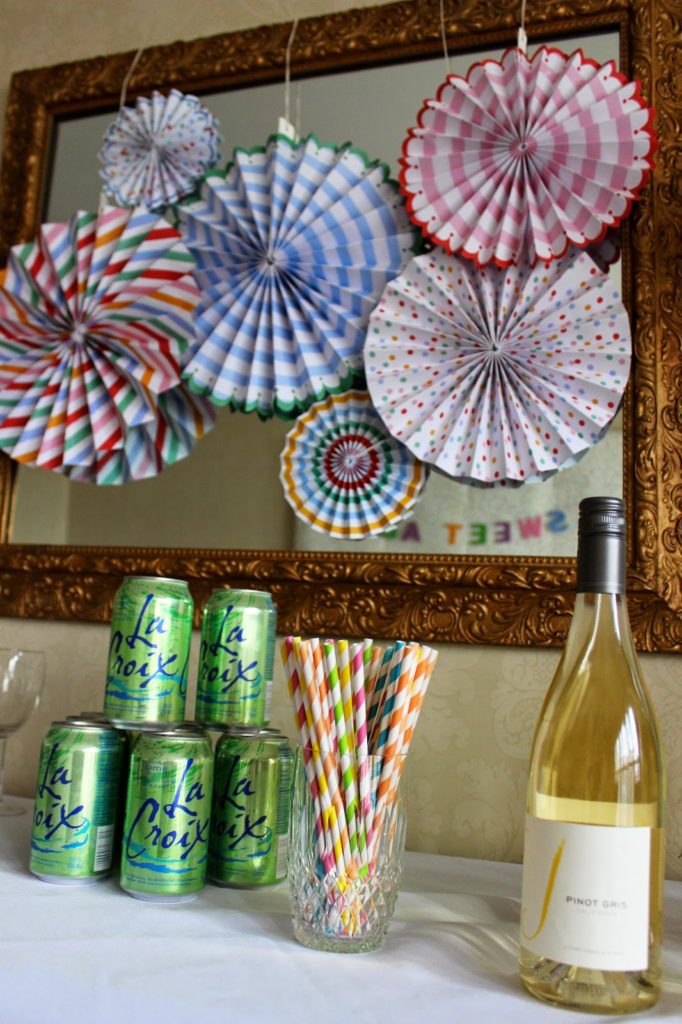
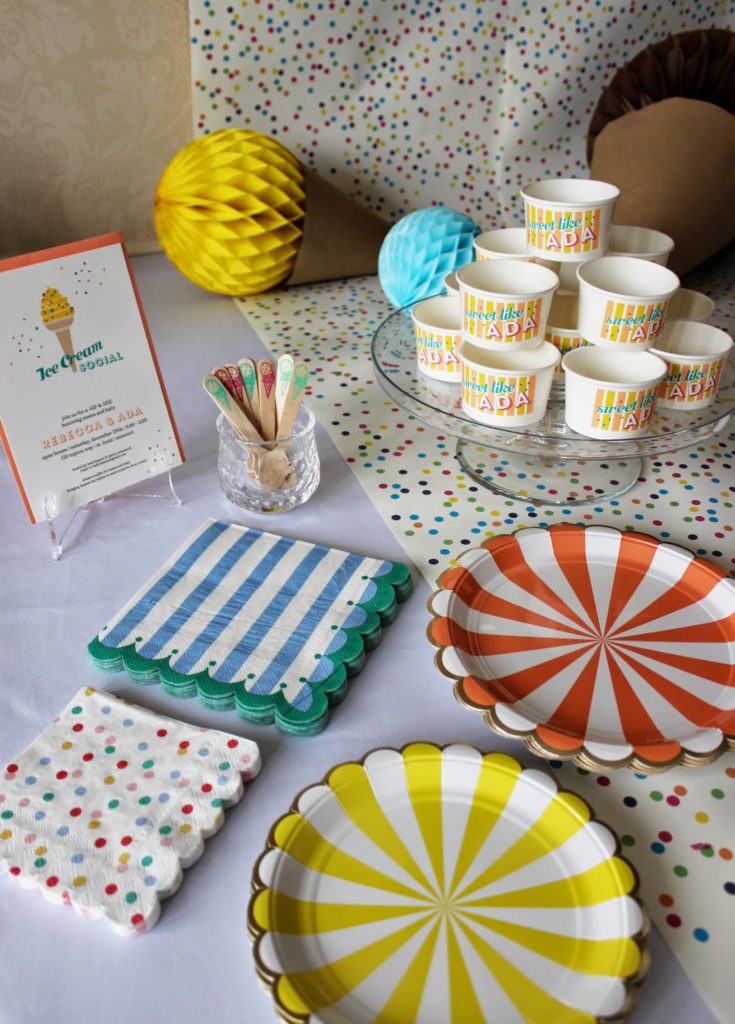
Pinwheels, plates, and napkins by Meri Meri.
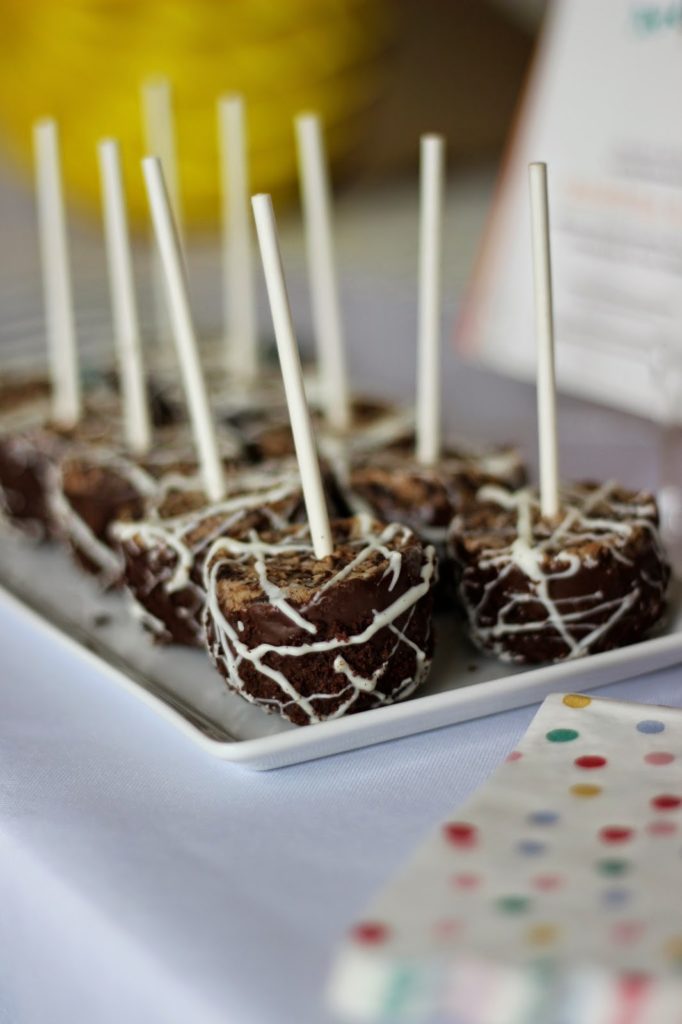
It’s not a party without Aunt Ellie’s Campfire Crispies! This time we went with gluten free Oreo flavor. Yuuuuum.
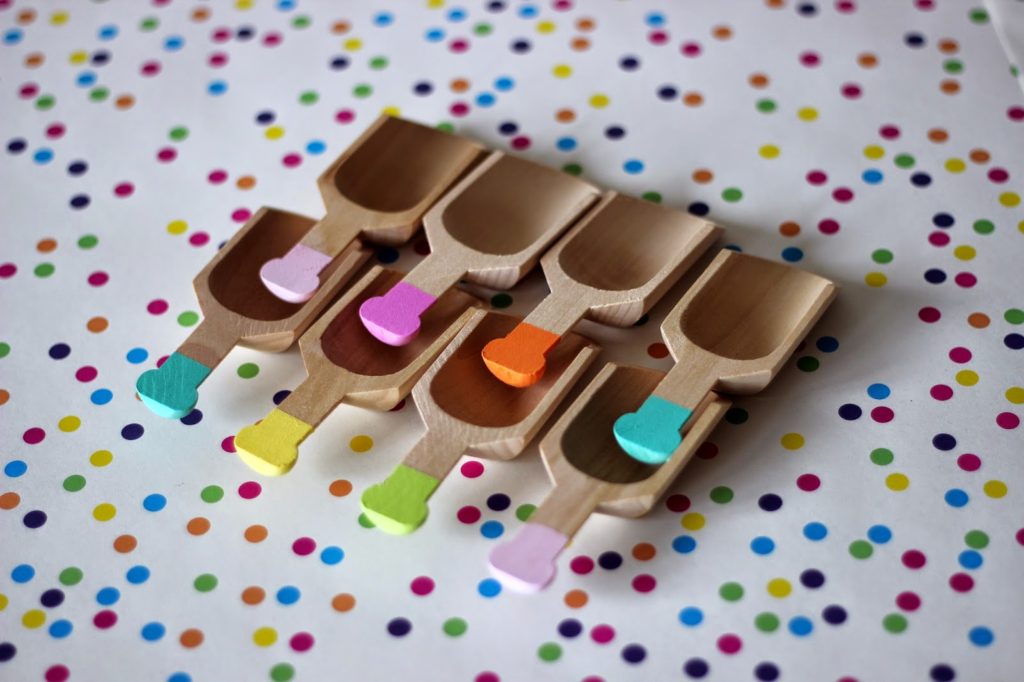
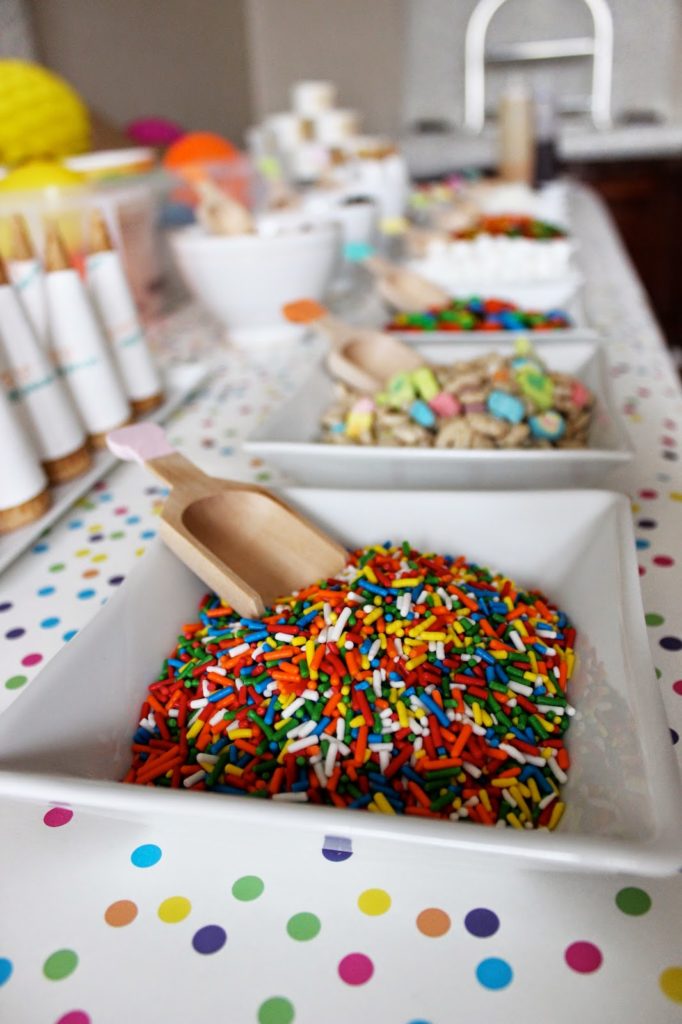
We got these adorable scoops HERE and painted them. We’re thinking about selling these little scoopity scoops painted custom in our ETSY shop- what do you think? They were perfect for ice cream toppings.
Table runner by Kitchen Papers.
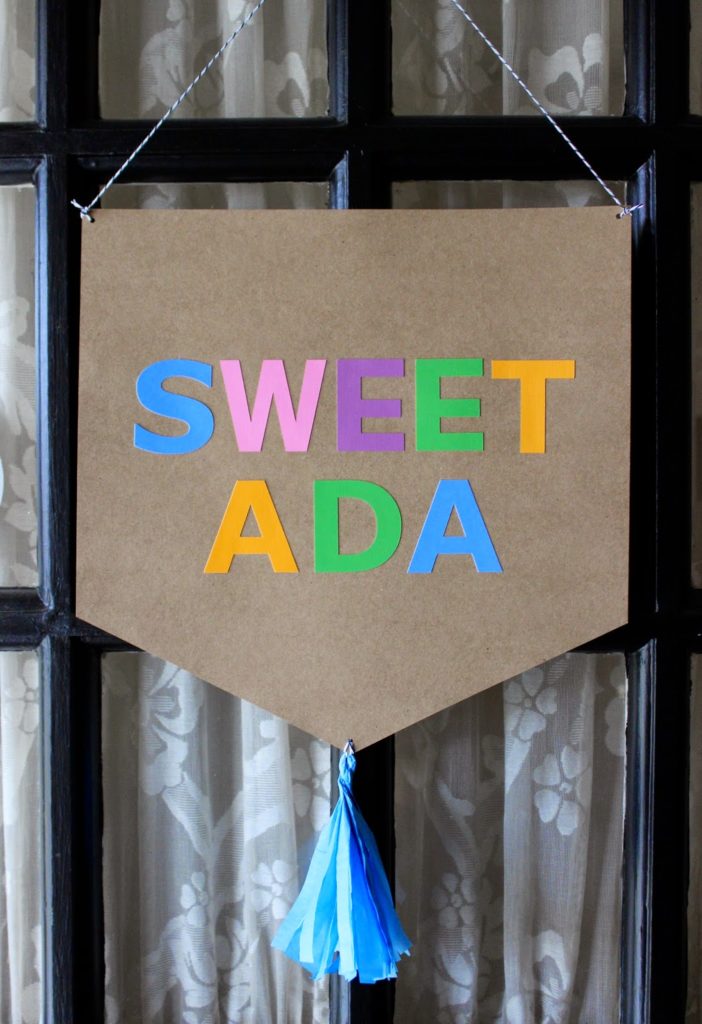
I used THIS tassel tutorial and used my Silhouette for the letters.
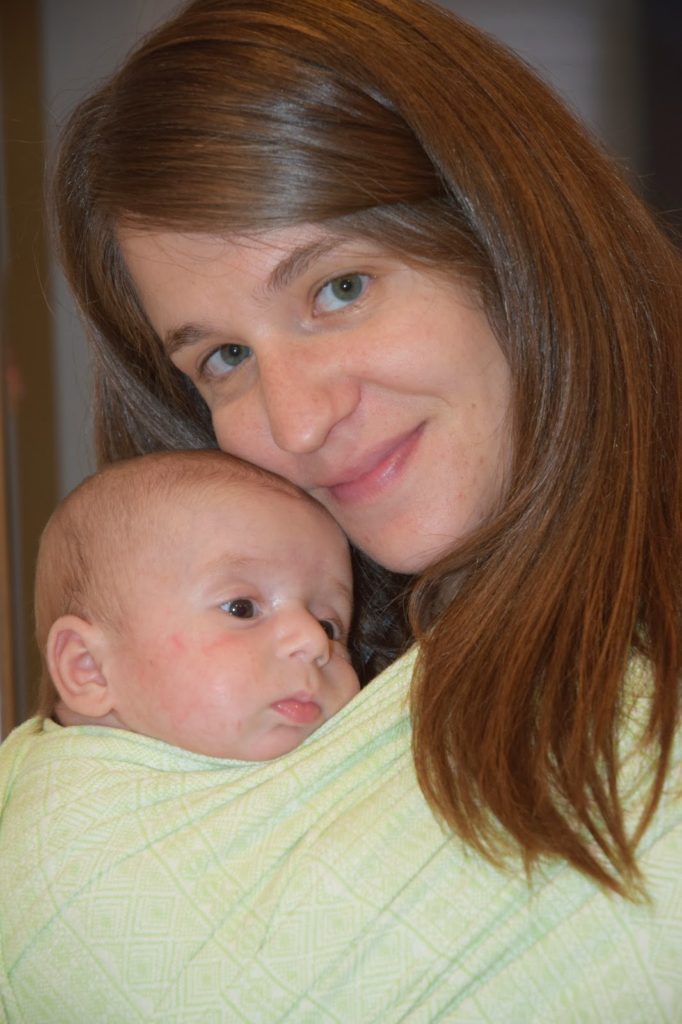
Here’s the new mama Rebecca and sweet Ada! Imagine knowing someone for your entire life, then they’re in labor, and you’re crying alone in your car just sitting in your driveway so your kids don’t get freaked out that you’re crying. Yep, that was me.
Ice cream parties are the easiest because there’s no cooking or baking! Everything is store bought but looks special depending on how you display it. Sweet and simple!
-L 

HOW TO PERFECTLY WRAP A GIFT

We hope you guys are enjoying the holiday season. Leah and I are a bit under the weather, which is NO. FUN. 
Okay, so wrapping gifts is one of our favorite tasks of the season. Most people loathe it, but we feel like if you buy beautiful wrap, gift toppers, ribbon and use these tips then you might actually ENJOY it. What!?!?! When Leah and I met ( working for our friend, Lauren, at her paper boutique) we were taught the skills to pay the bills by Lauren herself. We offered a professional gift wrapping service that saved a LOT of people from going insane over trying to wrap their gift themselves. Okay, they may not pay our bills, but they do make people envious of your beautifully wrapped gift at your holiday gift exchange. Whenever all of us girls get together, and there is gift giving involved, we almost care more about how it is wrapped vs. what is inside the box. True story! It is just in our blood now. 
Here are our tips that we are passing on from one great wrapper to another…. YOU!
Get a great box that is sturdy and has a good shape.
-Wrap your gift in beautiful tissue and seal with pretty tape 🙂 Details people.
– Once your items are placed in the box, then fill all of the extra empty space with tissue paper. This helps your box not cave in when you are wrapping it. This is VERY important. The box structure is everything!!
-Roll out your wrap and lay your box in face down. Pull the edge of your wrapping roll to the center of your box and tape (using regular invisible tape). This is where your perfect seam will be.
– Then, pull the other side of the wrapping roll (the actual roll itself) over about a 1/2″ passed the seam you created, and cut.
– Now, turn your box (with the wrap attached) horizontally to where the untaped edge of the wrap is closest to you. Fold over to create a perfectly seamed line. Then, attach DOUBLE-SIDED tape to the inside of the wrap. In other words, put the tape right on the fold that you just created. We use about three strips to go along the width of the box.
– Now time to do the ends! Simply cut excess paper off so that your edges reach about half way down the side of the box. Any seam you are taping directly to the box can be adhered with regular tape. Any of the corners that you fold in and adhere to the paper itself should be taped with double-sided tape. 
– Fold in all of your corners just like you would on a regular wrapping job. Remember to keep pulling tightly and doing intense folds to keep the wrap from “bubbling” around the box.
– Turn your gift right side up! We love to add “bands” around our gifts. They help make your pretty wrapping paper go further and adds interest. I chose an old wrap from last year to use as a band over the gold polka dots. Simply cut the band to size (width wise) and wrap it around the BACK of the box to where the ends of the band take up about a 1/4-1/2″ of each side of the back of the gift. We are alllllllll about the front! 
– I opted for a sparkly ribbon with no bow ( as this gift is for my 16 year old girl cousin). Again, to save ribbon, I just wrapped the ribbon slightly around the edges to the back of the gift and taped it. Double stick tape is preferred here so that you don’t see it on the back of the ribbon, but regular tape seemed to hold this ribbon better. 
– Choose your perfect gift tag. Don’t skimp on the gift tags!! They are fun and add that special touch to your already beautiful gift. Is it bad to say that we are NOT fans of sticker name tags on gifts???
oops!
Host a wrapping party, turn on a good holiday movie, or just grab a glass of champagne and get to wrapping!!! The investment in good boxes, pretty tissue, gift wrap and all of the pretty things that come after truly make the wrapping experience so much more fun! Also, receiving a beautifully wrapped gift can make the recipient feel all the more special. 
XO!!
-J
All wrap and gift wrapping goods were purchased at Lauren’s boutique, Rock Paper Scissors
Seriously, she has the best stuff!!!

FEATURED: HOLIDAY CENTERPIECE TUTORIAL

Anyone else in need of an incredible centerpiece for the holidays and have no clue how to do it? Luckily, my extremely talented friend, Matt Bollwinkel, just started a new floral business THISTLE BE FLORAL based out of LA and is graciously giving us a tutorial! I love how he uses unique textures, colors, and shapes that you’d never think of for a centerpiece. He’s seriously so talented and funny, and his wife happens to be the same. My face literally hurts from laughing after I hang out with them. They’re pretty much one of my fav couples ever.
If you’re in the LA area, contact Thistle Be Floral. Immediately. 
He’s the next big florist that you wish you knew before everyone else did… and now you do!

“MOM’S FAVORITE CHILD” HOLIDAY CENTERPIECE
Photographs by Sara Bollwinkel
Is your holiday table naked? Hide your shame with a homemade centerpiece that suggests you have your s*#t together. 

Here is what you will need… 

1. Fancy Shmancy Japanese flower arranging scissors. Or regular kitchen shears… (Anything between a machete to safety scissors will do)

2. Robert Goulet – “This Christmas I Spend with You”. This is not optional.
3. Oasis Floral Foam
4. A cool vessel…such as this tremendous silver antique champagne bucket.
5. Flower Food – pro tip: One packet of flower food and a quarter teaspoon of bleach in your water will make your plants die slower…or last longer if you are an optimist. Pro tip: if you don’t have bleach, use mouthwash!
6. Human Food – Your favorite holiday beer (or wine/scotch/kool-aid)

To prep your vessel for the flower invasion, cut the Oasis floral foam to fit and fill with water, flower food, and bleach. Allow this mixture to soak for a few minutes and pop open your human food.
Let’s get down to business.

7. Greenery – take some clippings from the christmas tree, your local forest, or a neighbor you feel like stealing from. Source your pretty greens as this is where it all begins. 


8. Random “Foraged” (stolen) Berries – If you have dogs or children, use with caution.

9. Magnolia Leaves – these are a classic holiday accent to any arrangement or wreath. Some people spray paint them gold, but who has time for that?

10. Holiday Food – Pomegranates, Pears, Persimmons, Pumpkins etc. Anything that starts with the letter P will do. (Pinecones…not food but totally acceptable)

11. Protea – This is a great “focal flower” that will last the duration of your family’s stay and into the new year. Succulents are another great option.

12. Ornamental Kale – Hippie/Hipster approved. These take up a lot of real estate. If you are super lazy, this is a solid addition.

13. Tulips – Great color splash – check out french tulips if you want a sassy option.

14. Star of Bethlehem – Cause its Christmas y’all. (Note they also last for a long time and will continue to bloom for weeks).

15. Peonies – This is the popular girl in school. She hangs out with the funny chicks (tulips) but steals their boyfriends. This is your other focal flower of choice. (Caution: much like the popular girl in school, they are fragile and fall apart easily)

Now that you have your flowers together, you need to process them by removing excess leaves from your stems. The idea is to keep all vegetation other than stems out of the water. The longer your water stays clean (and free of flower goo) the longer your flowers will last! 

The first stems to enter your vessel should be the greens.
Follow up the greens with accent greenery such as your magnolia leaves, or the berries I “borrowed” from my neighbors yard. This is the fitted sheet…totally necessary.
Next add your ornamental kale and focal flowers. Do this in a not boring way.
Fill in gaps with beautiful pieces of fruit or pine cones etc. To do this, carefully stab a wooden skewer into your fruit (make sure you don’t run the skewer all the way through). Cut the exposed skewer to the depth of your vessel (so no stick is showing and the fruit sits in the arrangement snug as a bug.)
After you have gotten this far, take a step back, grab a drink and give your eyes a minute to rest. Revisit it with fresh eyes in 10 minutes.
Now add your finishing detail elements. Tulips and star of bethlehem are great at filling in the gaps and will add lovely bursts of color as they continue to blossom.
Now step back, admire your work, quit your job, and become a florist.
Happy Holidays Yall!
<3 Matt 
INSTAGRAM: @thistlebefloral
EMAIL COMPLAINTS: info@thistlebefloral.com

Thistle Be is Matthew P. Bollwinkel, who was born in Sibu Sarawak Malaysia in the winter of 1980 to missionaries Mark and Elizabeth (Bonnie) Bollwinkel. Upon their return to the United States, the family spent the subsequent years moving from town to town in California and Nevada with various churches. To this day, the place Matt calls “home” is the San Francisco Bay area.

Matt’s artistic inspiration includes Japanese imagery and culture, feminism, loud and dissonant music, photographs in old medical encyclopedias, animals, rust, dirt, gold, and and the love he has for his wife Sara and their two dogs Albert and Norman. Matt is a studio musician, a baker, and a business man. His love for flowers began when he was a young boy, but his draw to floral design began in the winter of 2013 when his community began commissioning his work. Matt’s notoriety has circulated primarily by word of mouth, as he operates out of his home in Los Feliz in Los Angeles, CA (or in a glass case of emotion….or on location).

For more information or to set up a consultation please contact: 

THE BEST CHOCOLATE CAKE!

Not to toot my own horn… but I’m going to. This cake is the BEST. It’s super m-o-i-s-t (don’t say it out loud) and super chocolaty in a not-to-sweet way. It’s pretty easy too!
My two cute helpers
Ari said “Happy Birthday, Daddy! Daddy, how old are you turning? Oh wow, 32? Does that mean you’re going to go bald soon?”

THE BEST CHOCOLATE CAKE EVER EVER EVER

Cake Recipe
Adapted from Ina Garten
Ingredients:
Butter, for greasing the pans
1 3/4 cups all-purpose flour, plus more for pans (I use bread flour)
2 cups sugar
3/4 cups (good!!) cocoa powder
2 teaspoons baking soda
1 teaspoon baking powder
1 teaspoon kosher salt
1 cup buttermilk, shaken
1/2 cup vegetable oil
2 extra-large eggs, room temperature
1 teaspoon (good) pure vanilla extract
1 cup freshly brewed hot coffee
Directions:
Preheat the oven to 350 degrees.
Butter two 8-inch x 2-inch round cake pans (or 11×13″ sheet pan)
Line with the bottom of the pan with parchment paper, then butter and flour (or use cocoa powder) the pans.
If you’re using a sheet pan, have the parchment paper hang off on either side so you’ll have little handles to pop it out when you’re ready to cool it.
  1. Sift the flour, sugar, cocoa, baking soda, baking powder, and salt into a large bowl and mix until combined. I actually don’t like using an electric mixer with this recipe- it’s too liquidy
  2. In a medium bowl, combine the buttermilk, oil, eggs, and vanilla.
  3. Slowly add the wet ingredients to the dry.
  4. Slowly add the coffee and stir just to combine, scraping the bottom of the bowl with a rubber spatula.
  5. Pour the batter into the prepared pans and bake 20-25 minutes. Always bake for a few minutes less if you’ve never made this recipe before, so you don’t over-bake the cakes. You can always add more time, you can’t take away. When you start to smell it, it’s probably almost done. Give the pan a jiggle when you start smelling it. Keep adding 3 minutes on your time and checking it again. It should jiggle like solid pudding, not like jello. It will keep baking in your pan after you take it out of the oven. If you want to really check it, put a knife in the middle and it should come off with a few crumbs.
  6. Cool in the pans for 5 minutes (unless you’ve over-baked it*). Run a knife around the edges so the cake will come out more easily. Turn the cake out onto a cooling rack lined with parchment paper and cool completely. It’s a gooey cake, so the parchment paper on the cooling rack is KEY. If you’re baking it in a sheet pan, you’ll already have the parchment paper to just pop off and place on the cooling rack.
*If you’ve accidentally over-baked your cake, pop it out of the cake pan immediately to cool on a cooling rack or it will keep baking. Scrape off any crispy parts. Combine 1/4 cup of milk with 1/4 tsp vanilla. Brush it all over the surface of the cake.

CHOCOLATE FROSTING RECIPE

Adapted from Magnolia Bakery
* If frosting a sheet cake, I like to halve the recipe since you’re not covering as much area. This frosting is rich!
Ingredients:
1 1/2 cups (3 sticks) unsalted butter, softened to room temp
2 tablespoons whole milk, room temp
12 ounces chocolate, melted and cooled (I use Ghiradelli 60% bittersweet chocolate)
1 pinch fleur de sel / sea salt / kosher salt
1 teaspoon (good!!) vanilla extract
2 1/4 cups sifted confectioners’ sugar
Directions:
  1. To melt the chocolate, place in a double boiler over simmering water on low heat for about 5-10 minutes. Add a pinch of sea salt. Stir occasionally until completely smooth and no pieces of chocolate remain.
  2. Remove from the heat and let cool for 5-15 minutes.
  3. In a large bowl, on the medium speed of an electric mixer, beat the butter until creamy, 3 minutes
  4. Add the milk carefully and beat until smooth
  5. Add the melted chocolate and beat for 2 minutes.
  6. Add the vanilla and beat for 3 minutes.
  7. Gradually add the sugar and beat on medium until fluffy.
Your frosting might be a little melty so keep your mixer and beater attachment out. Refrigerate the frosting for 30 min or until the frosting is more solid, then re-whip it with the mixer.

MARSHMALLOW FROSTING

This will make the cake taste like a s’mores!

* If frosting a sheet cake, I like to halve the recipe since you’re not covering as much area. This frosting is rich!

Whip together:

1 cup salted butter, room temp (or add 1/4 tsp salt to unsalted butter)

14 ounces Marshmallow Fluff

2 cups powdered sugar

1 teaspoon vanilla


PEANUT BUTTER FROSTING

Ina Garten
* If frosting a sheet cake, I like to halve the recipe since you’re not covering as much area. This frosting is rich!
Ingredients:
2 c powdered sugar
2 c creamy peanut butter
10 tbsp butter, room temp
1 tsp vanilla
1/2 tsp salt
2/3 c heavy cream
Directions:
Beat all ingredients except the cream in a mixer on low until creamy. Add the cream and beat on high until fluffy and smooth.


You are going to LOVE this!! Enjoy!
-L

DIY HOLIDAY CARDS DISPLAY

This is so easy… I don’t even know why I’m posting it. BUT I think it turned out pretty cute. So. I’m also procrastinating cleaning my house. Typically when I’m at my most creative.
I just received my first two holiday cards! One from my bestie since college, and one from my sweet little nieces and nephews! Last year I was so lazy (read: just had my second baby) that I put all of my cards in a pretty bowl on the coffee table. This year I’m stepping it up a tiny notch. 
All you need for this easy DIY is:
– 1 wire wreath form
– 1-2 packs of plain clothes pins
– 1 roll of fun washi tape
– 1 clear command hook (sticks on the wall and removes without damaging the paint!) See below:
I found this pretty Meri Meri washi tape at our fav shop Rock Paper Scissors.
 Measure by sticking a clothes pin on the tape
 Cut tape
Bend around the sides of the clothes pin. Use the back of your finger nail to really stick it on there well. And… that’s it. Told you it was easy! You could totally spray paint the wreath form gold or silver first, but it’s going to get covered up with cards anyway, right? She says to convince herself.
I still have to finish decorating my mantel. Cannot find the rest of my decor!! It’s probably in storage somewhere. Ugh. Ooh and I’m waiting on a sparkly banner from The Bannerie! I’m a tad obsessed.
Happy decorating!
-L

HOLIDAY GIFT GUIDE FOR GIRLS

Do you have most of your shopping done already? Well, good for you! 😉 If not, here are my top picks if you are looking for that perfect little something for the little ladie(s) in your life. 
1. Stocking stuffers: 
Tinkerbell Pez dispenser – I loooooved getting these as a child, so I can only hope that my child will enjoy it as well this year. 
Snow globe – This little guy is a perfect keepsake for this Christmas. We always love to give our daughter something to mark the year, whether it be a snow globe or an ornament. Even better, 25% of the purchase price goes directly to St. Jude’s. 
Frozen activities book – because which kid isn’t still singing “Let it Go!”???
Wind up mouse –  This mouse gives my daughter laughter for minutes at a time. He flips over and she thinks it is “super duper cool”. 
Finger puppets – they are just so cute!
2. Board Game – These are always fun to add to your board game collection. Whether it be educational or just plain fun.
3. Cape & Dress up Accessory Kit – It occurred to me the other day (when my 3 year old daughter asked to be a super hero for Halloween next year) that little girls need to save the world sometimes too. Ya know, take a break from being a princess! 😉
4. Educational goods – I love watching my toddler learn. Watching her figure things out and use her problem solving skills is just the best. I love the idea of mixing fun gifts with some educational gifts as well. Adding a few books to your library is always a good idea. We tried these hot dot cards at Leah’s, and Amara loved them!! 
5. Sleeping bag – Even if your child is not doing sleep overs yet, I think these are so fun for movie nights or pretend play. I am adoring this one with the big bow!!
6. Bunny slippers – duh!
7. Mini Mercedes – The thing we all wanted when we were little. If only Santa could bring me this in MY size?!
8. Little People Princess Castle – We bought this for Amara last year, but she is just starting to play with it a year later. Her imaginary play has taken off. She loves to make the princesses talk….. like all day long. Such a fun little gift, so I had to include it in my picks for this year. 

HOLIDAY LOOKS / HIS & HERS

Got a holiday party coming up? Do you know what you are wearing yet? You might be last minute fashionistas like Leah and I, but these looks will have you dressing like you picked your outfit waaaaay in advance. 
Meet Damien and Lisa Wong-Ken! These are dear friends of mine who happen to be professional stylists. Lucky me, right? They have styled for big events such as the Dove Awards, AMAs, Grammys and Billboard Awards. They have been faithful texters when my husband or I are having a fashion crisis. Bless them!
We asked each of them to put together a look for you and the special guy in your life so that when you hit the holiday parties, you will do it in style and with confidence.
Lisa says…. 
I went for a matching top and bottom. It’s the look of a dress without being one. This 
gives you the opportunity to get different sizes to fit your unique body shape. You can 
also wear each piece as a separate later on. Pair the top with your favorite denim and the bottom 
with a white T-shirt!
Booties are a must have! These are sleek and have a great texture. I’m all about pieces
being able to transition into different looks. I love statement jewelry!! This ring has such an interesting look and unconventional shape! Being that it’s winter, opaque tights add the right amount of warmth. These tights go the extra mile by slimming you down. It’s the perfect companion to a pencil skirt.
The front and back look of these studs are perfect for any hair do. With the top and bottom of the outfit
being all over lace, this is just the right amount of subtlety.

Statement coats are really big this year, and I love it. If you are going to cover up your 
amazing outfit do it with a great topper. This amazing burgundy wrapper the perfect 
contrast with the gold. Last, but not least….. the clutch. When I’m going dancing I like to carry a cross body bag. I hate leaving my purse, and a strapless clutch becomes cumbersome. I love the 3D effect of 
the sequins and that it’s multi-colored.
MEN!!!! Take note. I know for my husband,  dressing up is an intimidating thing because when it comes to hems, layers, accessories, etc., there are “rules” that he is just unaware of, and it can be overwhelming. Damien gives such great tips on every little detail you need to pull off your look with style.
Damien says….
Slim cuts, layers, patterns, and colors are the go-to looks for the season, and are always the
most versatile during the cooler (and sometimes colder) weather – no matter where you 
are in the country.
Unless it is a formal event that you are attending (in which case a dark suit is always 
appropriate), go with a dark blue denim that is tailored and slimming.  Even if you’re a 
“big boy”, don’t shy away from slim cut jeans!  If they are hemmed correctly, they will 
make anyone look a few pounds lighter. A good tailor will know exactly how to give you the 
perfect amount of “break in the leg”.
Next, go for a mid-to-dark grey or black unconstructed sport jacket that fits right.  This 
simply means that there is little to no padding in the shoulders, and sometimes no lining.  
The seam should land at the top of the ball of your shoulder.  This will make it 
look slimmer and more flattering. The sleeves should be 
shortened to about a half of an inch just above your first thumb knuckle (the bump by your 
wrist).  It may seem short, but it’s right, and will add a touch of style to the end image as 
you show a little shirt cuff.

Shirts, ties, and pocket squares are preferences.  Patterns are always great so don’t be 
afraid of mixing them with colors.  A good rule of thumb as you start off is to have a 
printed shirt (let’s say a fine check) paired with a solid tie of a contrasting color 
(example: a blue and white fine check, with lighter/darker blue, a red, or yellow tie).  The 
tie should be about 2-3 inches at its widest point, tied in a 4-in-hand knot. When tied, 
the tip should land at the very top of your belt (Please! Wear a belt!!)  Cotton pocket 
squares are not for everyone, but they do break up a huge piece of blank canvas, and are a 
great accessory that doesn’t over do it.  If anything, just use a plain white cotton 
handkerchief and fold it into a square, exposing only a sliver.  No matter the 
shirt and tie, it’s a perfect compliment.
Socks and shoes are very personal items.  Socks can be as unique as you are, and shoes 
should always be clean.  For this particular look, I would go for a basic oxford. 
  Brown or black would look great. Matching a belt is not necessary either, as long as it’s “close enough”.
This look may not be your forte, but believe me, when people compliment you on how
you look, you’ll feel more comfortable and confident than ever!
EXTRA: Damien & Lisa’s roster of clients includes:

TobyMac, Newsboys, Chris Tomlin, Brandon Heath, Capital Kings, Ryan Stevenson, Run Kid Run
Finding Favor, B. Reith, Brit Nicole, Nicole C. Mullen, Mandisa, Journey’s Group (Journeys, SHI)

HOLIDAY GIFT GUIDE FOR THE LADIES

Drool-worthy gifts for the ladies in your life AKA for yourself. TREAT YO SELF!
Click item name for the link:
1. SLIPPERS could you wear these out of the house? Hmmmm…
2. BANNER Our talented friend The Bannerie knows how we do. I got this for my new office!
3. LEATHER TOTE Looks like the perfect size to hold all your junk and your kiddo’s inevitable change of undies.
4. TURTLENECK SWEATER Worried I’d wear this too much?? Not that worried.
5. FAUX FUR SCARF For feeling a little jazzy! How cute for a holiday party.
6. GOLD SCISSORS I just need this, okay? I’d definitely be more productive and creative.
7. LEOPARD CLUTCH Wear with jeans and a tee, or dress up with a cocktail dress!
8. DOORMAT Because you need a daily reminder.
9. CAMERA BAG Let me repeat. A camera bag!! With room for your other stuff!!! Perfection!
10. GLITTER EARRINGS Again, perfect for a holiday party or date night.
11. NECKLACE We looooove this jewelry company and everything they do.
12. CALENDAR Would love to frame these after the month is over! Gorgeous.
13. IPHONE CASE Have it. Love it. The clear design lets your phone peak through. FUN!
14. SWEATS Daily uniform, come to me!
15. AGATE BOOKENDS Wouldn’t this looks look gorg on a dresser or bookshelf? 
16. NAIL POLISH Perfect for the holidays – or any time really! 
17. COFFEE CUP A mantra was never more true.
18. SCARF – Gorgeous patterns and colors. Extra big to wrap around like a vest.
19. SOCKS Cozy comfies are always a good idea.
20. FEATHER PEN To make you feel super important, even when you’re writing your grocery list!
There you go! Just a small sample of some of our fav gifts out there!
::HINT HINT WINK WINK::
-L

DIY DOOR MONOGRAM

Some say I’m a hoarder (Jenni), some say I’m lazy (me), but I think we can all agree this DIY I did last year was worth keeping, right? It was so easy that I wanted to share with you again. And I haven’t gotten around to decorating my mantle yet… so….here ya go.
See the full tutorial HERE that I used for Ari’s room. Just switch out the junk keepsake treasures for ornaments. Obviously 🙂
Up for next week: more holiday gift guides and holiday style posts just in time for your party circuit!
-L

IT’S A……

We went to our 5th month check-up today, which is when we also find out the gender. We asked for the Ultrasound tech to put it in an envelope because we wanted to go get a balloon filled with confetti for us to pop and find out as a family. We thought it would be fun for Amara, and wanted to make it extra special.  Leah was sweet enough to let us pop by her entirely gorgeous and so spacious I am jealous new home. The plan was to video and take photos while we popped the balloon and watched the confetti fall and tell us what our sweet new addition would be. As we were setting up and getting ready to start snapping and filming…….
this happened…..
The balloon literally just popped on its own while my husband was walking around with it. The confetti was made of stars ( with really pointy edges), and we think it miraculously poked a hole in the bottom and BOOM! Just like that ( when we weren’t even “ready”) there was confetti all over the floor.  We all just stopped and stared in silence and in shock!! Number one, we couldn’t believe that the balloon popped. I am a little bit of a control freak, so the fact that it didn’t go as planned really caught me off guard. Ha! Secondly, wait….. is the BLUE????
 We really thought pink confetti was going to fall out of that balloon, even though we were totally open ( and maybe kind of hoping) for a boy. I felt immediate happiness for my husband who said he was so okay with either and just figured it was going to be a girl. I can’t wait to watch him be a dad to a boy!!
We are ready for this new adventure, and are so excited!! After Amara ONLY speaking of a baby sister, and shutting people DOWN if they mentioned a baby brother, we thought it would be hard for her to accept. Honestly, there was an immediate smile on her face and she celebrated with us on our ride home better than I could have hoped for! After her nap today, she woke up and told me ” baby brothers can be fun too!” My mama heart melted. We feel grateful for a healthy check up, and for God offering up the perfect addition to our little family of 3. 
Thanks for sharing in our joy!! 
XO!
-J

HOLIDAY GIFT GUIDE FOR THE BOYS

Heeeeere we go, people! T-minus 24 days (or 15 days if you celebrate Hannukah like me) ’til Christmas! Here are my picks for the little dudes in your life. 
Click the item names below for the links:
1. ALPHA POPS: These are genius. Combining a kid’s favorite food group and learning? Check. Match uppercase and lowercase letters, match colors, use for imaginative play. Yum- I mean- fun!
2. BROTHERS BANNER: Sweet little sign for bros bein’ bros. Cute for a playroom or a new big brother. Love this Etsy shop- lots of rad designs!
3. KIWI CRATE: Yet another genius idea! Monthly subscriptions (3, 6, or 12 months) of creative and educational projects for kids of all ages. AKA no work for you mamas to come up with something to battle the “I’m bored’s”.
4. SPY GLASSES: Because every little boy wants to be a spy!
6. SHARK AQUABOT: Swims in water! The only kind of pet I’m okay with right now.
7. HARRY POTTER BOOK SET: A special keepsake plus it comes in a cool trunk! You know me and my true love for Harry Potter. My husband and I passed that love onto our son. He’s not quite ready to read the books, but he’s seen the first movie about 50 times. This month.
8. KINETIC SAND: An OCD mother’s dream come true! Sand that isn’t messy! You can squeeze it, mold it, shape it, let your kiddo really experiment with it. Comes in lots of fun colors too.
9. TWIST AND DRILL: If your kid loves to pretend to play power tools as much as mine, they’ll love this! The drill actually works and twists the screws in to build cars and trucks. Good for hand eye coordination and pretend play.
10. HI/BYE HAT AND GLOVES: For friendly kids to say hi and bye to everyone they pass on the street. Warm and wooly but don’t put these in the dryer… been there, done that. Now Max wears them.
11. THE BOOK WITH NO PICTURES: Fun and silly and written by one of my fav comedians, B.J. Novak. I think any kiddo would get tons of giggles out of this one. 
12. STAR WARS COOKBOOK: Make ice saber popsicles. Enough said.
13. WOODEN CHESS SET: Chunky chess pieces perfect for chunky little hands with directions engraved at the bottom. A great first set for early learners.
Any gifts we missed? We’d love to know. Happy shopping!
-L

HAPPY ONE YEAR!!!!

Hey all! We hope your Thanksgiving was full of good eats, sweat pants and crazy relatives that you just love so very much! Leah and I both hosted family and friends in our homes this year. We thought we would share a few pics of our tables, but more importantly, take time to tell YOU “Thank you!!”
But first….. pictures….
Leah just moved into her home days before Thanksgiving. Let me just go on record saying that my dining room would NOT look this put together or be ready to host family. Bravo mama!!

Our very first blog post was our take on a Thanksgiving table last year. That means that the ole Love & Lion blog celebrated its one year anniversary this month! This year has gone by so incredibly fast, we have made such fun relationships through this process, and truly…… we are just so stinking grateful for each person that clicks through our site. Even if it is by accident…. we love you! We have a lot of things in store for this year!! We are excited to grow and hopefully have you all grow with us. In our recent year, Leah gave birth to that sweet Maxie of hers, moved into a new home and I am currently half way through my second pregnancy. These are big changes for us that have sometimes kept us from blogging as much as we would have liked or even from being as creative as our little hearts like to be. We are certainly mommies and wifeys first, but have a mad love for this blog. We look forward to getting to know you all even better over this next year! We appreciate you sticking with us.
Thank you from the bottom of our hearts…..
Sincerely,